

It often happens that some programs can send status messages or reports by e-mail, but do not offer any kind of authentication. Often you can only specify an SMTP server, but unfortunately no account information. For such cases, you can create a new receive connector that also accepts and forwards mails without prior authentication. However, this option should be used with caution and should be limited to IP addresses, as a relay can easily be misused for SPAM.
A new receive connector can be created either via the Management Console or via the Management Shell:
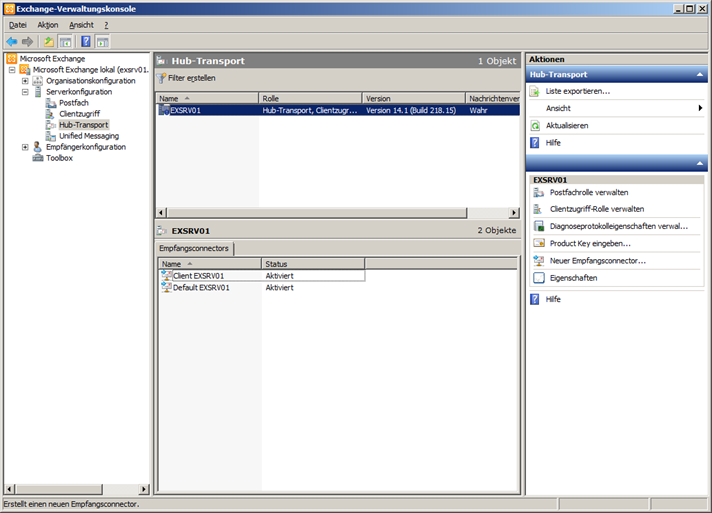
Unter der Serverkonfiguration / Hub Transport klickt man im Aktionsfeld auf „Neuer Empfangsconnector“

Im nächsten Dialog wird der Name des Connectors angegeben und der Typ der Verwendung festgelegt, in diesem Fall „Intern“, dann wird mit „Weiter“ bestätigt.


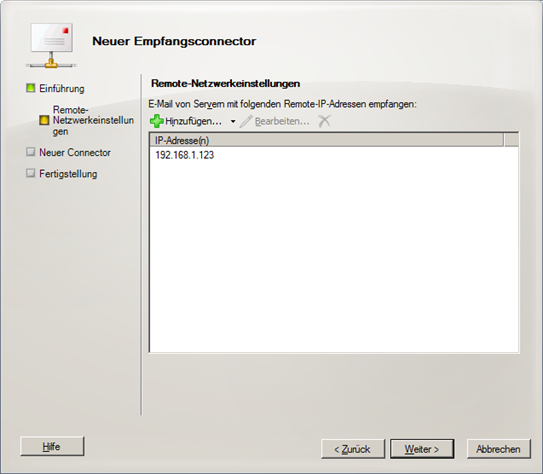
Im darauffolgenden Dialog ist es wichtig nur die Server oder Systeme anzugeben, die auch wirklich berechtigt sind, Mails ohne Authentifizierung zu senden. Auf keinen Fall sollte hier das komplette Subnetz oder ein zu großer Bereich angegeben werden. In diesem Fall wird nur die IP 192.168.1.123 berechtigt sein, diesen Connector zu nutzen. Mit einem Klick auf „Weiter“ und im nächsten Dialog auf „Neu“ wird der Connector angelegt.

The connector is created via the management shell with this command:
new-ReceiveConnector -Name ‚Allow Interal Relay‘ -Usage ‚Internal‘ -RemoteIPRanges ‚192.168.1.123‘ -Server ‚EXSRV01‘
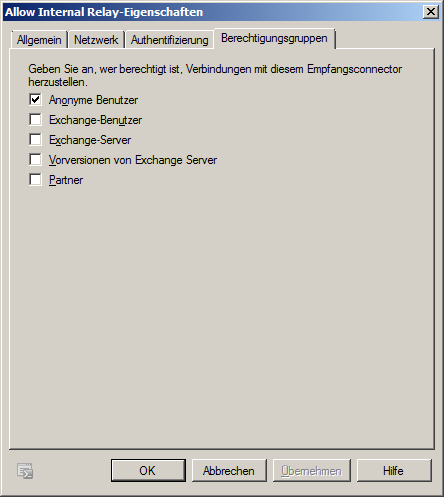
Jetzt legen wir in den Eigenschaften des neuen Connectors fest, das Anonyme Benutzer Mails an diesen Connector senden dürfen, also Häkchen bei „Anonyme Benutzer“ setzen:

Or again via Powershell:
Set-ReceiveConnector -PermissionGroups ‚AnonymousUsers‘ -Identity ‚EXSRV01\Allow Interal Relay‘
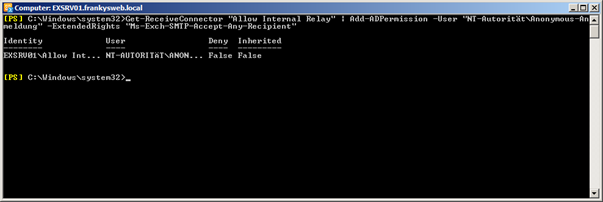
Finally the most important step, we have allowed the IP 192.168.1.123 to access the connector without specifying user and password, but not that mails can be sent via this connector, to change this we have to use the Powershell, because there is no corresponding setting in the console:
Get-ReceiveConnector „Allow Internal Relay“ | Add-ADPermission -User „NT-Autorität\Anonymous-Anmeldung“ -ExtendedRights „Ms-Exch-SMTP-Accept-Any-Recipient“
There is a small stumbling block here:
- For German servers it is called "NT-Authority\Anonymous login"
- For English servers it is called "NT AUTHORITY\ANONYMOUS LOGON"
The output of the command should look like this:

From now on, the computer with the IP 192.168.1.123 should be able to send mails via this connector.
If you want to revoke the right again, you can do so using this command:
Get-ReceiveConnector „Allow Internal Relay“ | Remove-ADPermission -User „NT-Autorität\Anonymous-Anmeldung“ -ExtendedRights „Ms-Exch-SMTP-Accept-Any-Recipient“