It's been a while since I published an article here about Exchange Server and Let's Encrypt certificates. In the meantime, things have changed a bit and I'm receiving quite a few inquiries on the subject, so I'm writing a new article.
As you know Let's Encrypt a public certification authority that issues SSL certificates with a validity period of 90 days free of charge. Let's Encrypt is accepted by all browsers and is very easy to use thanks to its automation. However, there are a few things to bear in mind.
Prepare Exchange Server
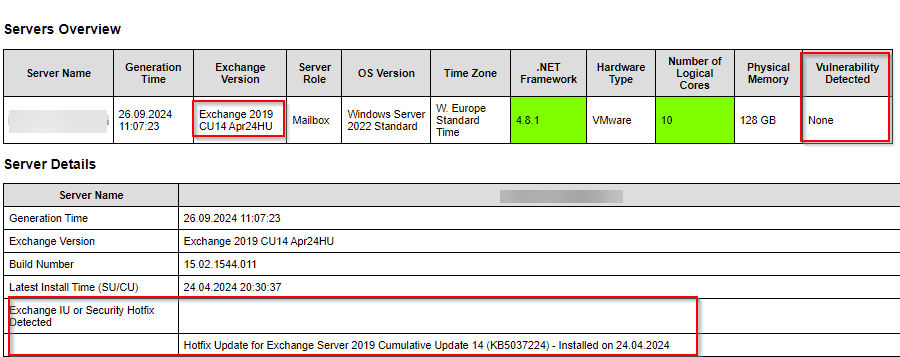
Before Exchange servers are made accessible from the Internet, you should be aware of the consequences. Exchange servers that are directly accessible from the Internet, i.e. without an upstream web application firewall (WAF), are a worthwhile target for attack. It is therefore imperative that Exchange Server and the operating system are always kept up to date. The CERT-Bund recently issued a warning thousands of outdated Exchange servers warned. You also need to keep a constant eye on the configuration, which is where the Exchange Health Checker does most of the work for you. It is best to generate a Health Checker report at regular intervals and check whether the configuration still complies with best practice and no vulnerabilities have been found:
Check DNS settings
Once all updates have been installed and Exchange Health Checker no longer finds any problems, the hostnames required for the certificate can be determined. To determine the hostnames, the small script from the following article can be used, even if it is already old, it works without any problems with Exchange Server 2019:
In most environments, exactly two names should be displayed here: autodiscover.domain.de for Autodiscover and an access point for the other protocols, for example outlook.domain.de. If the script displays further names, for example exsrv.company.local, then you still have a configuration error. To avoid certificate warnings later on, the host names should first be configured accordingly; this can also be done easily using PowerShell:
The script is also old, but also works without any problems with Exchange 2019 (nothing has changed). If changes are made to the host names: Do not forget DNS entries! Of course, there may now be certificate warnings in Outlook as long as no suitable certificate is configured for the configured DNS names.
It is best to check the configured DNS names internally and externally. The check can also be carried out via PowerShell:
#Internal
Resolve-DnsName outlook.domain.de
Resolve-DnsName autodiscover.domain.de
#External
Resolve-DnsName autodiscover.domain.de -Server 8.8.8.8
Resolve-DnsName outlook.domain.de -Server 8.8.8.8
The internal IP of the Exchange server should be resolved against the internal DNS (usually the domain controller) and the public IP against an external DNS server (Google in the example). Here is an example:
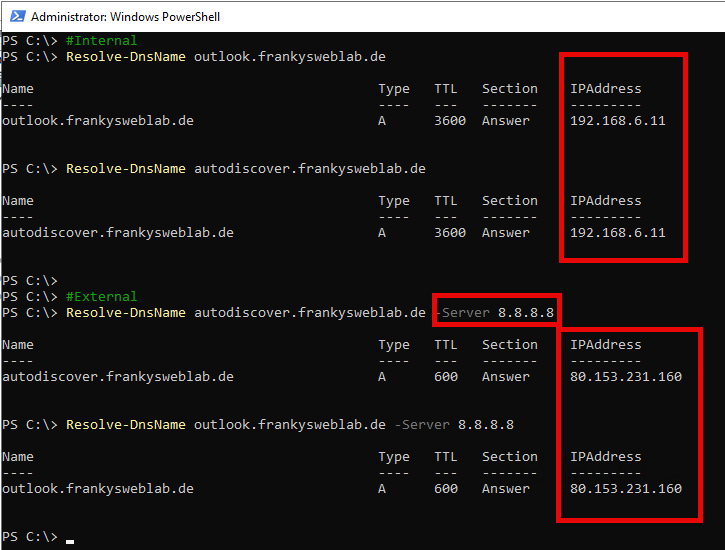
It is important that the name resolution works properly. Otherwise Lets' Encrypt will not issue a certificate.
Check firewall permissions
The next important point is shares in the firewall. For Let's Encrypt to issue a certificate, the Exchange server must be accessible from the Internet via at least port 80 (http) and port 443 (https). I will leave port 25 (smtp) out of consideration for this article.
In small companies, port forwarding is usually configured in the router for this purpose, as the configuration varies depending on the router / firewall, I cannot describe this in detail here, so here is just a small example from a UniFi Cloud Gateway:
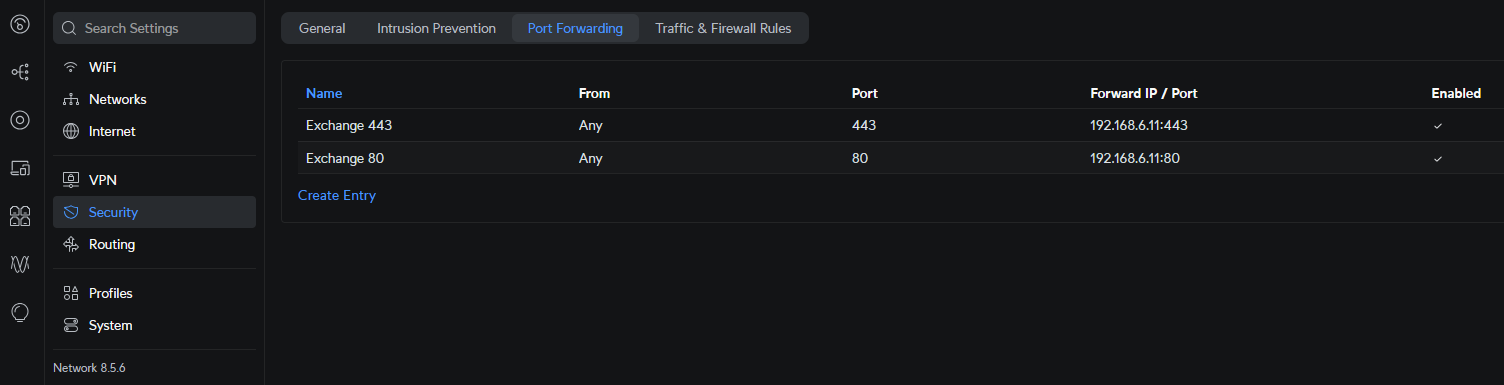
Some routers / firewalls require the port to be opened in the firewall in addition to port forwarding.
You can easily test whether external access works with a smartphone via LTE. Simply call up the OWA website. If it can be accessed externally, you can assume that it works.
Automate certificate
To request a certificate from Let's Encrypt, renew it if necessary and configure it automatically for Exchange Server, the WIN-ACME Client can be used. In addition to Exchange servers, WIN-ACME also supports a whole range of other software such as RD Gateway and SQL Server.
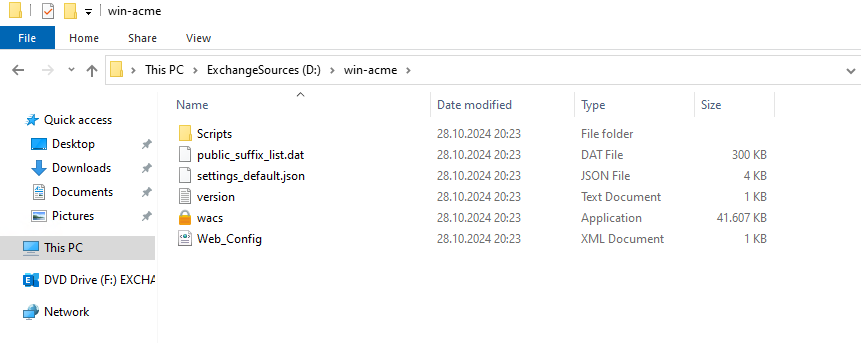
In order to issue and configure a certificate for the Exchange Server, the WIN-ACME client must first be unpacked on the Exchange Server, in this example to D:\win-acme:
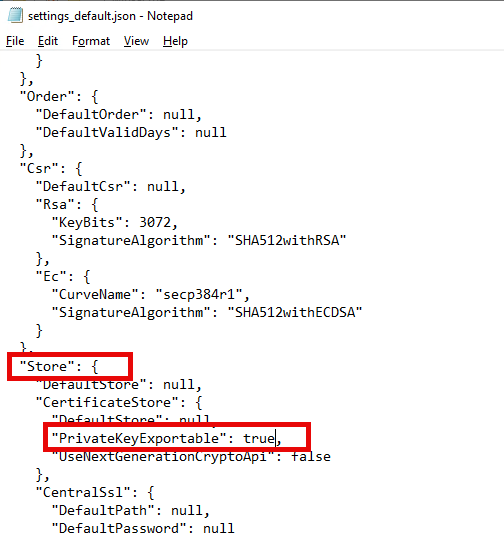
The directory contains the file settings_default.json, which can now be opened with the editor. In the file you will find the setting "PrivateKeyExportable" under the heading "Store". This setting is set to "false" by default. So that you can export the certificate later, this setting is set to "true" and the file is saved:
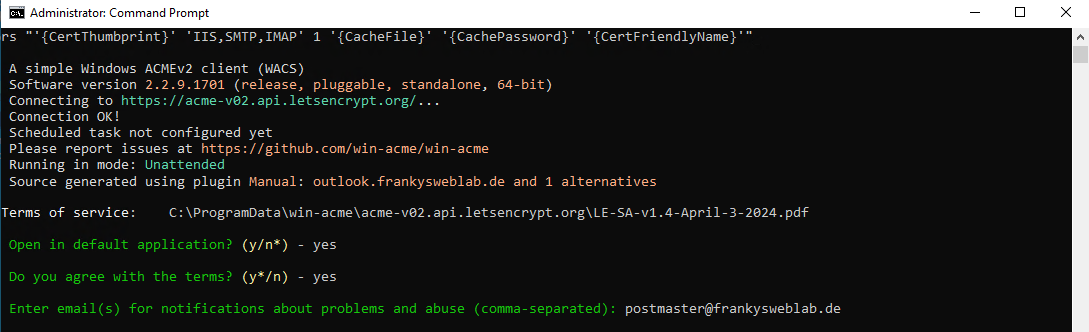
To request a certificate and configure it automatically for Exchange, you need to customize a command. Attention: Note the language of the operating system.
If Exchange is running on an operating system in German language is installed, you can use the following command and swap the hostnames outlook.domian.de andautodiscover.domain.de accordingly (this is where the authorizations for administrators and the network service are configured):
wacs.exe --source manual --host outlook.domian.de,autodiscover.domain.de --certificatestore My --acl-fullcontrol "Network Service,Administrators" --installation iis,script --installationsiteid 1 --script "./Scripts/ImportExchange.v2.ps1" --scriptparameters "'{CertThumbprint}' 'IIS,SMTP,IMAP' 1 '{CacheFile}' '{CachePassword}' '{CertFriendlyName}'"
If Exchange is running on an operating system in English language is installed, you can use the following command and exchange the hostnames outlook.domian.de andautodiscover.domain.de accordingly (the authorizations for administrators and the network service are configured here):
wacs.exe --source manual --host outlook.domian.de,autodiscover.domain.de --certificatestore My --acl-fullcontrol "network service,administrators" --installation iis,script --installationsiteid 1 --script "./Scripts/ImportExchange.v2.ps1" --scriptparameters "'{CertThumbprint}' 'IIS,SMTP,IMAP' 1 '{CacheFile}' '{CachePassword}' '{CertFriendlyName}'"
If the command is executed, the terms of use must be agreed to at the first start and an e-mail address for notifications must be entered:
The rest now happens automatically. A scheduled task is automatically created for the renewal of the certificate, which takes care of the update:
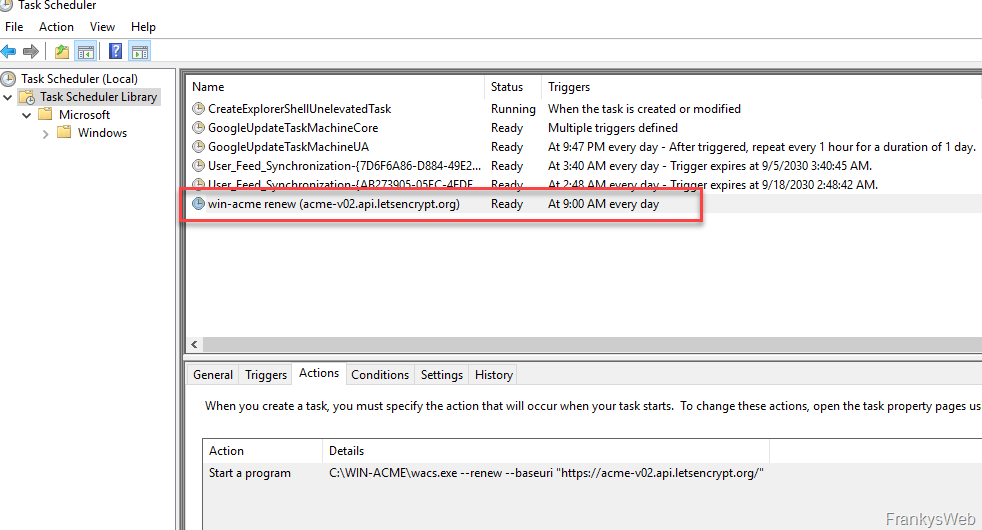
The certificate has also already been bound to the Exchange Services and activated, so nothing needs to be done manually here.
Check certificate
Finally, you should check whether the certificate is configured correctly. Outlook must not return any certificate error messages, and internal and external access via browsers (including Outlook, of course) must also work without certificate error messages. If there are still error messages, the problem lies with 99% as an incorrectly configured host name in the Exchange configuration or with the certificate.
As mentioned, Let's Encrypt certificates are valid for 90 days, so it makes sense to make an entry in the calendar in 80 days and check whether the certificate has been exchanged and everything has worked without any problems.
Falls man im Win-Acme Client anstatt der HTTP-Validation die DNS-Validation verwendet (DNS der Domain muss dies unterstützen), muss der Exchange nicht mal von außen direkt erreichbar sein, bzw. es kann auf den Port 80 verzichtet werden.