

Introduction
The DAG (Database Availablity Group) makes it easy for administrators to ensure high availability for the mailbox servers. Spanning a DAG with multiple databases across multiple servers is quite simple. But what about the other Exchange Server roles? If there are highly available mailbox servers, but the only CAS server in the company fails due to a defect, clients can no longer connect to the mailbox servers. This comes close to a total system failure. In this test environment, I focus specifically on the CAS role; the DC and mailbox role are not designed to be fail-safe due to a lack of hardware resources on the test system.
I have installed the following systems for the test environment:
1 Windows Server 2008 R2 as DC and Exchange mailbox server (ExSRV01)
2 Windows Server 2008 R2 as CAS and Hub Transport Server (ExSRV02 and ExSRV03)
The drawing shows the network configuration of the individual systems.

The IP configuration of the servers is as follows:
ExSRV01:
IPv4: 192.168.1.240/24
IPv6: 1999::1/64
ExSRV02:
IPv4: 192.168.1.241/24
IPv6: 1999::2/64
ExSRV03:
IPv4: 192.168.1.242/24
IPv6: 1999::3/64
The IPv4 address 192.168.1.243/24 and the IPv6 address 1999::4/64 are used as cluster IP addresses.
Note:
Bei Windows Server 2003 war es noch Standard 2 Netzwerkkarten für NLB Cluster zu verwenden. Dies ist seit Windows Server 2008 nicht mehr zwingend notwendig. Der „Netzwerklastenausgleich-Manager“ nörgelt zwar beim Start etwas rum. Die Funktion ist jedoch nicht beeinträchtigt. Der Einfachheit halber verwende ich in diesem Beispiel nur eine Netzwerkkarte um es übersichtlicher zu halten. In Produktiv Umgebungen sollten dennoch 2 Netzwerkkarten verwendet werden. Die Konfiguration ist in weiten Teilen gleich.
Installation and configuration NLB:
Zunächst installieren wir das Windows Feature „Netzwerklastenausgleich“ auf ExSRV01 und ExSRV02. Das können wir ganz einfach über den Servermanager durchführen:
Server Manager -> Windows Features -> Add Feature -> Network Load Balancing
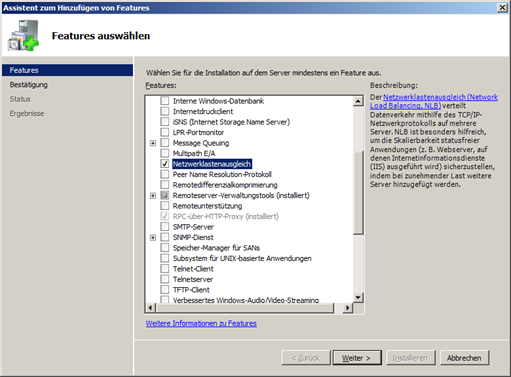

Ein Klick auf „Weiter“ installiert das gewünschte Feature. Nach der Installation befindet sich der „Netzwerklastenausgleich-Manager“ unter Start -> Verwaltung.
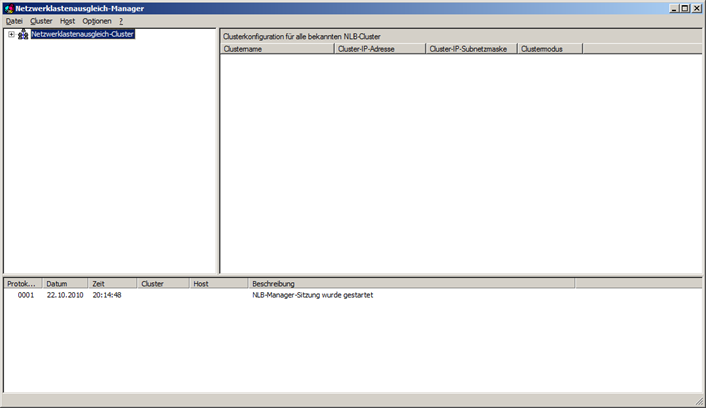

.Als nächstes konfigurieren wir einen neuen Cluster, dazu klicken wir auf die Menüeintrag „Cluster“ und dann auf „Neu“. Es öffnet sich der Dialog zum Erstellen eines neuen Clusters.
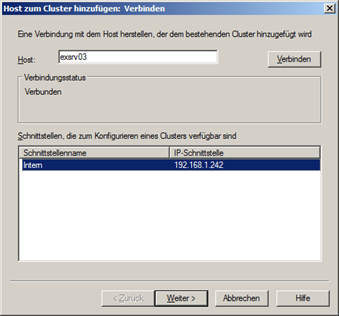

Wir verbinden uns zunächst mit dem Server „ExSRV02“, dann klicken wir auf „Weiter“. Im nächsten Dialog müssen wir nichts ändern und bestätigen die IP-Konfiguration mit „Weiter“.
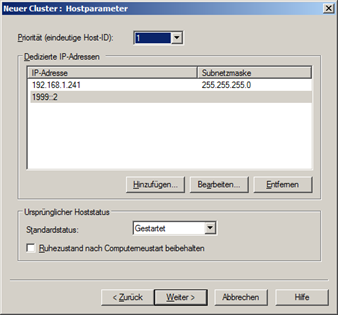

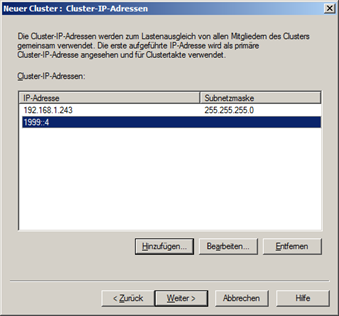
Dann geben wir die IP-Adresse an, unter der der Cluster in Zukunft zu erreichen ist, wir fügen also als IPv4-Adresse die 192.168.1.243/24 und als IP-v6-Adresse die 1999::4 hinzu und klicken auf „Weiter“
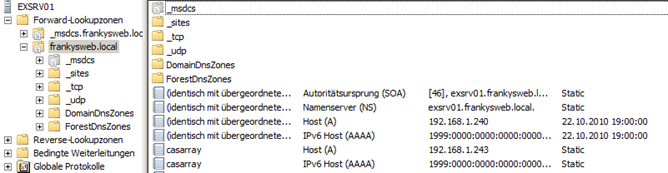
Als nächstes geben wir den zukünftigen DNS-Namen für den Cluster an, in meinem Beispiel ist das „casarray.frankysweb.local“. Diesen neuen Host muss auch auf unserem DC und DNS Server „ExSrv01“ als Host mit seiner entsprechenden Cluster IP-Adresse bekannt gemacht werden.
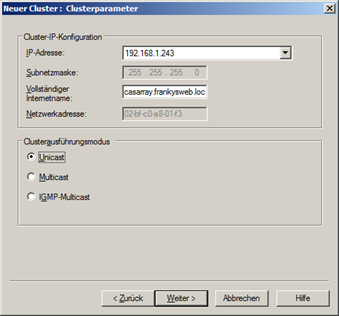
Note: Als Clusterführungsmodus habe ich „Multicast“ gewählt. Weitere Informationen zu den Clusterführungsmodi gibt’s hier:

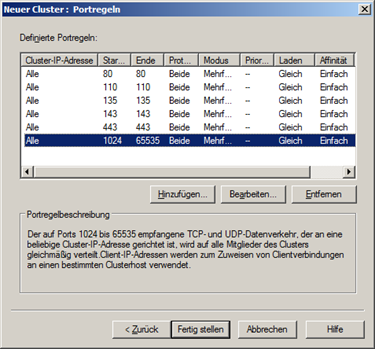
The required ports are configured in the next dialog. I have created the following rules:
Port 80 HTTP (not actually required, but quite useful for testing purposes)
Port 443 HTTPS (HTTP over SSL, required for OWA)
Port 110 POP (only required if the POP protocol is also used)
Port 143 IMAP (only required if IMAP is used)
Port 135 RPC endpoint mapper (for MAPI clients, i.e. Outlook)
Port 1024 - 65535 (dynamic for Outlook RPC or MAPI connection)


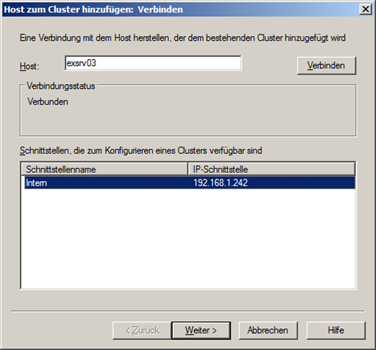
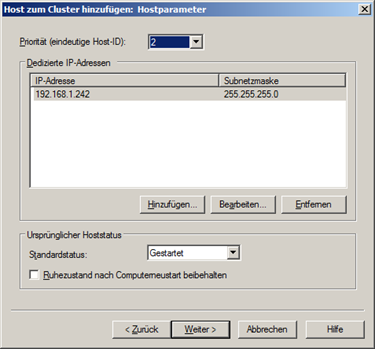
Mit dem Klick auf „Fertigstellen“ wird der neue Cluster angelegt. Wenn dies geschehen ist, fügen wir den zweiten CAS-Server „ExSRV03“ dem Cluster hinzu. Dazu markieren wir den Eintrag für den Cluster und klicken auf „Cluster“ und dann auf „Host hinzufügen“. Wir geben „ExSRV03“ als Host an und klicken auf „Verbinden“, danach auf „Weiter“

Further dialogs follow in which no settings need to be changed
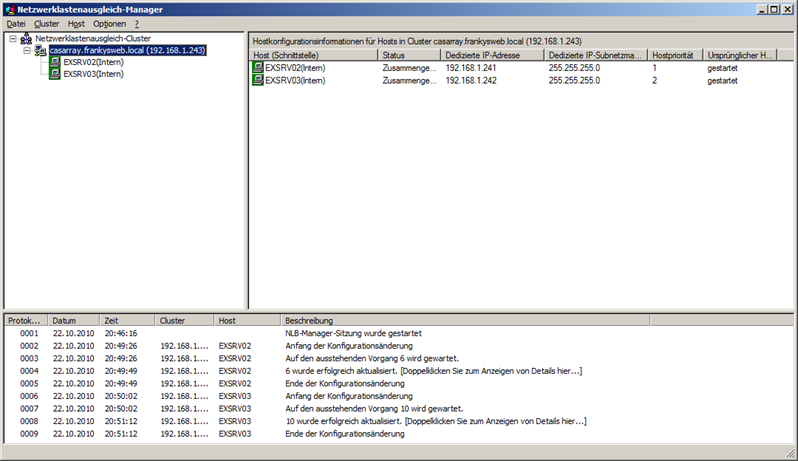
After a while, the new host should also have been added to the cluster.

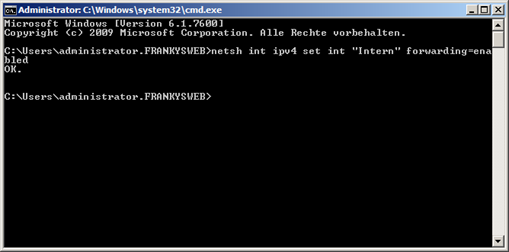
The configuration of the NLB cluster is now complete. In order to avoid problems, we switch on IP forwarding on both CAS servers. We can do this via the command prompt.
netsh int ipv4 set int „Intern“ forwarding=enabled
(Wobei „Intern“ für den Namen der Netzwerkverbindung steht)

Done!
Exchange configuration
Abschließend muss noch ein neues CAS-Array über die Exchange Management Shell angelegt werden.
New-ClientAccessArray -Name „CAS Array“ -site „Default-First-Site-Name“ -FQDN „casarray.frankysweb.local“
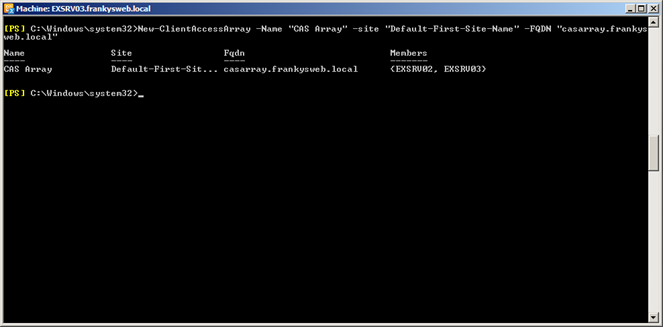

Der Parameter „Site“ steht für den Active Directory Standort des CAS-Arrays. „FQDN“ ist der Name unseres NLB Clusters.
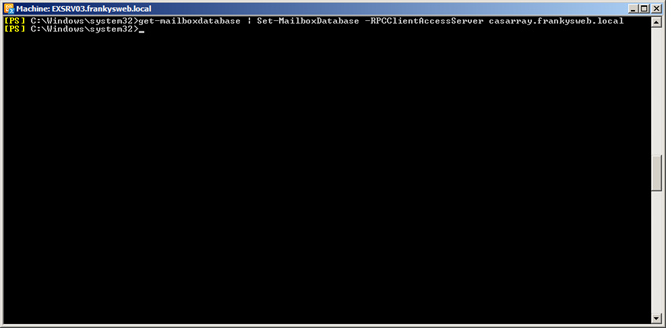
Next, we assign the new CAS array to the mailbox database:
Get-MailboxDatabase | Set-MailboxDatabase -RPCClientAccessServer „casarray.frankysweb.local“

We can check whether this has worked with the following command:
Get-MailboxDatabase | select Name,RPCClientAccessServer | ft
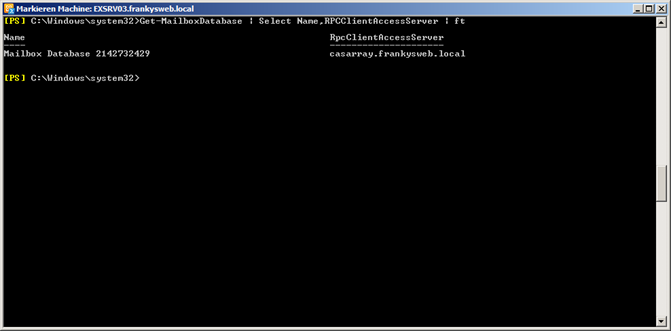

Wenn in der Spalte „RPCClientAccessServer“ der Name unseres NLB-Clusters steht ist alles gut gelaufen.
Addendum: If you want to design the CAS role to be fail-safe, the only way supported by Microsoft is the NLB solution. However, as Windows NLB is quite limited in its options, you should consider using a hardware load balancer in production environments. I have also planned to test a fail-over cluster with the CAS role, but as mentioned earlier, this variant is not supported by Microsoft.
In the next few days I will connect a client with Outlook 2010 to the cluster and carry out a few failure tests. The results will then be published here.