More and more companies now want to migrate to Exchange 2010. In my opinion, the most common case is the migration from Exchange 2003 to Exchange 2010. Exchange 2007 was left out by many companies. How Exchange 2003 is migrated to Exchange 2010 is described in this article.
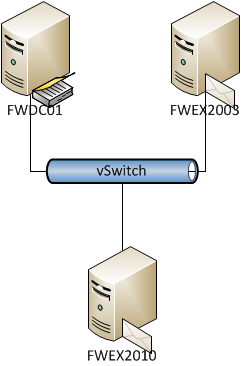
The test environment
FWDC01 is a Windows Server 2003 R2, this server acts as domain controller (frankysweb.local) and DNS server. FWEX2003 is a Windows Server 2003 with Exchange 2003 installed. 3 mailboxes (Bart, Lisa, Maggie) and a public folder with 3 contacts (Homer, Marge, Mr. Burns) are located on the Exchange 2003.
Only the Windows Server 2008 R2 operating system is currently installed on the FWEX2010 server. The server has also joined the frankysweb.local domain as a member server.
Preparing Exchange 2003 for migration
First of all, we make the preparations for the migration. If not already done, Service Pack 2 for Exchange 2003 must be installed. Service Pack 2 is a prerequisite for the migration. Once SP2 has been installed, we put Exchange 2003 into "unified mode". This process is comparable to raising the functional level of a domain or forest and cannot be undone. For "Unified Mode", only Exchange 2000 servers or higher may be in the organization. For the migration to Exchange 2010, however, only Exchange 2003 servers may still be in the organization. Older Exchange versions must first be migrated to Exchange 2003.
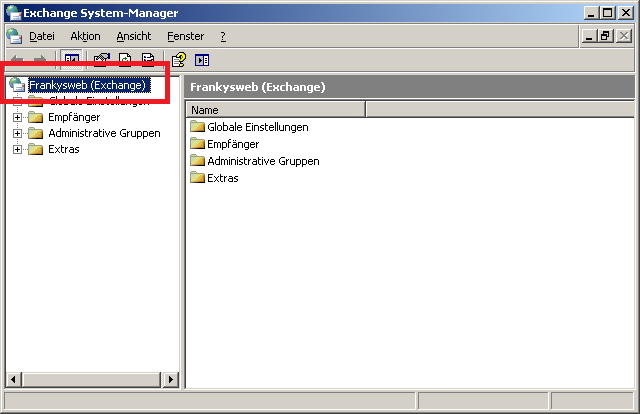
To set Exchange to unified mode, right-click on the Exchange organization in the System Manager and select "Properties" from the context menu.
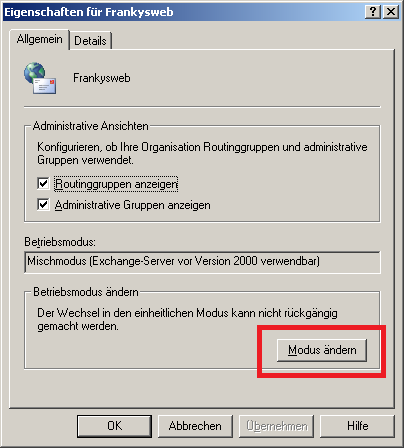
To change the operating mode, click on "Change mode"
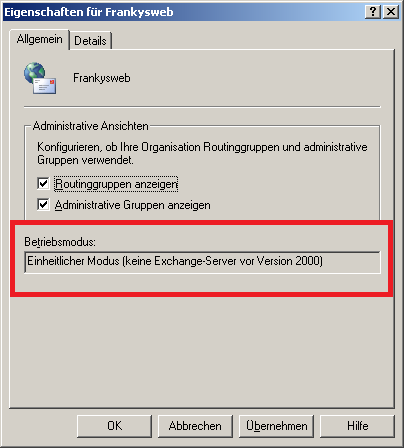
The warning is confirmed with "Yes". The "Uniform mode" operating mode should then be displayed
Installation Exchange Server 2010
On the server FWEX2010, which currently functions as a member server, we first install the prerequisites for Exchange 2010. In this article I have described which prerequisites must be installed for the 3 Exchange roles (Mailbox, Hub Transport, ClientAccess). A complete overview of which Windows roles/features are required for which Exchange roles can be found here:
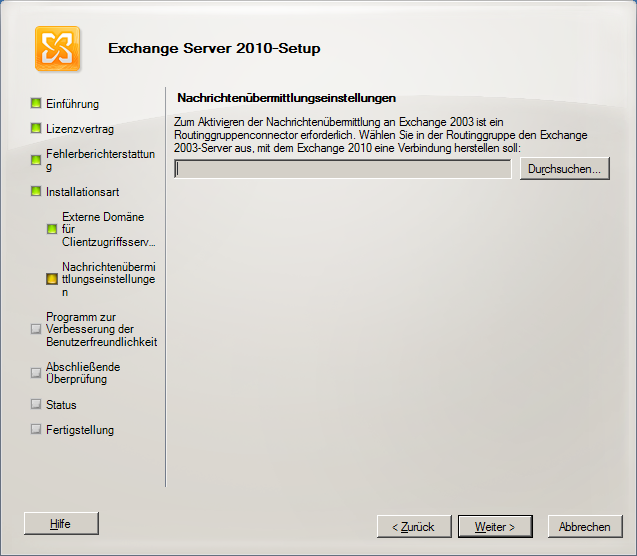
Once the necessary Windows roles have been installed, we run the Exchange 2010 setup. We first run a normal Exchange setup, but at one point we select the Exchange 2003 server.
By clicking on "Browse", we can specify the Exchange 2003 server here. As a result, the routing group connectors between Exchange 2010 and Exchange 2003 are created automatically. The connectors can also be created manually at a later date. This works via the Exchange Management Shell
After successful Exchange 2010 setup we execute the following command from the Exchange 2010 DVD:
Setup.com /PrepareLegacyExchangePermissions
The command causes the RUS service (Recipient Update Service) to continue to function during the migration according to the Update for Exchange 2010 schema (which is automatically updated during the installation).
Control and configuration Exchange 2010
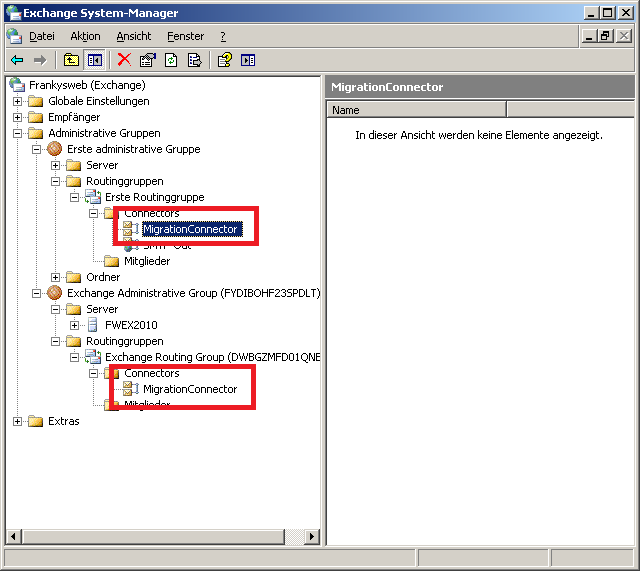
Exchange 2010 has been installed and the routing group connectors between Exchange 2003 and Exchange 2010 should have been created by the setup. We can check this with the Exchange 2003 System Manger
Of course, we can also check this via the Exchange 2010 Management Shell
Get-RoutingGroupConnector
Now it's time to configure Exchange 2010. I will only briefly list which points are necessary:
Configuration of the Exchange 2010 databases
Configuration Exchange 2010 Send Connector
Configuration Exchange 2010 Receive Connector
Configuration OWA, Outlook Anywhere
The configuration of Exchange 2010 does not differ from the configuration of a normal Exchange 2010 installation. A corresponding article for the Exchange 2010 basic configuration is in progress J
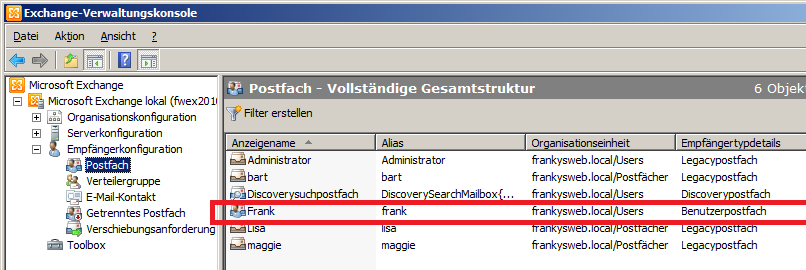
We should now be able to send mails between Exchange 2003 and Exchange 2010. To test this, we create a new user whose mailbox is stored on Exchange 2010. I create the user "Frank" for the test.
We can use OWA on both servers to test the mail routing. So I send a mail from Frank to Bart and then reply to this mail from Bart. If the mail routing works, we move on to the next step.
Setting up public folder replication
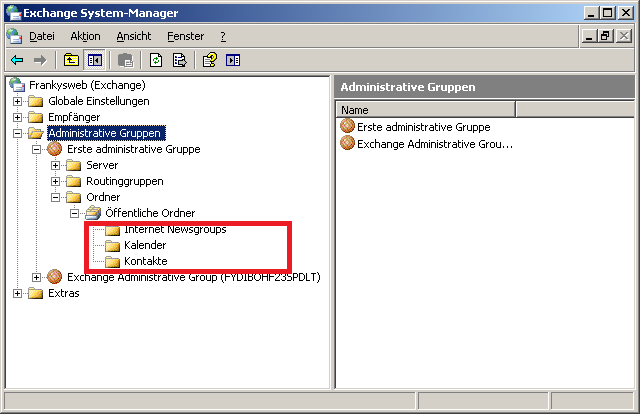
I have created 2 public folders in my test environment ("Contacts and Calendar". The folder "Internet Newsgroups" is created during the installation of Exchange 2003, all public folders must now be replicated to Exchange 2010.
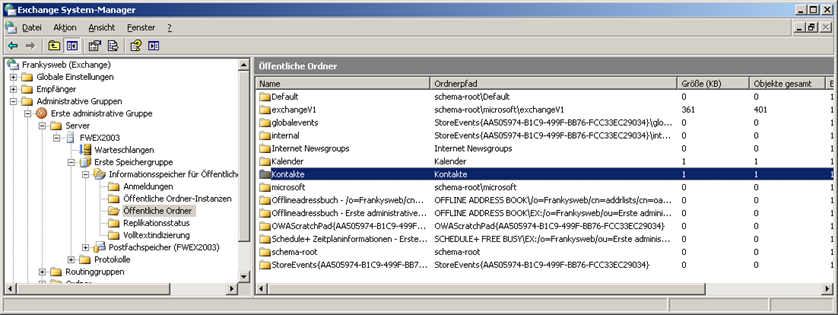
If there are only a few public folders, replication can be configured manually for each folder using the Exchange 2003 System Manager under "Public folders" in the information store:
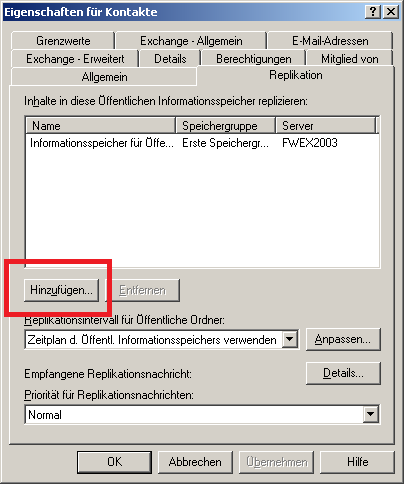
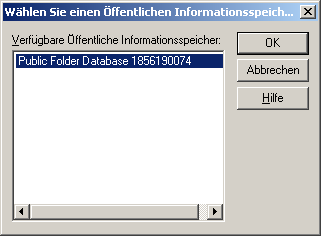
The properties of the public folder can be opened with a right-click; the public folder database is then added to the Exchange 2010 server under the "Replication" tab
These steps are now repeated for all public folders. However, it is easier to do this with the Exchange 2010 Management Shell. First change to the script directory of the Exchange 2010 server:
Cd C:\Program Files\Microsoft\Exchange Server\V14\Scripts
Now the script "AddReplicaToPFRecursive" can be executed:
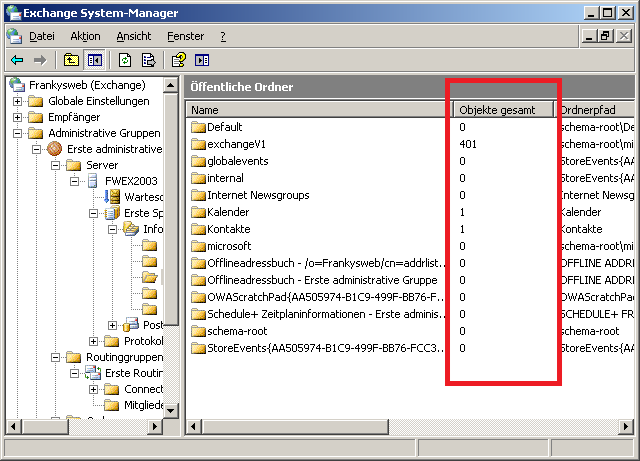
To make the replication partner visible in the Exchange 2003 System Manager, the System Manager must be closed and reopened once. Replicating the contents of the public folders can take quite a long time depending on the amount of data. It is therefore advisable to be patient. To check whether all elements of the public folders have been replicated, the columns "Total items" and "ItemCount" can be compared with each other:
The command to display the elements on Exchange 2010 servers is:
Get-PublicFolderStatistics | ft Name,itemcount
Some public folders only exist on the respective Exchange server, which is why the number of public folders differs on both Exchange servers. Both lists can be exported as CSV files and compared with Excel, for example. However, as the CSV files differ in their structure, manual work is required to compare the files. Special tools can do this work for you.
Once the public folders have been replicated, the address books and the RUS service can be moved.
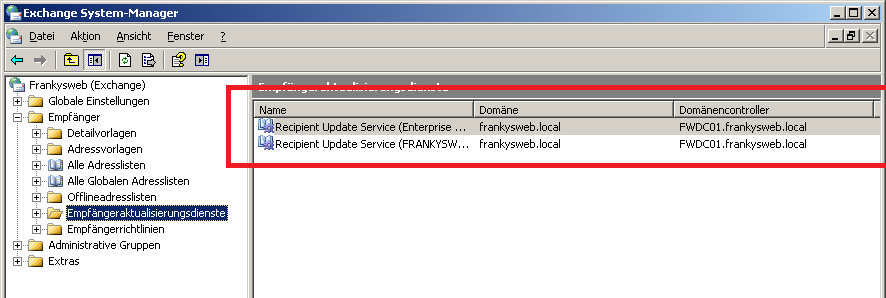
Moving the recipient update service and the address lists
To move the recipient update service to Exchange 2010, Exchange 2010 is set as the server for address list generation. This setting can be made via the Exchange 2003 System Manager:
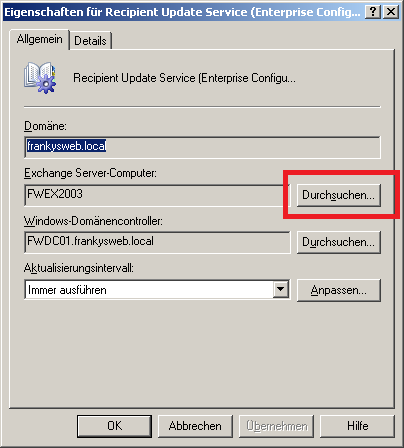
The new server can be defined by double-clicking on the two RUS (Recipient Update Service) entries
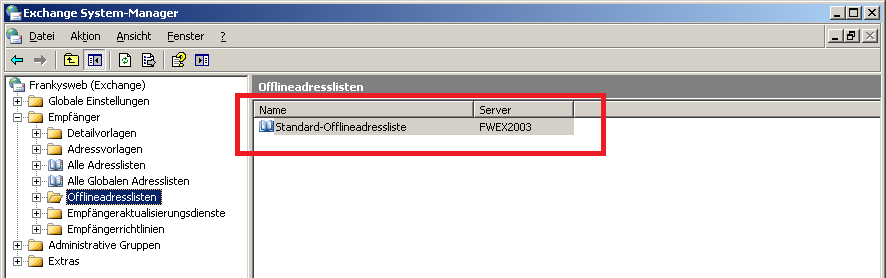
Click on "Browse" to select the computer account of the Exchange 2010 server. The offline address book can now be moved.
Here too, double-click on "Default offline address list" to set Exchange 2010 as the server.
The address lists can now be updated to Exchange 2010 by entering the following commands in the Exchange 2010 Management Shell:
Set-AddressList "All users" -IncludedRecipients MailboxUsers
Set-AddressList "All groups" -IncludedRecipients MailGroups
Set-AddressList "All contacts" -IncludedRecipients MailContacts
Now all mailboxes can be moved from Exchange 2003 to Exchange 2010
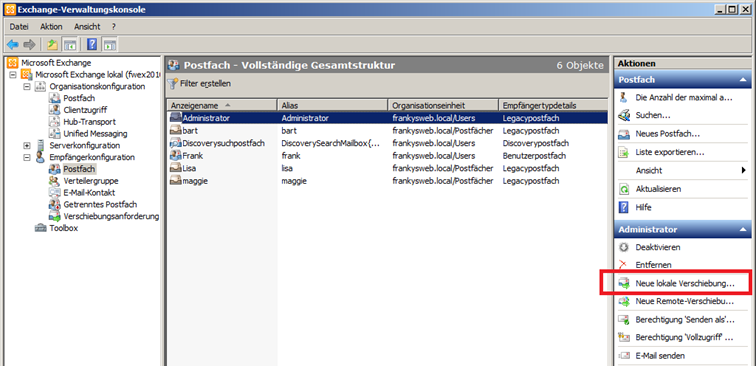
Moving the mailboxes
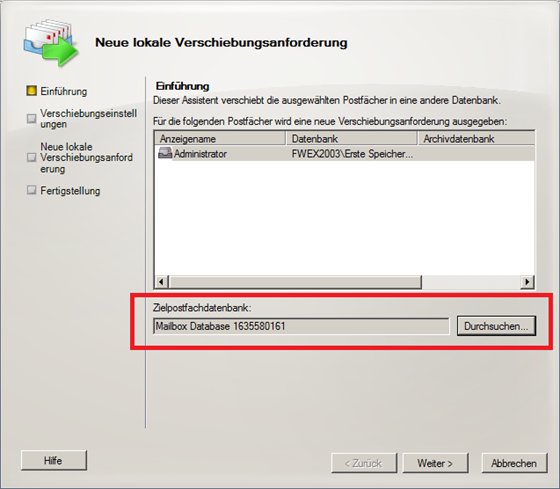
To move the mailboxes, either the Exchange 2010 Management Console or the shell can be used to create a move request for each mailbox
The mailbox database on the Exchange 2010 server is specified as the target database. If required, the mailboxes can also be moved back to the Exchange 2003 server.
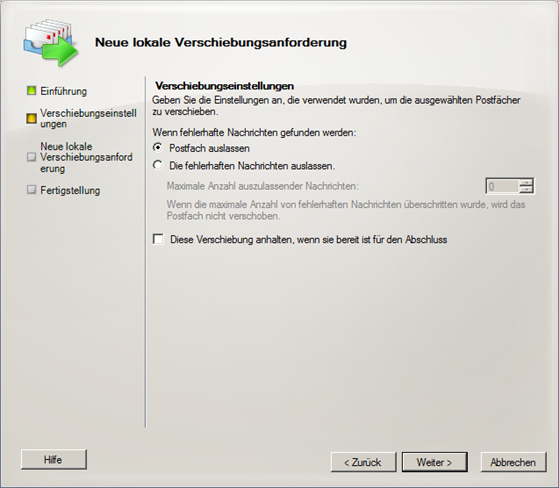
In the next dialog, you can specify whether a mailbox should be moved despite incorrect messages. The incorrect messages are then omitted and not moved.
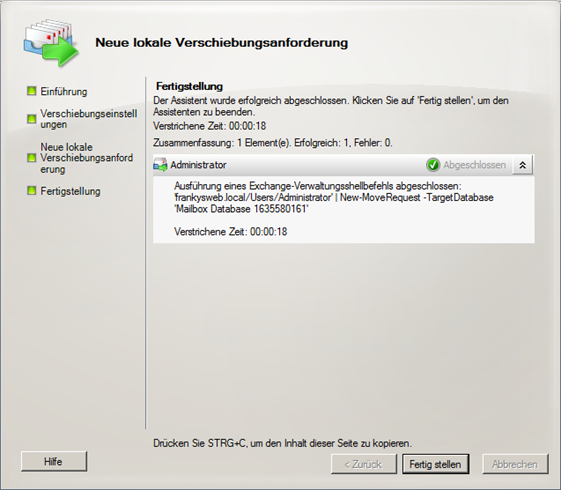
The mailbox is now moved
The following command can be used to move a mailbox with the shell:
Get-Mailbox "Bart" | New-MoveRequest -TargetDatabase "Name of the Exchange 2010 database"
This command can be used to move all mailboxes:
Get-Mailbox | New-MoveRequest -TargetDatabase "Name of the Exchange 2010 database"
This command is sufficient to check the status of the move requests:
Get-MoveRequest
Now you have to "wait" until all mailboxes have been moved. Depending on the size and number of mailboxes, this may take some time. My experience in terms of duration is about 100MB/min.
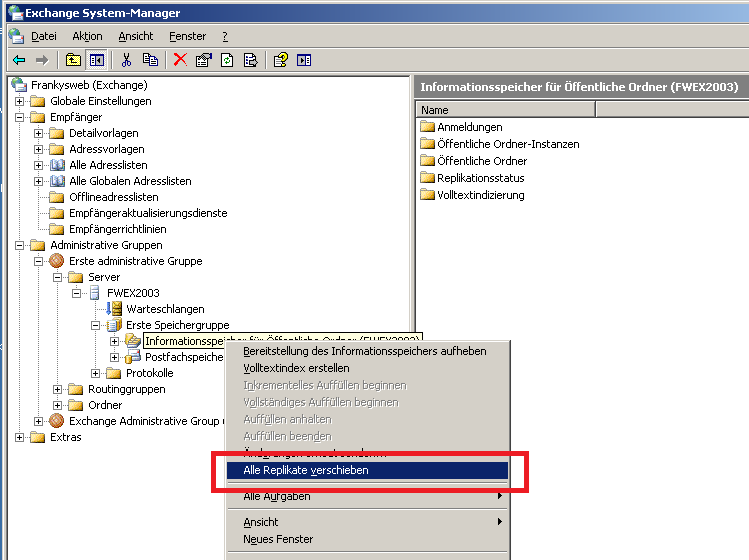
Move all public folder replicas to Exchange 2010
If all mailboxes have been moved to the Exchange 2010 server, Exchange 2003 can be removed as a replication partner for public folders. The replicas can be moved via Exchange 2003 System Manager or via Management Shell:
As can be seen in the image, the script is again located in the folder "C:\Program Files\Microsoft\Exchange Server\V14\Scripts". To ensure that the replication can be carried out completely, it is recommended to wait a little longer.
Uninstall Exchange 2003
To complete the migration, we now first remove the Exchange 2003 send connectors and the two routing group connectors. Right-click on the relevant connectors to open the context menu and click on "Delete" to remove the connectors.
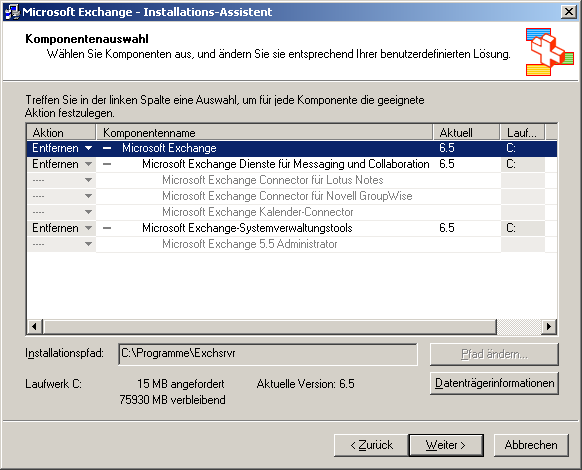
Now Exchange 2003 can be uninstalled via Control Panel -> Software
The installation CD is required to uninstall Exchange 2003. After Exchange 2003 has been uninstalled, the server can be removed from the domain (if no other roles are installed) and switched off.
38 thoughts on “Exchange 2010: Migration von Exchange 2003 zu Exchange 2010”
Hallo,
ich bin auf der Suche nach einer Anleitung wie sich ein Exchange 2010 zwischen zwei Servern umziehen lässt. In meinem Fall läuft der produktive Exchange derzeit auf einem Server 2008R2. Diesen würde ich jetzt gerne auf einen 2012R2 umziehen.
Hat hierzu vielleicht jemand einen Link zu einer Anleitung?
die Anleitung hat super funktioniert – danke hierfür erstmal :)
Allerdings muss der alte Exchange Server 2003 noch ein paar Tage Koexistieren und hier hat sich ein kleines Problem aufgetan.
Und zwar gibt es unter der gleichen Domäne (Beispiel contoso.com) noch weitere User welche von Außerhalb per POP3 Nachrichten beim Hoster abfragen. Soweit so gut.
Vor Installation hat das der Exchange 2003 mit einem Haken gelöst. Sinngemäß: Alles was nicht vorhanden ist, über den Smarthost weiterschicken.
Bei Exchange 2010 ist ja hierfür die Domäne auf „Internal Relay“ zu konfigurieren. Das funktioniert auch, die Mails kommen nun bei den Usern an. Allerdings stellt der Exchange im Anschluss keine Nachrichten mehr an die Postfächer zu. Nur im Modus „autorativ“ funktioniert dies.
prinzipiell wird mit dem Exchange Setup das Active Directory Schema um die entsprechenden Objekte erweitert. In komplexeren Umgebungen empfiehlt sich jedoch, die Schemaerweiterung vor dem Setup auf dem Schemamaster der entsprechenden Domain auszuführen und die Änderungen zu replizieren: – setup /PrepareAD
Das Kommando führt folgende Unterkommandos in einem Schritt aus: – setup /PrepareLegacyExchangePermissions – setup /PrepareSchema
Bei der Planung der Schemaerweiterung für komplexe Organisationsstrukturen sollten Sie sich ausführlich mit dem entsprechenden Microsoft Artikel auseinander setzen:
Hallo! Vielen Dank für Ihre Anleitung, jedoch habe ich noch einige Fragen. In anderen Anleitungen sind noch zusätzlich folgende Schritte vor der Exchange2010 Installation beschrieben:
Diese Schritte kommen in Ihrer Anleitung nicht vor. Werden diese Schritte bei den aktuellen Exchange2010 Installationen automatisch beim Setup auf dem neuen Exchangeserver2010 ausgeführt?
Hallo, das Exchange 2010 Setup aktualisiert das Schema und bereitet das Active Directory während der Installation vor. Sie müssen die befehle also nicht vorher manuell eintippen.
Hallo, eine frage: wie bekommen die Client PCs (Outlook 2003 & Outlook2010) mit, das es einen neuen Exchange Server gibt mit einer neuen IP? wie, bzw. wo muss man dies einstellen, das man an den Client PCs möglichst wenig machen muss?
diese Anleitung ist einfach erklärt und sehr verständlich! Danke! Eine Angabe fehlt mir allerdings: An welcher Stelle werden Mails nicht mehr zugestellt bzw. wie groß ist die Downtime wenn man die Migration eines Servers so durchführt, wie hier beschrieben? Wir wollen unseren Server umziehen und eine möglichst geringe Downtime haben, da unser Mailserver als MX-Record beim Hoster eingetragen ist! Downtime bedeutet bei uns u.U. auch gleichzeitig „verlorene eingehende Mails“ …
während die Postfächer verschoben werden, ist keine Anmeldung von Outlook am Postfach möglich, sprich Outlook ist getrennt (der Vorgang lässt sich natürlich zeitlich steuern). Mails gehen aber nicht verloren, die bleiben in der Warteschlange bis das Postfach verschoben wurde. Auch das Umstellen des MX-Records ist unkritisch, egal auf welchem Server (Ex2003 oder Ex2010) das Postfach liegt, beide Server sind in der Lage Mails in die entsprechenden Postfächer zuzustellen. Bevor Sie also Ex2003 deinstallieren, sollten Sie den MX umstellen, dann 1 Tag warten, bis alle Mails nur noch über Exchange 2010 angenommen werden und dann Ex2003 deinstallieren.
Hi Frank, danke für Deine Antwort. Habe den Befehl sowohl abgetippt, als auch eingefügt (über Notepad). Habe die Anführungszeichen ersetzt, leider selbe Fehlermeldung. :-/
Hi, wirklich eine sehr gute Anleitung, danke dafür. Stoße allerdings auf ein Problem beim Verschieben der Globalen Standardadressliste. Gebe den Befehl genauso ein wie Du; es kommt allerdings folgende Fehlermeldung: Dieser Vorgang kann nicht für die globale Standardadressliste ausgeführt werden. +CategoryInfo : InvalidOperation: (\Globale Standardadressliste:ADObjectId) [Set-GlobalAddressList}, InvalidOperationException +FullyQuallifiedErrorId: 7294D31B,Microsoft.Exchange.Management.SystemConfigurationTasks.SetGlobalAddressList
Der findet bei mir den Exchange 2003 Server nicht, wenn ich am anfang den Befehl ind die Shell eingebe. Über den Explorer seh ich den und kann auch zugreifen…kann es damit zusammenhängen das der auf dem 2003 Server nicht auf dem Systemlaufwerk installiert ist? Gruß Thomas
Hi, der verlinkte Artikel bezieht sich auf Exchange 2000 und Exchange 2003. Normalerweise ist dieser Schritt nicht nötig, wenn es aber in eurem Fall geholfen hat, dann habt ihr wahrscheinlich schon vorher ein Problem gehabt.
Das öffentliche Ordner „Problem“ nach der Deinstallation vom Exchange 2003 liegt ganz einfach dran, dass hier ein Schritt für die Migration auf Ex20xx nicht beschrieben wurde…
Im System Manager vom Exchange 2003 wird man unter Administrative Gruppen -> Name der Gruppe (Meist Erste administrative Gruppe) einen Ordner mit dem Namen Ordner entdecken unter dem ein Objekt mit dem Namen „öffentlicher Ordner“ liegt.
Dieses Objekt MUSS per Drag & Drop auf den neuen Exchange geschoben werden. Vorher entsprechend den Ordner mit dem Namen „Ordner“ anlegen.
Hat man den Exchange 2003 bereits deinstalliert (mir bei meiner ersten Migration natürlich auch passiert, weil in keinem Guide der Welt diese Info steht ;)) muss nur die Exchange 2003 Console wieder installiert werden…
Sonst aber eine gute und leicht verständliche Anleitung -> Danke dafür
Das ist so nicht richtig, der Root Folder wird in jeder Öffentlichen Ordner Datenbank angelegt, nur die Replikation muss noch eingerichtet werden, wie es im Artikel steht :-)
Anleitung finde ich super… Allerdings habe ich nach der Deinstallation von Exchange 2003 jetzt das Problem, dass auf die öffentlichen Ordner nicht mehr zugegriffen werden kann. Ich dachte zunächst, dass ich einfach die entsprechenden Berechtigungen noch vergeben muss, doch leider hilft das nichts. Es kommt immer die Meldung „Die Ordnergruppe kann nicht geöffnet werden. Fehler bei der Anmeldung bei Microsoft Exchange“. Ich habe auch eben einen neuen Ordner angelegt und Berechtigung vergeben. Gleiches Bild. Ich kann noch nicht mal in der Ordnerleiste auf „Öffentliche Ordner – Benutername@domäne gehen. Da kommt die Meldung schon.
Hallo Frank, deine Anleitung ist gut, funktioniert jedoch bei mir nicht ganz. Beim Verschieben der Postfächer erhalte ich immer eine Fehlermeldung (MapiLogonFailed). Könntest du noch etwas zu deinen Vorbereitungen sagen (Rechte gesetzt..)? Danke
Hallo Frank, erstmal vielen Dank für das HowTo! Ich habe die Migration von 2003 zu 2010 erledigt. Nun ist leider durch ein Update der 2010 irgendwie Schrott, ein verwertbares Backup gibt es nicht, selbst Microsoft kann nicht wirklich helfen. Jetzt spiele ich mit dem Gedanken einen 2. Exchange 2010 zu installieren und den 1. nun gleich wegzuwerfen. Kann ich die Migration vom 1. zum 2. gleich machen wie in diesem HowTo (abgesehen von den 2003 Punkten)? Vielen Dank


")
")
")
")

Hallo,
ich bin auf der Suche nach einer Anleitung wie sich ein Exchange 2010 zwischen zwei Servern umziehen lässt. In meinem Fall läuft der produktive Exchange derzeit auf einem Server 2008R2. Diesen würde ich jetzt gerne auf einen 2012R2 umziehen.
Hat hierzu vielleicht jemand einen Link zu einer Anleitung?
Gruss, David
So muss das also aussehen: (Bei Set-GlobalAdresslist)
Set-GlobalAddressList „Globale Standardadressliste“ -RecipientFilter {(Alias -ne $null -and (ObjectClass -eq ‚user‘ -or ObjectClass -eq ‚contact‘ -or ObjectClass -eq ‚msExchSystemMailbox‘ -or ObjectClass -eq ‚msExchDynamicDistributionList‘ -or ObjectClass -eq ‚group‘ -or ObjectClass -eq ‚publicFolder‘))}
Der RUS wird in einer Exchange 2007+ Umgebung nicht mehr benötigt und muss daher nicht umgezogen, sondern entfernt werden.
Siehe dazu:
> https://technet.microsoft.com/de-de/library/Bb288905(v=EXCHG.80).aspx
Hallo Frank,
die Anleitung hat super funktioniert – danke hierfür erstmal :)
Allerdings muss der alte Exchange Server 2003 noch ein paar Tage Koexistieren und hier hat sich ein kleines Problem aufgetan.
Und zwar gibt es unter der gleichen Domäne (Beispiel contoso.com) noch weitere User welche von Außerhalb per POP3 Nachrichten beim Hoster abfragen. Soweit so gut.
Vor Installation hat das der Exchange 2003 mit einem Haken gelöst. Sinngemäß: Alles was nicht vorhanden ist, über den Smarthost weiterschicken.
Bei Exchange 2010 ist ja hierfür die Domäne auf „Internal Relay“ zu konfigurieren. Das funktioniert auch, die Mails kommen nun bei den Usern an. Allerdings stellt der Exchange im Anschluss keine Nachrichten mehr an die Postfächer zu. Nur im Modus „autorativ“ funktioniert dies.
Hast du eine Idee?
LG
Gordon
Hallo Andreas,
prinzipiell wird mit dem Exchange Setup das Active Directory Schema um die entsprechenden Objekte erweitert.
In komplexeren Umgebungen empfiehlt sich jedoch, die Schemaerweiterung vor dem Setup auf dem Schemamaster der entsprechenden Domain auszuführen und die Änderungen zu replizieren:
– setup /PrepareAD
Das Kommando führt folgende Unterkommandos in einem Schritt aus:
– setup /PrepareLegacyExchangePermissions
– setup /PrepareSchema
Bei der Planung der Schemaerweiterung für komplexe Organisationsstrukturen sollten Sie sich ausführlich mit dem entsprechenden Microsoft Artikel auseinander setzen:
https://technet.microsoft.com/de-de/library/bb125224(v=exchg.141).aspx.
F
Bei wem der Befehl Set-GlobalAddressList “Globale Standardadressliste” -RecipientFilter {(Alias -ne $null -and (ObjectClass -eq “user” -or ObjectClass -eq “contact” -or ObjectClass -eq “msExchSystemMailbox” -or ObjectClass -eq “msExchDynamicDistributionList” -or ObjectClass -eq “group” -or ObjectClass -eq “publicFolder”))}
nicht funktioniert: doppelte Anführungszeichen durch einfache ersetzen :)
[Zitat]Hi Franky,
was mache ich denn , wenn ich den RUS auf den neuen Exchange Server verweisen will, bekomme diesen aber nicht im AD angezeigt ?[/Zitat]
Habe das Problem auch
LG Chris
Hallo!
Vielen Dank für Ihre Anleitung, jedoch habe ich noch einige Fragen.
In anderen Anleitungen sind noch zusätzlich folgende Schritte vor der Exchange2010 Installation beschrieben:
setup /prepareSchema
setup /prepareAD /Organizationname:
setup /prepareDomain
Diese Schritte kommen in Ihrer Anleitung nicht vor. Werden diese Schritte bei den aktuellen Exchange2010 Installationen automatisch beim Setup auf dem neuen Exchangeserver2010 ausgeführt?
Vielen Dank vorab!
MfG
Hallo,
das Exchange 2010 Setup aktualisiert das Schema und bereitet das Active Directory während der Installation vor. Sie müssen die befehle also nicht vorher manuell eintippen.
Gruß, Frank
Hallo, eine frage: wie bekommen die Client PCs (Outlook 2003 & Outlook2010) mit, das es einen neuen Exchange Server gibt mit einer neuen IP? wie, bzw. wo muss man dies einstellen, das man an den Client PCs möglichst wenig machen muss?
Am Client muss nichts eingestellt werden. Outlook bekommt die neuen Einstellungen automatisch.
Hallo,
diese Anleitung ist einfach erklärt und sehr verständlich! Danke!
Eine Angabe fehlt mir allerdings:
An welcher Stelle werden Mails nicht mehr zugestellt bzw. wie groß ist die Downtime wenn man die Migration eines Servers so durchführt, wie hier beschrieben?
Wir wollen unseren Server umziehen und eine möglichst geringe Downtime haben, da unser Mailserver als MX-Record beim Hoster eingetragen ist! Downtime bedeutet bei uns u.U. auch gleichzeitig „verlorene eingehende Mails“ …
Danke und viele Grüße
Stefan
Hallo,
während die Postfächer verschoben werden, ist keine Anmeldung von Outlook am Postfach möglich, sprich Outlook ist getrennt (der Vorgang lässt sich natürlich zeitlich steuern). Mails gehen aber nicht verloren, die bleiben in der Warteschlange bis das Postfach verschoben wurde. Auch das Umstellen des MX-Records ist unkritisch, egal auf welchem Server (Ex2003 oder Ex2010) das Postfach liegt, beide Server sind in der Lage Mails in die entsprechenden Postfächer zuzustellen. Bevor Sie also Ex2003 deinstallieren, sollten Sie den MX umstellen, dann 1 Tag warten, bis alle Mails nur noch über Exchange 2010 angenommen werden und dann Ex2003 deinstallieren.
Gruß, Frank
Hi Franky,
was mache ich denn , wenn ich den RUS auf den neuen Exchange Server verweisen will, bekomme diesen aber nicht im AD angezeigt ?
Danke
Gruß
Marco
Hi Frank,
danke für Deine Antwort. Habe den Befehl sowohl abgetippt, als auch eingefügt (über Notepad). Habe die Anführungszeichen ersetzt, leider selbe Fehlermeldung. :-/
http://s14.directupload.net/file/d/3413/tz4mnezl_jpg.htm
Das gibts doch nicht, dass es jetzt am letzten Schritt scheitert. Siehst Du eventuell woran es liegen könnte?
Hi,
kannst du mal die Aufgabe von „get-globaladdresslist | fl“ posten‘?
Gruß, Frank
Hi, wirklich eine sehr gute Anleitung, danke dafür. Stoße allerdings auf ein Problem beim Verschieben der Globalen Standardadressliste. Gebe den Befehl genauso ein wie Du; es kommt allerdings folgende Fehlermeldung:
Dieser Vorgang kann nicht für die globale Standardadressliste ausgeführt werden.
+CategoryInfo : InvalidOperation: (\Globale Standardadressliste:ADObjectId) [Set-GlobalAddressList}, InvalidOperationException
+FullyQuallifiedErrorId: 7294D31B,Microsoft.Exchange.Management.SystemConfigurationTasks.SetGlobalAddressList
hast Du hierzu eine Idee?
Hallo,
für mal den Befehl in Notepad ein und ersetze die Anführungszeichen. :-)
Gruß, Frank
Ja das kann ich, werde es dann mal so probieren.
Der findet bei mir den Exchange 2003 Server nicht, wenn ich am anfang den Befehl ind die Shell eingebe. Über den Explorer seh ich den und kann auch zugreifen…kann es damit zusammenhängen das der auf dem 2003 Server nicht auf dem Systemlaufwerk installiert ist?
Gruß Thomas
Ne, das macht keine Probleme, kannst du denn manuell einen Routinggruppenconnector anlegen?
Gruss, Frank
Ich bin da der gleichen Meinung wie Sascha, ich hatte das Problem auch mal nach einer Migration.
1. Einfach in der neuen administrative group rechtsklick -> Neu -> Öffentlicher Ordner Container anlegen.
2. Per Drag & Drop den Öffentlichen Ordner in die neue EAG verschieben.
Quelle: http://support.microsoft.com/kb/252105
Hi, der verlinkte Artikel bezieht sich auf Exchange 2000 und Exchange 2003. Normalerweise ist dieser Schritt nicht nötig, wenn es aber in eurem Fall geholfen hat, dann habt ihr wahrscheinlich schon vorher ein Problem gehabt.
Gruss, Frank
Das öffentliche Ordner „Problem“ nach der Deinstallation vom Exchange 2003 liegt ganz einfach dran, dass hier ein Schritt für die Migration auf Ex20xx nicht beschrieben wurde…
Im System Manager vom Exchange 2003 wird man unter Administrative Gruppen -> Name der Gruppe (Meist Erste administrative Gruppe) einen Ordner mit dem Namen Ordner entdecken unter dem ein Objekt mit dem Namen „öffentlicher Ordner“ liegt.
Dieses Objekt MUSS per Drag & Drop auf den neuen Exchange geschoben werden. Vorher entsprechend den Ordner mit dem Namen „Ordner“ anlegen.
Hat man den Exchange 2003 bereits deinstalliert (mir bei meiner ersten Migration natürlich auch passiert, weil in keinem Guide der Welt diese Info steht ;)) muss nur die Exchange 2003 Console wieder installiert werden…
Sonst aber eine gute und leicht verständliche Anleitung -> Danke dafür
Gruß Sascha
Das ist so nicht richtig, der Root Folder wird in jeder Öffentlichen Ordner Datenbank angelegt, nur die Replikation muss noch eingerichtet werden, wie es im Artikel steht :-)
Gruß, Frank
ach ja…. zwischenzeitlich sieht man die Ordner im Outlook auch gar nicht mehr…
Äh…??? Wenn du mir freundlicherweise sagen kannst wie ich das prüfe, dann schaue ich gerne nach…
Hallo Frank,
Anleitung finde ich super… Allerdings habe ich nach der Deinstallation von Exchange 2003 jetzt das Problem, dass auf die öffentlichen Ordner nicht mehr zugegriffen werden kann. Ich dachte zunächst, dass ich einfach die entsprechenden Berechtigungen noch vergeben muss, doch leider hilft das nichts. Es kommt immer die Meldung „Die Ordnergruppe kann nicht geöffnet werden. Fehler bei der Anmeldung bei Microsoft Exchange“. Ich habe auch eben einen neuen Ordner angelegt und Berechtigung vergeben. Gleiches Bild. Ich kann noch nicht mal in der Ordnerleiste auf „Öffentliche Ordner – Benutername@domäne gehen. Da kommt die Meldung schon.
Und nun?
Hast du einen Tipp für mich?
Vielen Dank
Udo
Hi,
Hast du die Öffentliche Order Datenbank an die Mailboxdatenbank gebunden?
Hallo Frank, deine Anleitung ist gut, funktioniert jedoch bei mir nicht ganz. Beim Verschieben der Postfächer erhalte ich immer eine Fehlermeldung (MapiLogonFailed). Könntest du noch etwas zu deinen Vorbereitungen sagen (Rechte gesetzt..)? Danke
Hallo Frank,
erstmal vielen Dank für das HowTo!
Ich habe die Migration von 2003 zu 2010 erledigt.
Nun ist leider durch ein Update der 2010 irgendwie Schrott, ein verwertbares Backup gibt es nicht, selbst Microsoft kann nicht wirklich helfen.
Jetzt spiele ich mit dem Gedanken einen 2. Exchange 2010 zu installieren und den 1. nun gleich wegzuwerfen.
Kann ich die Migration vom 1. zum 2. gleich machen wie in diesem HowTo (abgesehen von den 2003 Punkten)?
Vielen Dank
bei mir gehen die letzten 2 befehle nicht
Set-AddressList “Öffentliche Ordner” -RecipientFilter { RecipientType -eq “PublicFolder” }
Set-GlobalAddressList “Globale Standardadressliste” -RecipientFilter {(Alias -ne $null -and (ObjectClass -eq ‘user’ -or ObjectClass -eq ‘contact’ -or ObjectClass -eq ‘msExchSystemMailbox’ -or ObjectClass -eq ‘msExchDynamicDistributionList’ -or ObjectClass -eq ‘group’ -or ObjectClass -eq ‘publicFolder’))}
Kopier die beiden Befehle zunächst in Notepad und ersetze die Anführungszeichen durch „normale Anführungszeichen“
und bei set GlobalAddressList muß es so ausschauen:
Set-GlobalAddressList „Globale Standardadressliste“ -RecipientFilter {(Alias -ne $null -and (ObjectClass -eq ‚user‘ -or ObjectClass -eq ‚contact‘ -or ObjectClass -eq ‚msExchSystemMailbox‘ -or ObjectClass -eq ‚msExchDynamicDistributionList‘ -or ObjectClass -eq ‚group‘ -or ObjectClass -eq ‚publicFolder‘))}
Sorry so muß es auschauen. Gerade bei einer Echt Migration eingetragen.
Set-AddressList „Öffentliche Ordner“ -RecipientFilter { RecipientType -eq „PublicFolder“ }
Folgende Anweisung muss unter Exchange 2010 so aussehen:
Set-AddressList “Öffentliche Ordner” -RecipientFilter {( RecipientType -eq “PublicFolder”) }
Hallo. Eine Frage: wie lange dauert dieser gesamte Prozess ausgehend von einer Company mit 10 Usern? Eine grobe Hausnummer genügt als Schätzung…
Herzlichen Dank!
Vielen Dank für diese Anleitung. Kann ich sehr gut nachvollziehen.