There are several ways to organize address lists with Exchange 2010. Which one is the right choice for your Exchange organization must be decided depending on the structure. Here I present 3 ways in which address lists can be created and managed.
Example 1 (address lists by location)
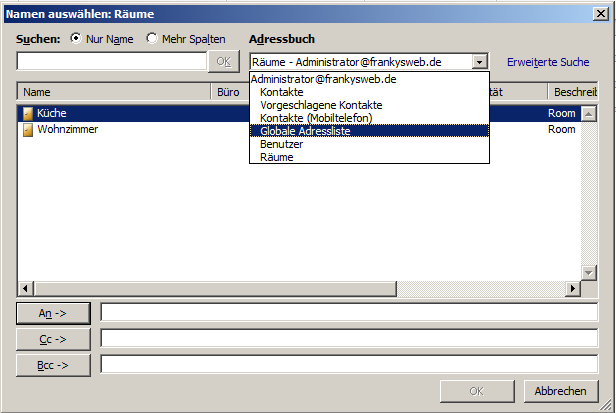
In the Exchange Management Console, new address lists are created and nested within the existing address lists, for example to separate resource types from each other or to delimit locations. For example, a subdivision in Outlook 2010 could look like this
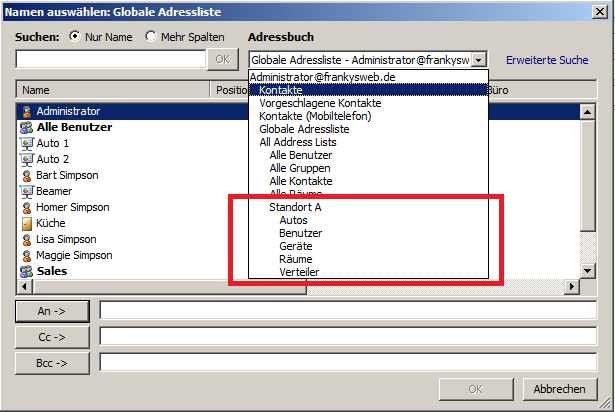
This is how the first example appears in Outlook Web App (OWA)
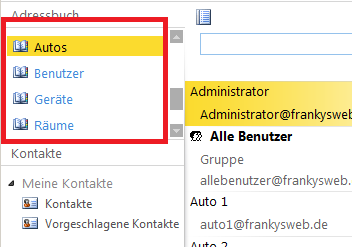
Unfortunately, OWA does not perform as well here as Outlook 2010. The address list window is static and cannot be resized. With many address lists, this means a lot of scrolling in a small window. In addition, all address lists are listed alphabetically. The nice nesting is gone and with it the logical assignment to location A as in Outlook 2010. If there are several locations, there are several address lists with the same name in OWA that are displayed one below the other. This is of course confusing for a user and hardly practicable. An identification feature for the location would therefore have to be included so that users can also find their way around OWA. In small environments with only one location, however, it may make sense to arrange the address lists in this or a similar way.
There are several ways to implement this example; it depends largely on the structure and organization of the Active Directory and which filters are set for the address lists. In my test environment, the structure of the Active Directory looks like this:
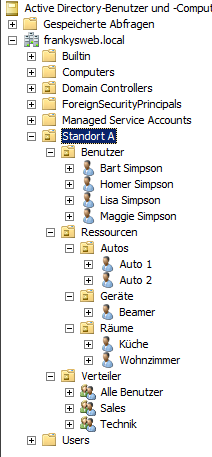
I have therefore created the address lists as follows
new-AddressList -Name 'Location A' -RecipientContainer 'frankysweb.local/Location A' -IncludedRecipients 'AllRecipients' -Container '\' -DisplayName 'Location A'
new-AddressList -Name 'A Rooms' -RecipientContainer 'frankysweb.local/Location A/Resources/Rooms' -IncludedRecipients 'Resources' -Container '\Location A' -DisplayName 'Rooms'
new-AddressList -Name 'A Cars' -RecipientContainer 'frankysweb.local/Location A/Resources/Cars' -IncludedRecipients 'Resources' -Container '\Location A' -DisplayName 'Cars'
new-AddressList -Name 'A Devices' -RecipientContainer 'frankysweb.local/Location A/Resources/Devices' -IncludedRecipients 'Resources' -Container '\Location A' -DisplayName 'Devices'
new-AddressList -Name 'A User' -RecipientContainer 'frankysweb.local/Location A/User' -IncludedRecipients 'MailboxUsers, MailUsers' -Container '\Location A' -DisplayName 'User'
new-AddressList -Name 'A Distributor' -RecipientContainer 'frankysweb.local/Location A/Distributor' -IncludedRecipients 'MailGroups' -Container '\Location A' -DisplayName 'Distributor'
The "-Name" parameter specifies the name of the address list, this name must be unique, so I choose the name "A Cars", "A Devices" etc. here. So that the users are shown a somewhat friendlier name, the parameter "-DisplayName" is only "Rooms" or "Devices". The parameter "-DisplayName" may occur more than once. So there are no problems if a location B is created. The parameter "-RecipientContainer" points to the organizational unit in the Active Directory in which the respective mailboxes or distribution lists are stored. The parameter "-IncludedRecipients" specifies which recipient types are to be included in the address list. #
Example 2 (address lists by recipient type)
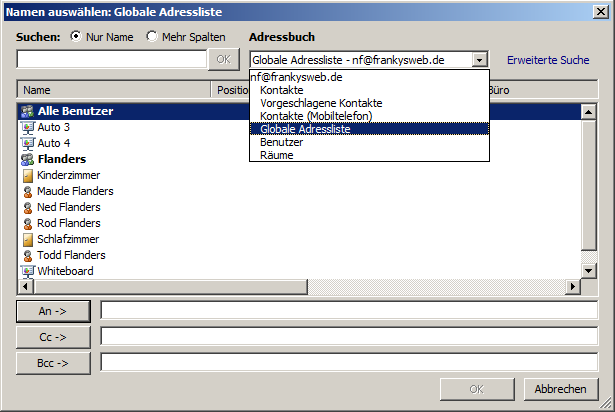
Another option is to nest the address lists according to recipient types, as in this example. The separation is made here according to the recipient types (e.g. users or devices), under the respective categories of the recipient types there is a location-specific address list such as "A user, B user etc.".)
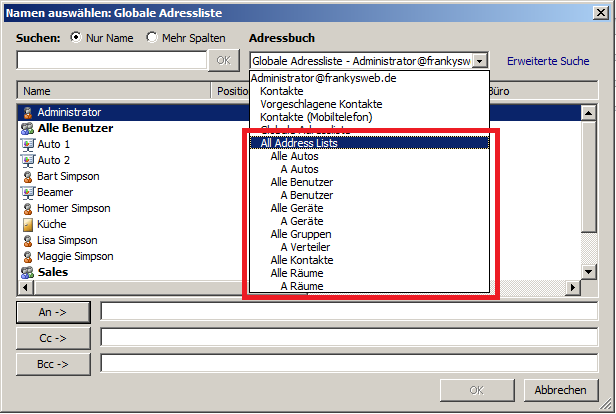
And this is how this construct would look in Outlook Web Access. As can be seen here, there is hardly any difference for the user, as the address lists are sorted alphabetically as described above.
The structure of the Active Directory has not been changed for this and is still as shown above. Only the nesting of the address lists has been changed. To create the address lists as above, these commands were executed:
new-AddressList -Name 'All devices' -IncludedRecipients 'Resources' -Container '\' -DisplayName 'All devices'
new-AddressList -Name 'All cars' -IncludedRecipients 'Resources' -Container '\' -DisplayName 'All cars'
new-AddressList -Name 'A Rooms' -RecipientContainer 'frankysweb.local/Location A/Resources/Rooms' -IncludedRecipients 'Resources' -Container '\All Rooms' -DisplayName 'A Rooms'
new-AddressList -Name 'A User' -RecipientContainer 'frankysweb.local/Location A/User' -IncludedRecipients 'MailboxUsers, MailUsers' -Container '\All Users' -DisplayName 'A User'
new-AddressList -Name 'A Autos' -RecipientContainer 'frankysweb.local/Location A/Resources/Cars' -IncludedRecipients 'Resources' -Container '\All Cars' -DisplayName 'A Autos'
new-AddressList -Name 'A Distributor' -RecipientContainer 'frankysweb.local/Location A/Distributor' -IncludedRecipients 'MailGroups' -Container '\All Groups' -DisplayName 'A Distributor'
new-AddressList -Name 'A Devices' -RecipientContainer 'frankysweb.local/Location A/Resources/Devices' -IncludedRecipients 'Resources' -Container '\All Devices' -DisplayName 'A Devices'
These two examples work with all Exchange Server 2010 versions. Service Pack 2 for Exchange Server 2010 is required for the next example.
Example 3 (address list guidelines)
Here comes a function that many have sorely missed in Exchange 2010: Address list policies. Many people also know the term as "separation" or "multi-tenancy". Roughly explained: With address list policies, the Exchange administrator can define which address lists are visible to which users. In this way, several mail domains (clients) can be created in an Exchange organization without users of mail domain A being able to access address lists of mail domain B. To illustrate this, I extend my Active Directory structure to include location B. The AD now looks as follows:

The example deals with 2 separate locations (A and B), users at location A should only receive the address lists intended for them, just like users at location B. In addition to the location-specific address lists, users should be able to use global address lists. This setup is useful for companies with sub-domains or many locations. Address policies are used for this purpose, more on this in a moment. In Outlook 2010, the separation looks like this:
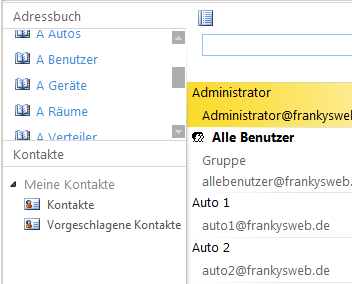
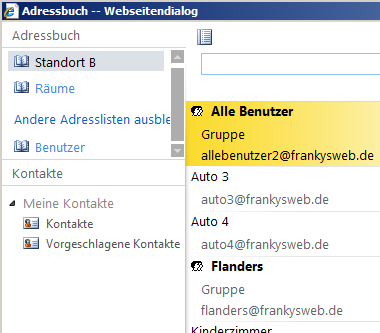
The address policy "Location A" has been assigned to the user Administrator, this user now only sees the address lists of the respective location, in this case the users of "Location A"

Only the address lists configured for the user in the address policy are displayed:
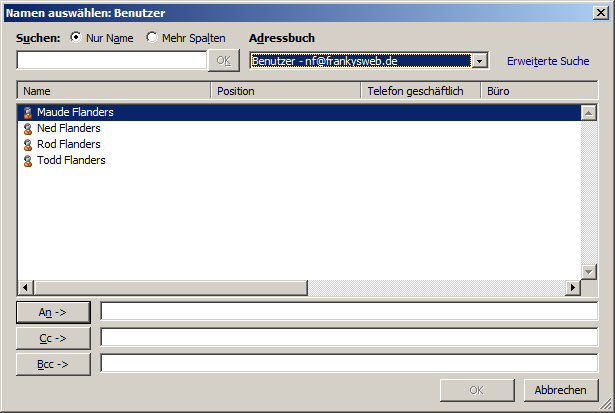
Here from the perspective of user "Ned Flanders", he also only sees his respective address lists:
Even the duplicate display names are no longer a problem. This example is also suitable for OWA
The address lists were created as follows this time:
New-GlobalAddressList "Location A" -RecipientFilter {(Alias -ne $null) -and (((ObjectClass -eq 'user') -or (ObjectClass -eq 'contact') -or (ObjectClass -eq 'msExchSystemMailbox') -or (ObjectClass -eq 'msExchDynamicDistributionList') -or (ObjectClass -eq 'group') -or (ObjectClass -eq 'publicFolder')))} -RecipientContainer 'frankysweb.local/Location A'
New-GlobalAddressList "Location B" -RecipientFilter {(Alias -ne $null) -and (((ObjectClass -eq 'user') -or (ObjectClass -eq 'contact') -or (ObjectClass -eq 'msExchSystemMailbox') -or (ObjectClass -eq 'msExchDynamicDistributionList') -or (ObjectClass -eq 'group') -or (ObjectClass -eq 'publicFolder')))} -RecipientContainer 'frankysweb.local/Location B'
new-AddressList -Name 'A User' -RecipientContainer 'frankysweb.local/Location A/User' -IncludedRecipients 'MailboxUsers, MailUsers' -Container '\' -DisplayName 'User'
new-AddressList -Name 'B User' -RecipientContainer 'frankysweb.local/Location B/User' -IncludedRecipients 'MailboxUsers, MailUsers' -Container '\' -DisplayName 'User'
new-AddressList -Name 'A Rooms' -RecipientContainer 'frankysweb.local/Location A/Resources/Rooms' -IncludedRecipients 'Resources' -Container '\' -DisplayName 'Rooms'
new-AddressList -Name 'B Rooms' -RecipientContainer 'frankysweb.local/Location B/Resources/Rooms' -IncludedRecipients 'Resources' -Container '\' -DisplayName 'Rooms'
new-OfflineAddressBook -Name 'Site A' -Server 'EX01' -AddressLists '\A User' -PublicFolderDistributionEnabled $false -VirtualDirectories 'EX01\OAB (Default Web Site)'
new-OfflineAddressBook -Name 'Site B' -Server 'EX01' -AddressLists '\B User' -PublicFolderDistributionEnabled $false -VirtualDirectories 'EX01\OAB (Default Web Site)'
new-AddressBookPolicy -Name 'Location A' -GlobalAddressList '\Location A' -OfflineAddressBook '\Location A' -RoomList '\A Rooms' -AddressLists '\A Users'
new-AddressBookPolicy -Name 'Location B' -GlobalAddressList '\Location B' -OfflineAddressBook '\Location B' -RoomList '\B Rooms' -AddressLists '\B Users'
Set-Mailbox "nf" -AddressBookPolicy "Location B"
As already mentioned, Service Pack 2 for Exchange Server 2010 is required for the address policies. For the sake of simplicity, I have not created all address lists, in examples 1 and 2 there are still address lists for devices and cars, I have omitted these lists here.
The next article will deal with address guidelines in detail and is currently in progress.

Hallo Frank,
Ich weiß Exchange 2010 ist schon älter…. ich habe trotzdem ein Problem bei den Adresslisten…
Wie kann ich z.B. in einer globalen Adressliste eine Spalte, in diesem Fall den Alias, ausblenden?
VG Michael
Hi,
sorry für die Späte meldung.
Ich benutze Outlook 2010 Version 14.0.6112.500 (32-Bit).
Danke!
Gruß
Hans
Hi Frank,
erstmals danke für den super blog. Hab ich schon sehr oft benötigt.
Ich will so ein szenario so wie in Bsp. 3. Das Problem ist in OWA funktioniert es ohne Probleme, aber von Outlook aus sehe ich wieder die ganze Globale Adressliste. Hab ich was vergessen zu machen?
Gruß,
Hans
Hallo,
welche Outlook Version setzt du ein?
Gruß Frank
Hi Frank,
kein Problem, habe den Fehler mittlerweile auch gefunden :-)
Der Admin ist in der Standard-OU Users. Verschieben?
Grüße,
André
Hi Frank,
danke für das super Tutorial. Ich habe mich gerade an Beispiel 3 verausgabt, habe allerdings das Problem, dass mir bei Standort A in der globalen Adressliste des Benutzers aus Standort A immer noch der Administrator und das Discoverysuchpostfach anstatt den Objekten aus Standort A. Wo muss ich noch Hand anlegen?
Ansonsten ist mir aufgefallen, dass der erste und zweite Powershellbefehl zum Anlegen einer globalen Adressliste per Copy and Paste einen Fehler bringt:
—
Invoke-Command : Der Parameter „RecipientFilter“ kann nicht an das Ziel gebunden werden. Ausnahme beim Festlegen von „R
ecipientFilter“: „Ungültige Filtersyntax. Eine Beschreibung der Syntax für Filterparameter finden Sie in der Hilfe zum
Befehl.
‚(Alias -ne $null) -and (((ObjectClass -eq ‚user‘) -or (ObjectClass -eq ‚contact‘) -or (ObjectClass -eq ‚msExchSystemMa
ilbox‘) -or (ObjectClass -eq ‚msExchDynamicDistributionList‘) -or (ObjectClass -eq ‚group‘) -or (ObjectClass -eq ‚publi
cFolder‘)))‘ an Position 43.“
Bei C:\Users\administrator.C1\AppData\Roaming\Microsoft\Exchange\RemotePowerShell\c1-exch01.c1.local\c1-exch01.c1.local
.psm1:26900 Zeichen:29
+ $scriptCmd = { & <<<< $script:InvokeCommand `
+ CategoryInfo : WriteError: (:) [New-GlobalAddressList], ParameterBindingException
+ FullyQualifiedErrorId : ParameterBindingFailed,Microsoft.Exchange.Management.SystemConfigurationTasks.NewGlobalA
ddressList
—-
Ich habe dann die globale Adressliste mit
New-GlobalAddressList "Standort A" -RecipientFilter {(Alias -ne $null) -and (ObjectClass -eq 'user
')} -RecipientContainer 'domäne.local/Standort A'
angelegt.
Liegt evtl. hier der Fehler mit meiner globalen Adressliste?
Danke Dir und Grüße,
André
Hi,
es folgt noch ein detailierter Artikel zu Adressrichtlinien, der Befehl funktioniert bei dir nicht, da die Anführungszeichen falsch gesetzt werden, wenn du die Befehle aus dem Artikel kopierst. Das muss ich noch beheben :-)
Guck dir in der Fehlermeldung mal ‚User‘ an, da siehst du es :-) Bin da auch schon böse drauf reingefallen, aber vergesse jedesmal den Fehler vom Blog zu suchen, Sorry :)
In welcher OU befindet sich bei dir denn der User Administrator?
Gruß,
Frank