

There are several ways to organize address lists with Exchange 2010. Which one is the right choice for your Exchange organization must be decided depending on the structure. Here I present 3 ways in which address lists can be created and managed.
Example 1 (address lists by location)
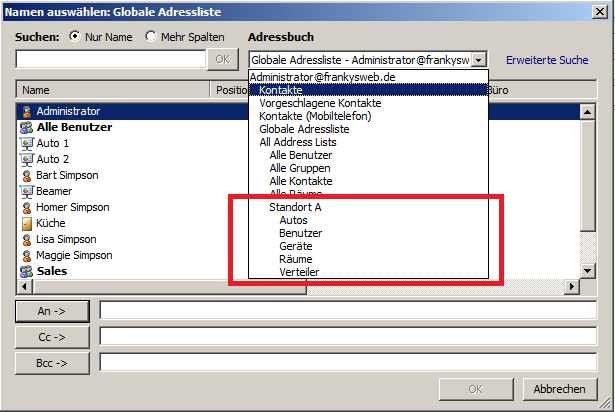
In the Exchange Management Console, new address lists are created and nested within the existing address lists, for example to separate resource types from each other or to delimit locations. For example, a subdivision in Outlook 2010 could look like this

This is how the first example appears in Outlook Web App (OWA)
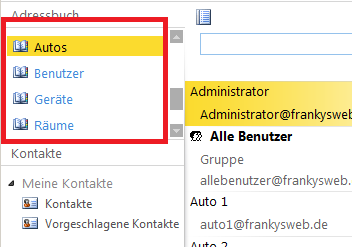

Unfortunately, OWA does not perform as well here as Outlook 2010. The address list window is static and cannot be resized. With many address lists, this means a lot of scrolling in a small window. In addition, all address lists are listed alphabetically. The nice nesting is gone and with it the logical assignment to location A as in Outlook 2010. If there are several locations, there are several address lists with the same name in OWA that are displayed one below the other. This is of course confusing for a user and hardly practicable. An identification feature for the location would therefore have to be included so that users can also find their way around OWA. In small environments with only one location, however, it may make sense to arrange the address lists in this or a similar way.
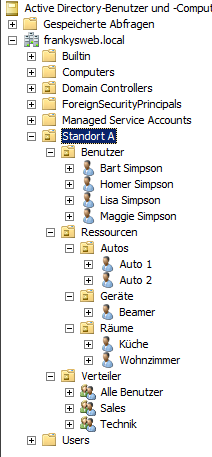
There are several ways to implement this example; it depends largely on the structure and organization of the Active Directory and which filters are set for the address lists. In my test environment, the structure of the Active Directory looks like this:

I have therefore created the address lists as follows
new-AddressList -Name ‚Standort A‘ -RecipientContainer ‚frankysweb.local/Standort A‘ -IncludedRecipients ‚AllRecipients‘ -Container ‚\‘ -DisplayName ‚Standort A‘
new-AddressList -Name ‚A Räume‘ -RecipientContainer ‚frankysweb.local/Standort A/Ressourcen/Räume‘ -IncludedRecipients ‚Resources‘ -Container ‚\Standort A‘ -DisplayName ‚Räume‘
new-AddressList -Name ‚A Autos‘ -RecipientContainer ‚frankysweb.local/Standort A/Ressourcen/Autos‘ -IncludedRecipients ‚Resources‘ -Container ‚\Standort A‘ -DisplayName ‚Autos‘
new-AddressList -Name ‚A Geräte‘ -RecipientContainer ‚frankysweb.local/Standort A/Ressourcen/Geräte‘ -IncludedRecipients ‚Resources‘ -Container ‚\Standort A‘ -DisplayName ‚Geräte‘
new-AddressList -Name ‚A Benutzer‘ -RecipientContainer ‚frankysweb.local/Standort A/Benutzer‘ -IncludedRecipients ‚MailboxUsers, MailUsers‘ -Container ‚\Standort A‘ -DisplayName ‚Benutzer‘
new-AddressList -Name ‚A Verteiler‘ -RecipientContainer ‚frankysweb.local/Standort A/Verteiler‘ -IncludedRecipients ‚MailGroups‘ -Container ‚\Standort A‘ -DisplayName ‚Verteiler‘
Der Parameter „–Name“ gibt den Namen der Adressliste an, dieser Name muss eindeutig sein, daher wähle ich hier den Namen „A Autos“, „A Geräte“ usw. Damit die Benutzer einen etwas freundlicheren Namen angezeigt bekommen, lautet der Parameter „-DisplayName“ nur „Räume“ bzw „Geräte“. Der Parameter „-Displayname“ darf mehrfach vorkommen. Es gibt also keine Probleme wenn ein Standort B angelegt wird. Der Parameter „-RecipientContainer“ zeigt auf die Organisationseinheit im Active Directory in der die jeweiligen Postfächer oder Verteiler gespeichert sind. Der Parameter „-IncludedRecipients“ gibt an, welche Empfänger Typen in die Adressliste aufgenommen werden soll. #
Example 2 (address lists by recipient type)
Eine weitere Möglichkeit ist die Verschachtelung der Adresslisten nach Empfängertypen wie in diesem Beispiel. Die Trennung erfolgt hier nach den Empfängertypen (z.B. Benutzer oder Geräte), unter den jeweiligen Kategorien der Empfängertypen findet sich eine Standortspezifische Adresslisten wie „A Benutzer, B Benutzer usw.)
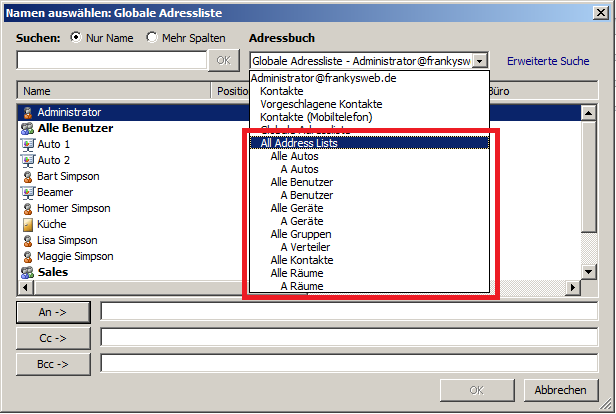

And this is how this construct would look in Outlook Web Access. As can be seen here, there is hardly any difference for the user, as the address lists are sorted alphabetically as described above.

The structure of the Active Directory has not been changed for this and is still as shown above. Only the nesting of the address lists has been changed. To create the address lists as above, these commands were executed:
new-AddressList -Name ‚Alle Geräte‘ -IncludedRecipients ‚Resources‘ -Container ‚\‘ -DisplayName ‚Alle Geräte‘
new-AddressList -Name ‚Alle Autos‘ -IncludedRecipients ‚Resources‘ -Container ‚\‘ -DisplayName ‚Alle Autos‘
new-AddressList -Name ‚A Räume‘ -RecipientContainer ‚frankysweb.local/Standort A/Ressourcen/Räume‘ -IncludedRecipients ‚Resources‘ -Container ‚\Alle Räume‘ -DisplayName ‚A Räume‘
new-AddressList -Name ‚A Benutzer‘ -RecipientContainer ‚frankysweb.local/Standort A/Benutzer‘ -IncludedRecipients ‚MailboxUsers, MailUsers‘ -Container ‚\Alle Benutzer‘ -DisplayName ‚A Benutzer‘
new-AddressList -Name ‚A Autos‘ -RecipientContainer ‚frankysweb.local/Standort A/Ressourcen/Autos‘ -IncludedRecipients ‚Resources‘ -Container ‚\Alle Autos‘ -DisplayName ‚A Autos‘
new-AddressList -Name ‚A Verteiler‘ -RecipientContainer ‚frankysweb.local/Standort A/Verteiler‘ -IncludedRecipients ‚MailGroups‘ -Container ‚\Alle Gruppen‘ -DisplayName ‚A Verteiler‘
new-AddressList -Name ‚A Geräte‘ -RecipientContainer ‚frankysweb.local/Standort A/Ressourcen/Geräte‘ -IncludedRecipients ‚Resources‘ -Container ‚\Alle Geräte‘ -DisplayName ‚A Geräte‘
These two examples work with all Exchange Server 2010 versions. Service Pack 2 for Exchange Server 2010 is required for the next example.
Example 3 (address list guidelines)
Hier kommt nun eine Funktion die viele schmerzlich in Exchange 2010 vermisst haben: Adresslistenrichtlinien. Viele kennen den Begriff auch unter „Separation“ oder „Mandantenfähigkeit“. Grob erklärt: Mit Adresslistenrichtlinien, kann der Exchange Administrator festlegen, welche Adresslisten für welche Benutzer sichtbar sind. So können auch in einer Exchange Organisation mehrere Maildomänen (Mandanten) geschaffen werden, ohne das Benutzer der Maildomäne A auf Adresslisten der Maildomäne B zugreifen können. Um das zu verdeutlichen erweitere ich meine Active Directory Struktur um den Standort B. Das AD sieht nun wie folgt aus:


The example deals with 2 separate locations (A and B), users at location A should only receive the address lists intended for them, just like users at location B. In addition to the location-specific address lists, users should be able to use global address lists. This setup is useful for companies with sub-domains or many locations. Address policies are used for this purpose, more on this in a moment. In Outlook 2010, the separation looks like this:
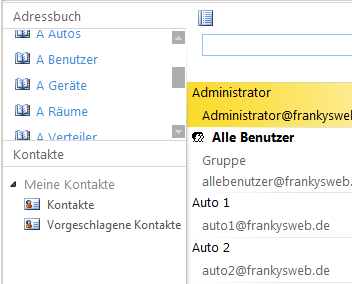
Dem Benutzer Administrator wurde die Adressrichtlinie „Standort A“ zugewiesen, dieser Benutzer sieht nun nur noch die Adresslisten des jeweiligen Standorts, in diesem Fall die Benutzer von „Standort A“


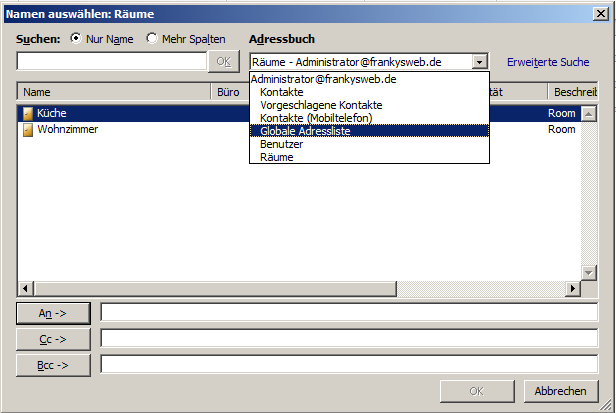
Only the address lists configured for the user in the address policy are displayed:

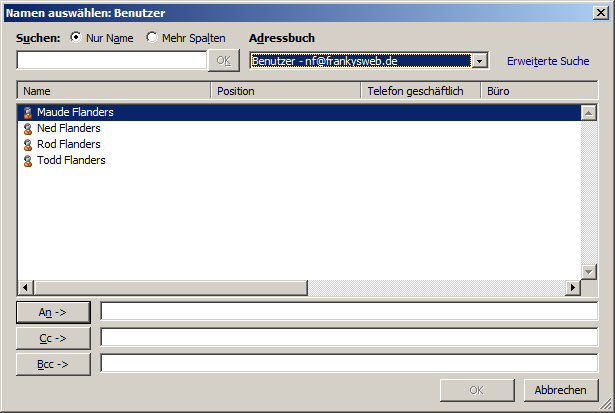
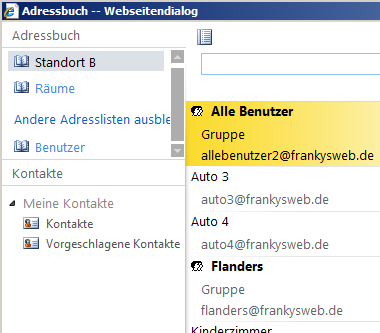
Hier mal aus der Sicht von Benutzer „Ned Flanders“, auch er sieht nur seine jeweiligen Adresslisten:
Even the duplicate display names are no longer a problem. This example is also suitable for OWA

The address lists were created as follows this time:
New-GlobalAddressList „Standort A“ -RecipientFilter {(Alias -ne $null) -and (((ObjectClass -eq ‚user‘) -or (ObjectClass -eq ‚contact‘) -or (ObjectClass -eq ‚msExchSystemMailbox‘) -or (ObjectClass -eq ‚msExchDynamicDistributionList‘) -or (ObjectClass -eq ‚group‘) -or (ObjectClass -eq ‚publicFolder‘)))} -RecipientContainer ‚frankysweb.local/Standort A‘
New-GlobalAddressList „Standort B“ -RecipientFilter {(Alias -ne $null) -and (((ObjectClass -eq ‚user‘) -or (ObjectClass -eq ‚contact‘) -or (ObjectClass -eq ‚msExchSystemMailbox‘) -or (ObjectClass -eq ‚msExchDynamicDistributionList‘) -or (ObjectClass -eq ‚group‘) -or (ObjectClass -eq ‚publicFolder‘)))} -RecipientContainer ‚frankysweb.local/Standort B‘
new-AddressList -Name ‚A Benutzer‘ -RecipientContainer ‚frankysweb.local/Standort A/Benutzer‘ -IncludedRecipients ‚MailboxUsers, MailUsers‘ -Container ‚\‘ -DisplayName ‚Benutzer‘
new-AddressList -Name ‚B Benutzer‘ -RecipientContainer ‚frankysweb.local/Standort B/Benutzer‘ -IncludedRecipients ‚MailboxUsers, MailUsers‘ -Container ‚\‘ -DisplayName ‚Benutzer‘
new-AddressList -Name ‚A Räume‘ -RecipientContainer ‚frankysweb.local/Standort A/Ressourcen/Räume‘ -IncludedRecipients ‚Resources‘ -Container ‚\‘ -DisplayName ‚Räume‘
new-AddressList -Name ‚B Räume‘ -RecipientContainer ‚frankysweb.local/Standort B/Ressourcen/Räume‘ -IncludedRecipients ‚Resources‘ -Container ‚\‘ -DisplayName ‚Räume‘
new-OfflineAddressBook -Name ‚Standort A‘ -Server ‚EX01‘ -AddressLists ‚\A Benutzer‘ -PublicFolderDistributionEnabled $false -VirtualDirectories ‚EX01\OAB (Default Web Site)‘
new-OfflineAddressBook -Name ‚Standort B‘ -Server ‚EX01‘ -AddressLists ‚\B Benutzer‘ -PublicFolderDistributionEnabled $false -VirtualDirectories ‚EX01\OAB (Default Web Site)‘
new-AddressBookPolicy -Name ‚Standort A‘ -GlobalAddressList ‚\Standort A‘ -OfflineAddressBook ‚\Standort A‘ -RoomList ‚\A Räume‘ -AddressLists ‚\A Benutzer‘
new-AddressBookPolicy -Name ‚Standort B‘ -GlobalAddressList ‚\Standort B‘ -OfflineAddressBook ‚\Standort B‘ -RoomList ‚\B Räume‘ -AddressLists ‚\B Benutzer‘
Set-Mailbox „nf“ -AddressBookPolicy „Standort B“
As already mentioned, Service Pack 2 for Exchange Server 2010 is required for the address policies. For the sake of simplicity, I have not created all address lists, in examples 1 and 2 there are still address lists for devices and cars, I have omitted these lists here.
The next article will deal with address guidelines in detail and is currently in progress.