With Exchange Server 2016 CU11, the requirements have changed somewhat, so here is an updated HowTo for installing Exchange 2016 from CU11 on Windows Server 2016. This HowTo is not an update of an existing installation, but a new/first installation on Windows Server 2016. A HowTo for updating Exchange installations can be found here here.
Exchange 2016 can only be installed on Windows Server 2016 with GUI (Desktop Experience). Server 2016 Core and Nano Server are not supported. The Active Directory forest functional level must be at least Windows Server 2008 R2. Older function levels are no longer supported.
Exchange 2016 CU11 supports .NET Framework version 4.7.2. Newer NET Framework versions can cause problems and should therefore not be installed. Here it is important to Exchange Support Matrix to be checked.
Prepare Windows Server 2016
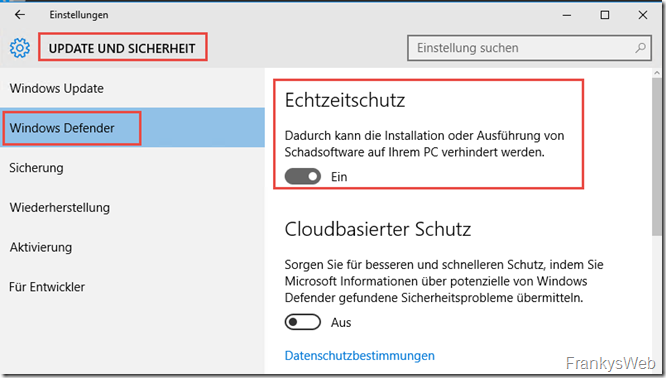
Windows Defender should be temporarily deactivated before the Exchange Server installation. Otherwise the installation may take longer and cause other problems:

After the Exchange installation, Windows Defender can be configured accordingly and switched on again (see below).
Set fixed page file
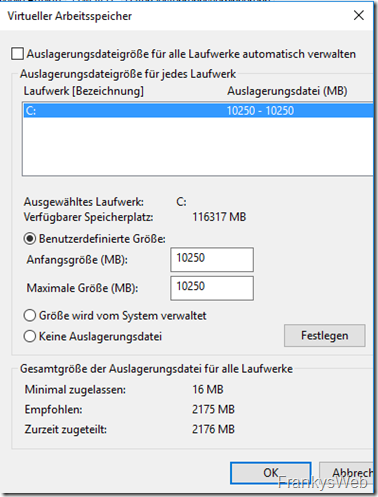
The size of the swap file should be set to the size of the RAM plus 10 MB. With 10 GB RAM (10240 MB + 10 MB), this results in a fixed swap file size of 10250 MB:

If the Exchange Server has 32 GB or more RAM, the maximum size for the page file is 32778 MB. With 64 GB RAM, the maximum size for the page file is 32778 MB.
NoteExchange Server should not have more than 196 GB RAM, if Exchange is operated on physical servers, HyperThreading should be deactivated.
Depending on the environment and storage, it may make sense to place the page file on a separate disk. If the page file is located on drive C: as shown above, C: should be sized accordingly.
I recommend using a separate disk for the installation of Exchange. Whether this is a separate virtual hard disk or a separate array/JBOD depends on the environment.
For virtual Exchange servers, for example, a typical setup would be
- C: VMDK or VHDX on controller 1 for the operating system (~70GB + page file GB)
- D: VMDK or VHDX to Controller 1 for Exchange installation (150 GB)
- E: VMDK or VHDX to controller 2 for databases / logs
Install Exchange prerequisites
Exchange requires some Windows features as a prerequisite for the installation, these can be easily installed via PowerShell:
Install-WindowsFeature NET-WCF-HTTP-Activation45, RPC-over-HTTP-proxy, RSAT-Clustering, RSAT-Clustering-CmdInterface, RSAT-Clustering-Mgmt, RSAT-Clustering-PowerShell, Web-Mgmt-Console, WAS-Process-Model, Web-Asp-Net45, Web-Basic-Auth, Web-Client-Auth, Web-Digest-Auth, Web-Dir-Browsing, Web-Dyn-Compression, Web-Http-Errors, Web-Http-Logging, Web-Http-Redirect, Web-Http-Tracing, Web-ISAPI-Ext, Web-ISAPI-Filter, Web-Lgcy-Mgmt-Console, Web-Metabase, Web-Mgmt-Console, Web-Mgmt-Service, Web-Net-Ext45, Web-Request-Monitor, Web-Server, Web-Stat-Compression, Web-Static-Content, Web-Windows-Auth, Web-WMI, Windows-Identity-Foundation, RSAT-ADDS

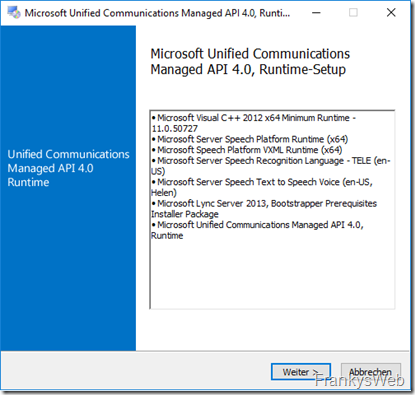
After installing the Windows features, UCMA Runtime 4 must be installed:
Unified Communications Managed API 4.0 Runtime

Exchange 2016 CU11 supports .NET Framework 4.7.2, which is not yet part of the Windows Server GUI installation. NET Framework 4.7.2 can either be installed via Windows Update or via Offline Installer. The corresponding download can be found here:

Neu mit CU11 ist die Voraussetzung der Visual C++ Runtimes, diese beiden müssen ebenfalls installiert werden:
- Visual C++ Redistributable für Visual Studio 2012 Update 4
- Visual C++ Redistributable Packages für Visual Studio 2013
The server should now be restarted and then the Exchange installation can begin.
Active Directory Schema Update
For larger Active Directory environments with several locations and AD domains, the schema update for Exchange must be carried out manually and full replication must be awaited.
In small environments with only one domain and at the same location, the schema update can usually also be carried out by the Exchange setup.
To update the Active Directory schema and prepare all domains in the forest, the following commands can be used (Setup.exe is located in the Exchange ISO):
Setup.exe /PrepareSchema /IAcceptExchangeServerLicenseTerms
Setup.exe /PrepareAD /OrganizationName: "ExchangeOrganizationName" /IAcceptExchangeServerLicenseTerms
Setup.exe /PrepareAllDomains /IAcceptExchangeServerLicenseTerms
Further information on the scheme update can be found here:
Install Exchange 2016
The installation is easy after the preparation, so here are just the screenshots and a short comment if necessary.
As a rule, there is no need to search for updates if the current CU is already being used for installation:


I always select "Do not use recommended settings" at this point, as this allows me to specify the installation path and the name of the organization:

As Exchange 2016 only has the mailbox role (with the exception of the Edge role), only the mailbox role needs to be selected here:

I install Exchange on the D: drive. This means that there are no logs, performance data, queues, etc. on drive C:

The name of the organization can now be defined here:

I have not had any good experiences with the built-in Exchange malware filter. I therefore deactivate the feature. Which setting is used here is up to you:

In small environments with, for example, only one Active Directory domain and one location, Exchange Setup can extend the AD schema. In larger environments with several locations and/or several domains, the schema update should be carried out manually before installation and the complete replication should be awaited:

The Exchange setup then requires some patience, the installation of a server in my test environment always takes about 45 minutes

After the Exchange installation
After installation, the basic configuration of Exchange must be carried out promptly. The reason for this is that Autodiscover is already offered via Active Directory SCP. As Exchange 2016 still uses a self-signed certificate after installation, certificate errors may occur in Outlook.
Finalize Exchange configuration
The basic configuration for a new Exchange installation can be found here:
- Exchange 2016: The basic configuration
- The HowTos for migrating from Exchange 2016 can be found here:
- Howto: Migration from Exchange 2010 to Exchange 2016
HowTo: Migration from Exchange 2013 to Exchange 2016
Configure Windows Defender
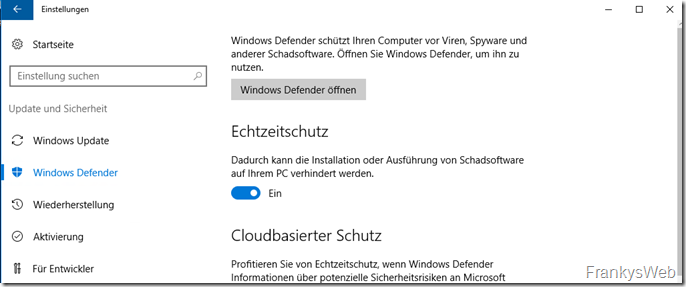
Windows Defender is activated by default on Windows Server 2016. As Exchange Server requires some exclusions from the virus scanner, these must also be stored accordingly in Windows Defender. The same applies to virus scanners from other manufacturers.
The following information can be found on the Exchange Team Blog:
Windows Defender is on by default in Windows Server 2016. Attention to malware settings is particularly important with Exchange to avoid long processing times during installation and upgrade, as well as unexpected performance issues. The Exchange team recommends the Exchange installation and setup log folders be excluded from scanning in Windows Defender and other Anti-Virus software. Exchange noderunner processes should also be excluded from Windows Defender.
Source: Exchange Team Blog
The exclusions for Exchange 2016 are documented here in Technet:
However, the list is long, so Exchange MVP Paul Cunningham has published a script that clearly sorts the folders, processes and file types into 3 files. You can download the script here:
To avoid having to enter all exclusions manually in Windows Defender, I have created a script that uses the files from Paul's script and adds the exclusions to Windows Defender via PowerShell:
Once the exceptions have been entered, Windows Defender can be reactivated.

Unfortunately, Windows Defender has proven itself in the past. not necessarily covered in glory. I therefore advise you to uninstall Windows Defender if you install another virus scanner:
And what about errors during installation?
During the installation, the Exchange Setup stores very detailed logs in the "C:\ExchangeSetupLogs" directory. The file "C:\ExchangeSetupLogs\ExchangeSetup.log" in particular provides valuable information if the installation goes wrong.

In the event of an error, the log should be reviewed at your leisure. The log usually contains very precise information on why the setup failed. Once the problem has been resolved, the setup can be restarted. The installation will then continue from the point at which it was interrupted (provided the problem has been resolved).
Note: With virtual servers, some people tend to simply delete the VM in the event of an error and "start again from the beginning". This is rather counterproductive in the case of an aborted Exchange installation, as in most cases Setup has already made settings in the Active Directory. You would then have to clean up "corpses" again. It therefore makes more sense to analyze the above log and fix the original problem. As a rule, the newly started setup will then also run through.
Hallo Frank,
oh dann habe ich ja noch ein viel größeres Problem.
Mich wundert nur, dass es ca. 1 Jahr ohne Probleme lief.
Na dann bleibt mir nur die Migration auf Exchange 2019.
Danke für den Hinweis.
Gruß
Fani
Hallo Frank,
ich habe auch das Problem „Die Windows-Komponente Server-Gui-Mgmt-Infra ist nicht auf diesem Computer installiert. Sie muss installiert werden, bevor das Exchange-Setup gestartet werden kann.“ und komme trotz deiner guten Anleitung nicht weiter. Habe das UcmaRuntimeSetup heruntergeladen, beim Start kommt wollen sie deinstallieren, also muss es ja eigentlich drauf sein. Deinstallation, Neustart, Installation, Neustart hat auch nichts gebracht. Ich habe hier einen Server 2019 und Exchange 2016 cu11. Ich möchte das aktuelle cu18 installiere. Schema und AD lassen sich im Voraus ohne Fehler anpassen. Falls es eine Rolle spielt der nachfolgende Fehler „Ein nicht unterstütztes Betriebssystem wurde erkannt. Die Postfach- und Edge-Transport-Serverrollen von Exchange Server 2016 unterstützen Windows Server 2012 oder höher.“ steht noch dahinter. Die Überprüfung mit get-mailbox -Arbitration und get-mailbox -AuditLog verweist aber auf keine alten Systempostfächer. Das Exchange wurde mal aus Exchange 2010 unter Server 2008r2 migriert, sollte aber eigentlich sauber deinstalliert bzw. entfernt worden sein. Ich hoffe, ich habe es dieses Mal an der richtigen Stelle gepostet.
Vielen Dank im Voraus!
Fani
Hallo Fani,
Exchange 2016 wird nicht auf Server 2019 unterstützt.
Gruß,
Frank
Das muss ich hier mal korrigieren da ich gerade vor der gleichen Herausforderung stehe.
Ab CU12 wird der Exchange 2016 auf dem Server 2019 unterstützt!
https://docs.microsoft.com/de-de/exchange/plan-and-deploy/supportability-matrix?view=exchserver-2019
Kommando zurück. Die AD Umgebung wird unterstützt. Aber nicht das OS.
Sry…..
Hi Franky,
dumme Rückfrage von mir zu:
Neu mit CU11 ist die Voraussetzung der Visual C++ Runtimes, diese beiden müssen ebenfalls installiert werden:
Visual C++ Redistributable für Visual Studio 2012 Update 4
Visual C++ Redistributable Packages für Visual Studio 2013
…
Es reichen die x64 redist in der Installation aus (also keine x86er)?
Hi Exchanger/innen
Microsoft erwähnt im KB4134118 nur Visual Studio 2013 runtime und nicht 2012. Wieso muss man das 2012er installiert werden?
Gruss Florian
Hallo Franky,
letzte Frage vor den Feiertagen.
Wir haben hier einen Kunden EX 2016 CU5 mit .Net 4.6.1 übernommen (nur ein einzelner MB,TR Server)
Welche Reihenfolge wäre richtig um auf CU11 zu kommen:
(1) Erst .NET 4.7.2 installieren, dann CU11 oder
(2) erst CU11 dann .NET 4.7.1 oder
(3) erst der Zwischenschritt auf CU8 mit .NET 4.7.1 und dann .NET 4.7.2 installieren und dann CU11
oder oder oder?
Wie geht man fachmännisch richtig vor?
Schöne Weihnachtsfeiertage und guten Rutsch für Dich!
Hallo Oliver,
hier ist das Vorgehen beschrieben:
https://www.frankysweb.de/exchange-2013-stolperstein-beim-update-einer-alten-version-auf-das-aktuelle-cu/
Fröhliche Weihnachten,
Frank
Danke erstmal, Paket ist eingerichtet, aaaaber …
Mein Problem:
ich habe meinen Exchange hier mit ner festen IP bei mir daheim. Die Hauptdomain ist becker.ag, MX mail.becker.ag.
Der Reverseeintrag beim Provider (die sind zu blöd den richtig zu setzen, bzw. machen das nicht) ist
ip-213188106078.static.heagmedianet.de
Das führt dazu, dass einige Mailserver Mails von meinem Server ablehnen. Ich hatte mir eingebildet, dass ich über den Strato Smarthost relayen kann. Geht aber nicht. – Domain: exchangeout.de
Hat da wer mal nen Tipp wie ich das Ganze mal hinbekommen kann? – bis vor einigen Monaten stand mein Server im RZ, da war das kein Problem. Seit ich jetzt die neue Kiste – hier, dank endlich mal ner 100MBit-Anbindung, bei mir habe, gibt es da diese Probleme.
Beste Grüße aus dem Odenwald
Jörg
Hallo Jörg,
du kannst den Strato Smarthost nicht mit einer anderen Domain nutzen. Wenn du also bei Strato die Domain exchangeout.de registriert hast, kannst du nicht Mails unter dem Absender becker.ag verschicken.
Gruß,
Frank
Hallo zusammen,
wo finde ich Frankys Beschreibung für den Strato Smarthost in Verbindung mit der Sophos. Ich hab da mal was gesehen, weiß aber nicht mehr wo das war. @Franky: Welches Paket muss ich dafür bei Strato buchen?
Grüsse aus dem Odenwald
Jörg
Hallo Jörg,
in der UTM brauchst du nur den Starto Server in der EMail Protection eintragen (EMail Protection -> SMTP -> Erweitert -> Smarthost Einstellungen).
Bei Strato reciht dazu schon das kleinste Hosting Paket (Hosting Starter).
Gruß,
Frank
Hi,
gibt es eigentlich beim 2016er auch noch den „CAS-Server“?
Gruß,
Stefan
Hallo Stefan,
nein, es gibt nur noch die Mailbox Rolle (in dieser wurden Hub Transport, CAS, UM und Mailbox vereint). Separat ist lediglich die Edge Transport Rolle. Der neue Begriff ist daher „CAS-Service“ :-)
Gruß,
Frank
Tolle Anleitung!
Achtung die deutsche Version der Kompatibilitätsmatrix ist unvollständig. Gilt auch für viele andere Seiten. Nutzt lieber den link mit en-us.
Die C++ redists sind veraltet und unsicher und werden auch nicht über Windows Update aktualisiert. Siehe Günter Borns Artikel zum Thema C++.
Nutzt daher die C++ Installation von all in one Runtimes. Dort ist gegenwärtig nur C++2017 noch veraltet.
In deinem Screenshot steht 4.7.1 statt 4.7.2
Beim MS Link steht auch nur, dass 4.7.2 beim Server 2016 (1709!) supported ist?
Hallo noname,
vielen Dank für den Hinweis, den Screenshot habe ich aktualisiert. Die MS Doku ist leider noch nicht aktuell. Dies wird aber bestimmt noch angepasst.
Gruß,
Frank
Ich habe es anscheinend auf den Augen. Hätte schwören können vorhin 471 gelesen zu haben.
Es steht halt noch NICHT in der Supoort Matrix.
.NET 472 wird mit CU11 supportet.
„.NET Framework 4.7.2 is now supported with Exchange Server 2016 Cumulative Update 11. .NET Framework 4.7.2 will be required on Exchange Server 2016 with the Cumulative Update released in June, 2019.“
https://blogs.technet.microsoft.com/exchange/2018/10/16/released-october-2018-quarterly-exchange-updates/
Hallo Ralf,
richtig, wie im Artikel erwähnt wird mit CU11 .NET 4.7.2 unterstützt, habe ich es irgendwo noch keine falsche Angabe im Artikel? Wenn ja, bitte kurzen Hinweis, dann korrigiere ich es.
Gruß, Frank
Die Visual Studio Geschichte dürfte für unbelesene Admins zum Stolperstein werden. Gute Zusammenfassung, an einem Punkt habe ich noch eine Optimierung in meinen Projekten gefunden, danke Ihnen ;)