

In the second part of the migration from Exchange 2016 to Exchange 2019 CU15, Exchange 2019 was configured. This part now deals with the migration of the mailboxes to the new server. Finally, the old Exchange 2016 server can be uninstalled and the migration completed.
Migration of mailboxes
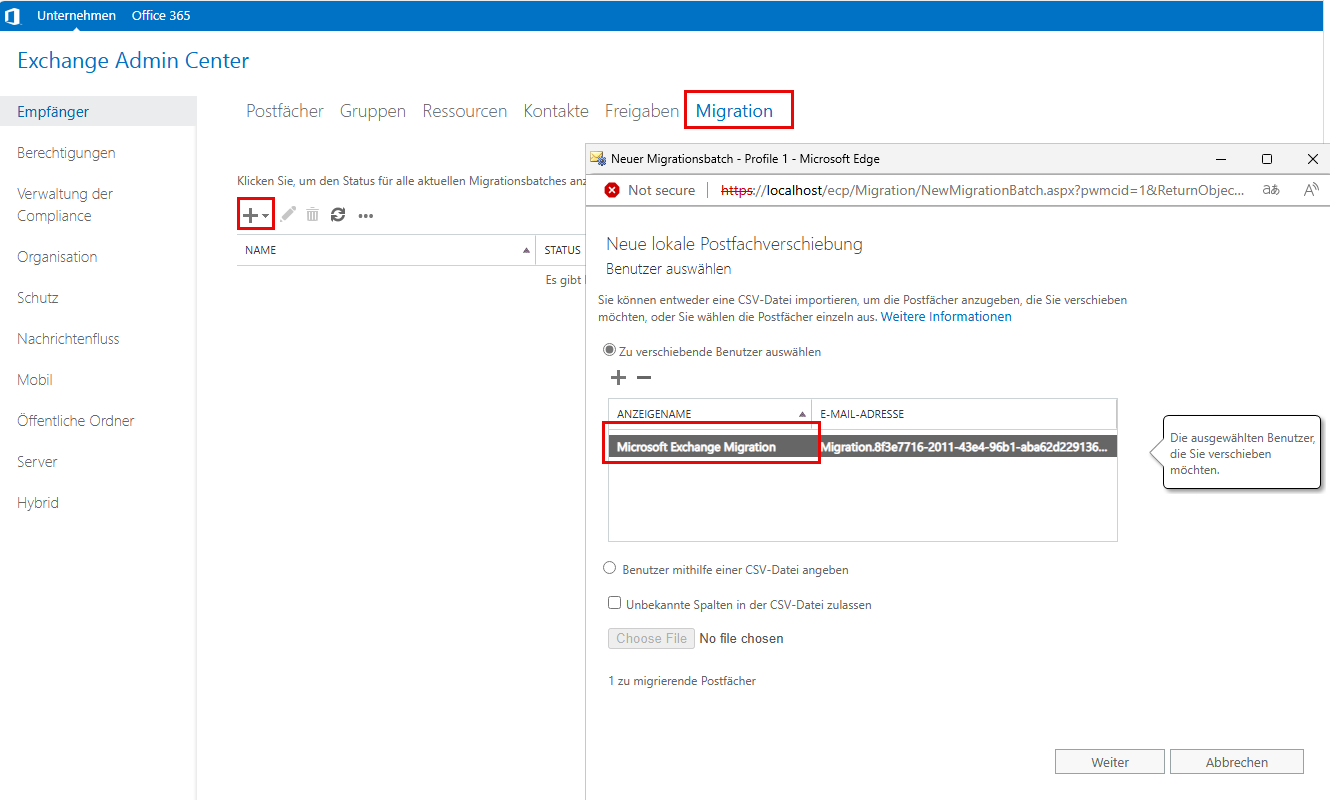
The mailboxes can be moved to the new database via the Exchange Admin Center or the Exchange Management Shell. The "Migration" tab can be found in the Exchange Admin Center. The wizard helps you to create the migration batches for moving the mailboxes. If the migration of the mailboxes is carried out via the Exchange Admin Center, make sure that the mailbox with the name "Microsoft Exchange Migration" is moved first:
The remaining mailboxes can then be moved. The path via the Exchange Admin Center has one disadvantage, however. The Exchange Admin Center creates migration batches and these are quite slow. The Exchange Admin Shell and MoveRequests are faster. Although MoveRequests are older, they run faster.
In the following, I will describe the method via the Exchange Management Shell, but both methods work without any problems and the user will not notice that their mailbox has been moved in either case. Which method is chosen is therefore ultimately irrelevant.
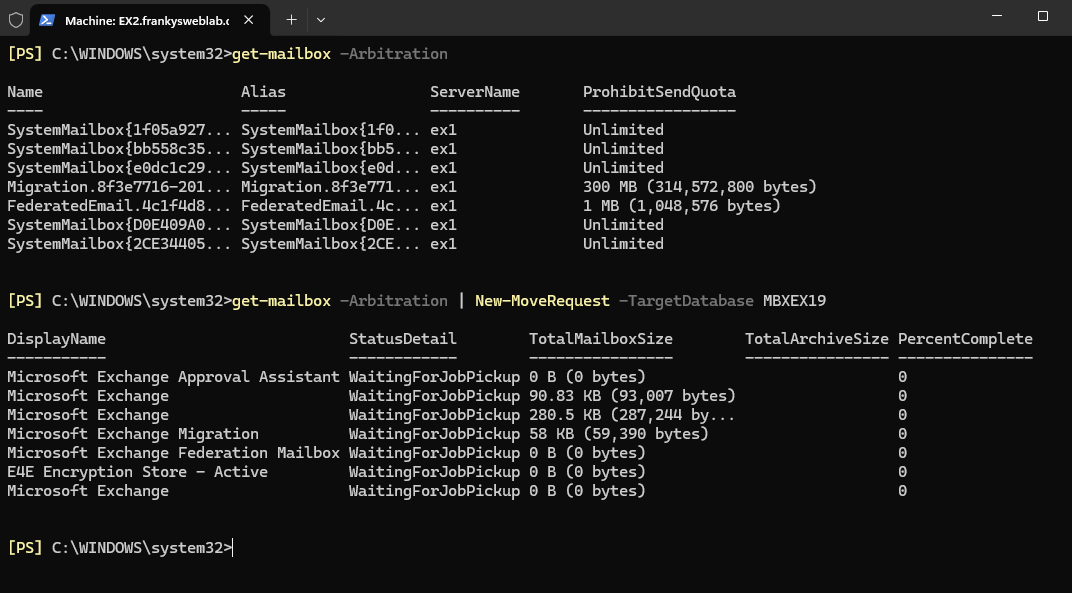
Move system mailboxes
First, the system mailboxes including the migration mailbox are moved. To do this, simply execute the following command with the Exchange 2019 database name:
get-mailbox -Arbitration | New-MoveRequest -TargetDatabase MBXEX19
As soon as the moverequests have been completed, you can continue with the remaining mailboxes. The status of the moverequests can be displayed with the following commands:
Get-MoveRequest
Get-MoveRequest | Get-MoveRequestStatistics
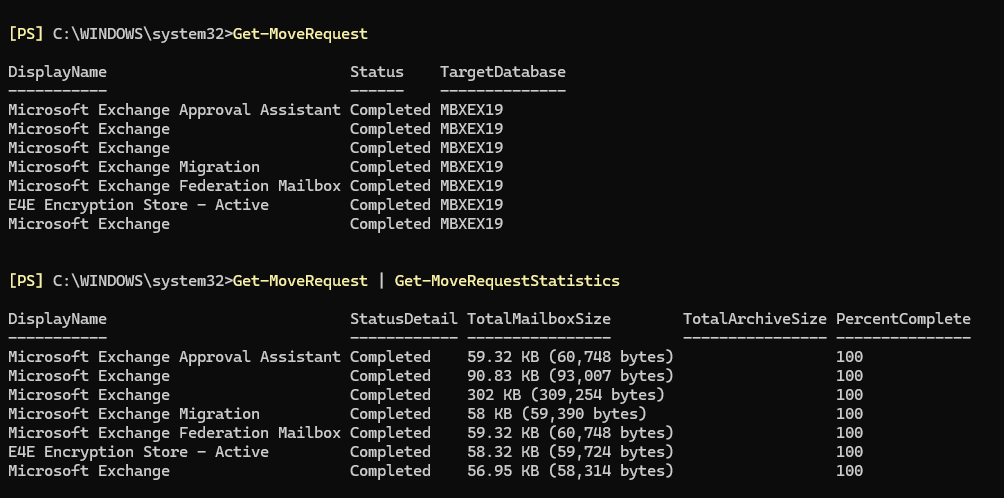
Incidentally, the Exchange Admin Center does not display the moverequets, only migration batches are visible there.
Move user mailboxes
User mailboxes can now be moved in the same way as system mailboxes:
get-mailbox -RecipientTypeDetails UserMailbox | New-MoveRequest -TargetDatabase MBXEX19

Of course, there are many ways to prioritize if you want to. When mailboxes are moved to the Exchange 2019 database, many transaction logs are generated, which are cleaned up when the database is backed up. It can therefore make sense to only move a certain number of mailboxes per day and to wait for a backup from time to time. You have to feel your way around here. If you don't feel so confident with PowerShell, you can also use the Exchange Admin Center and create your own migration batches according to your own requirements.
Move mailboxes for public folders
Mailboxes for public folders can be moved with the following command:
get-mailbox -PublicFolder | New-MoveRequest -TargetDatabase MBXEX19
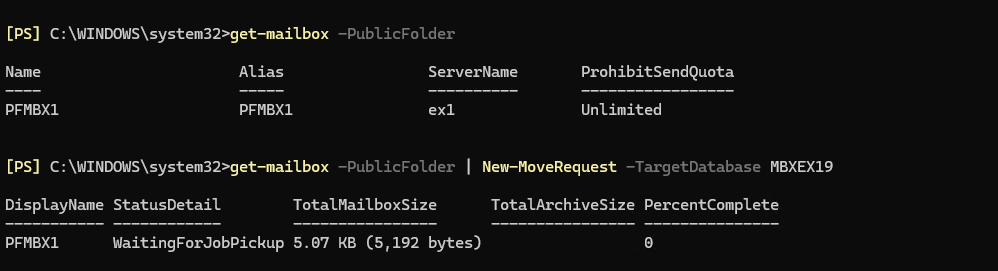
The public folders are therefore just as easy to move as all other mailboxes. This has been more difficult in the past.
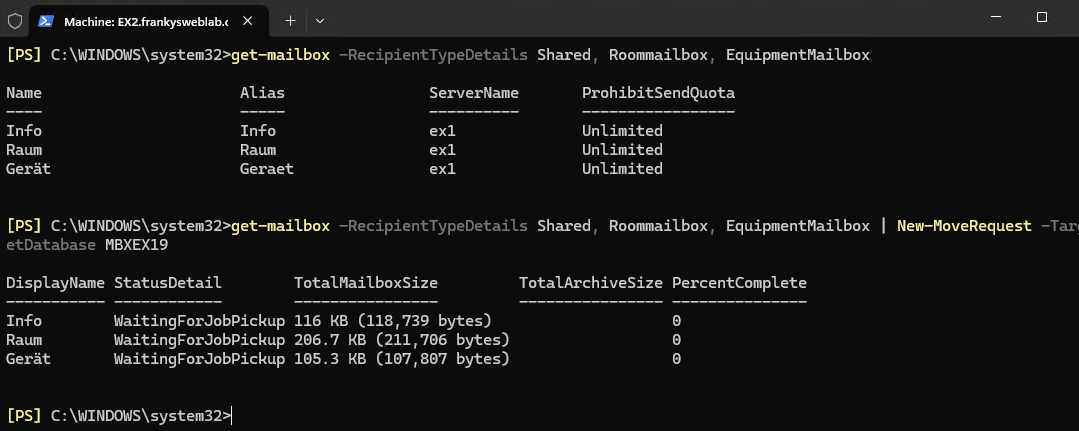
Move shared and resource mailboxes
Shared and resource mailboxes can be moved to the new database with the following command:
get-mailbox -RecipientTypeDetails Shared, Roommailbox, EquipmentMailbox | New-MoveRequest -TargetDatabase MBXEX19
Here, too, there are many options for filtering and prioritizing. If you want or need to.
Move other mailboxes
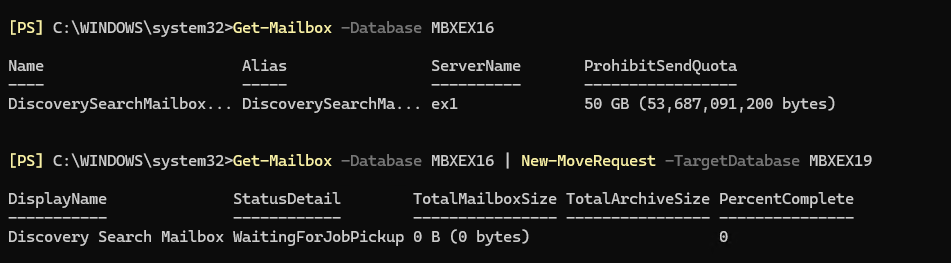
Most mailboxes can be moved using the above commands. To move all mailboxes from the old database to the new database, the following command can be used:
Get-Mailbox -Database MBXEX16 | New-MoveRequest -TargetDatabase MBXEX19
The audit mailbox can be moved with the following command:
get-mailbox -Database MBXEX16 -AuditLog | New-MoveRequest -TargetDatabase MBXEX19

No more mailboxes should now be stored in the Exchange 2016 database. If there are other Exchange 2016 databases, the MoveRequests can also be created for these using the shell or the migration batches in the Exchange Admin Center.
Exchange 2016 uninstallation
To uninstall Exchange 2016 and complete the migration, all mailboxes must be moved to the new Exchange 2019 server. The Exchange 2016 databases are therefore empty. The uninstallation can therefore now be prepared.
Check firewalls / routers / devices and port forwards
Before Exchange 2016 is uninstalled, you should check whether there are still devices such as firewalls, routers, printers, scanners, MFCs or other software that deliver mails via the Exchange 2016 server. There may also be port forwards (25,443,80) to the Exchange 2016 server which should be switched to the Exchange 2019 server now at the latest.
Exchange Message Tracking can be used to find software and devices that are still sending emails via Exchange 2016. There is a GUI or also the shell.
Remove Exchange 2016 database
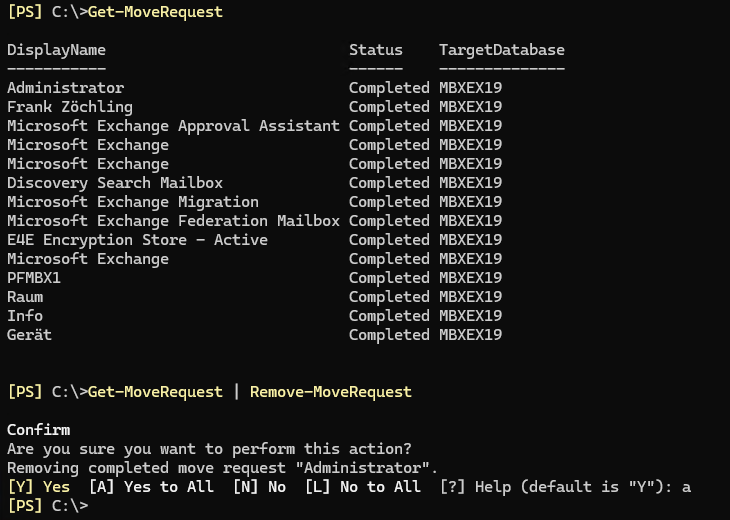
As soon as the Exchange database is empty and no longer contains any mailboxes, the MoveRequest can be deleted first:
Get-MoveRequest | Remove-MoveRequest
If migration batches have been used, they can be deleted via the Exchange Admin Center.
The empty Exchange 2016 database can now be dismounted and deleted. These two commands can be used for this:
Dismount-Database MBXEX16
Remove-MailboxDatabase MBXEX16

Uninstall Exchange 2016 and complete the migration
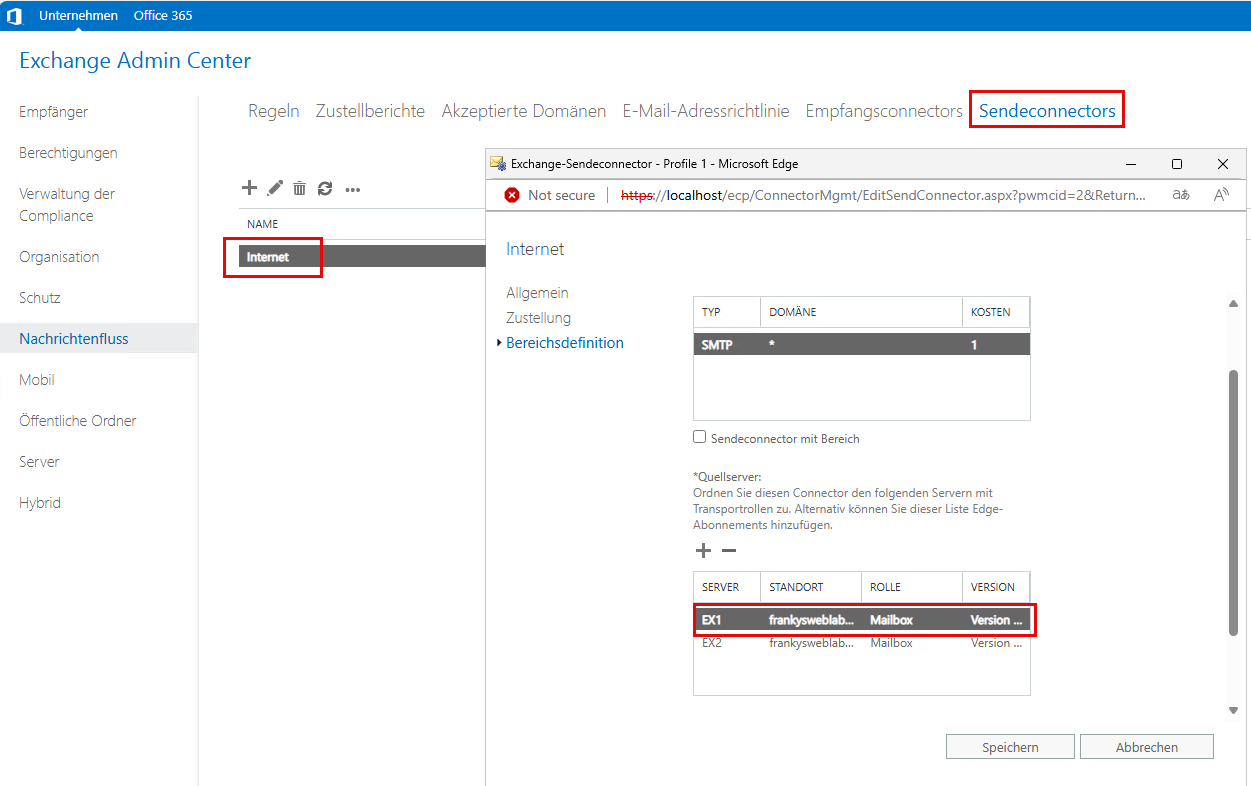
To be able to uninstall Exchange 2016, only the send connector needs to be adjusted. The Exchange 2016 server is deleted from the list of source servers for all send connectors:
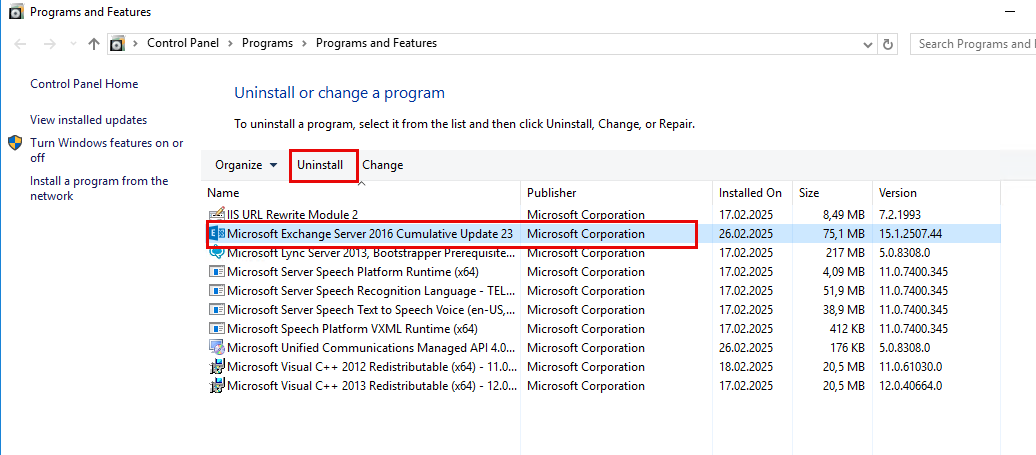
Exchange 2016 can now be uninstalled under "Programs and Features":
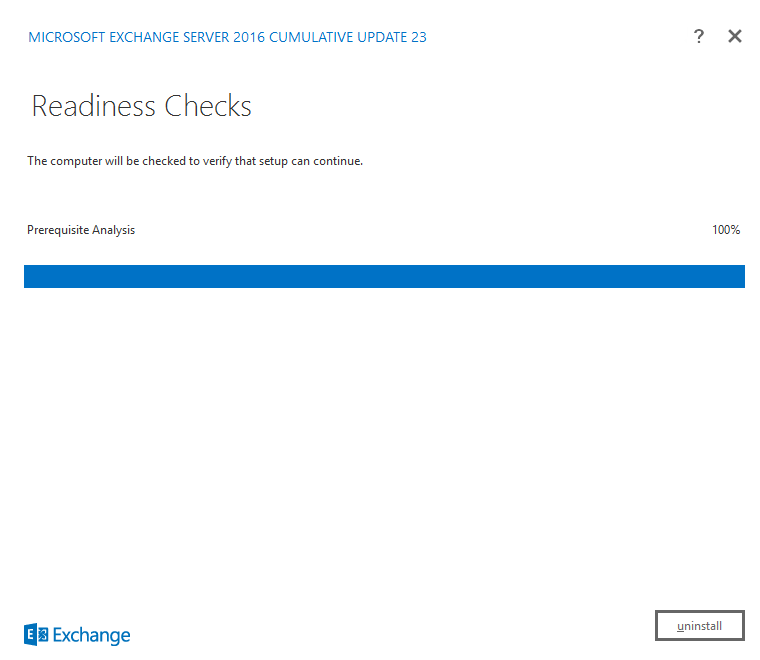
The wizard for uninstalling the server opens:

After the final check, the Exchange 2016 server can be uninstalled:
After successful uninstallation, the server can be removed from the Active Directory and deleted. The migration is now complete.