Support for Exchange Server 2013 ends on 11.04.2023, after this date there will be no more security updates for Exchange 2013. It is therefore high time to consider the migration from Exchange 2013 to Exchange 2019. The migration should not present any major hurdles and corresponds almost 1-to-1 to the Migration from Exchange 2013 to Exchange 2016. However, migrating from Exchange 2013 to Exchange 2016 makes little sense, as Exchange 2016 is already in extended support. So here is a short how-to on migrating from Exchange 2013 to Exchange 2019.
Foreword
This guide describes the migration from Exchange 2013 to Exchange 2019 and is intended to provide an overview of the necessary steps and is therefore deliberately kept simple. Certificates and the namespace are to be transferred. As Exchange 2013 and Exchange 2019 are very similar, the migration is quite simple and will probably not cause any major problems in most cases.
One thing first: This is not a generally valid migration guide that can be applied to every Exchange 2013 organization. The migration should therefore be tried out in a test environment to get a feel for it.
Surroundings
The test environment consists of 3 Windows servers. A domain controller, an Exchange 2013 server and an Exchange 2019 server:
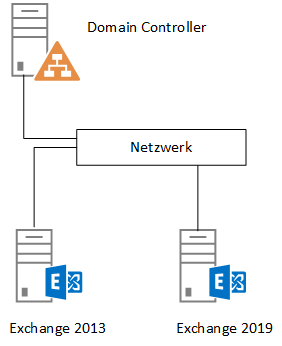
Exchange 2013 and Exchange 2019 are already installed.
To avoid problems during the migration, the Exchange organization should have the latest updates installed. This means that the latest CU23 and the currently available security updates for the operating system and Exchange should be installed. The download for the Exchange 2013 CU 23 can be found here:
The Exchange 2019 installation in an existing Exchange 2013 organization is no different from the installation in a fresh environment. Only the question about the organization name is omitted. I will therefore save myself the trouble of describing the installation of Exchange 2016, as I have already done that here:
Exchange 2013 is configured to the following URLs:
- Server name: EX2013EX1.frankysweblab.de
- Outlook: outlook.frankysweblab.de
- OWA, EWS, ActiveSync, OAB: outlook.frankysweblab.de
- Outlook Anywhere: outlook.frankysweblab.de
- Autodiscover: autodiscover.frankysweblab.de
Exchange 2016 should use the following URLs:
- Server name: EX2013EX2.frankysweblab.de
- Outlook: outlook.frankysweblab.de
- OWA, EWS, ActiveSync OAB: outlook.frankysweblab.de
- Outlook Anywhere: outlook.frankysweblab.de
- MAPIoverHTTP: outlook.frankysweblab.de
- Autodiscover: autodiscover.frankysweblab.de
The new Exchange 2019 should therefore use the same URLs as Exchange 2013, so users do not need to get used to them.
MAPIoverHTTP is already activated in the test environment. If this is not yet the case in the Exchange 2013 organization to be migrated, MAPIoverHTTP should be activated before the migration. I have described how to activate MAPIoverHTTP here:
Preparation for the migration
As already mentioned, Exchange 2019 is already installed in the test environment, but not yet configured. The URLs are therefore configured first, the easiest way to do this is using the Exchange Management Shell:
$servername = "EX2013EX2"
$internalhostname = "outlook.frankysweblab.de"
$externalhostname = "outlook.frankysweblab.de"
$autodiscoverhostname = "autodiscover.frankysweblab.de"
$owainturl = "https://" + "$internalhostname" + "/owa"
$owaexturl = "https://" + "$externalhostname" + "/owa"
$ecpinturl = "https://" + "$internalhostname" + "/ecp"
$ecpexturl = "https://" + "$externalhostname" + "/ecp"
$ewsinturl = "https://" + "$internalhostname" + "/EWS/Exchange.asmx"
$ewsexturl = "https://" + "$externalhostname" + "/EWS/Exchange.asmx"
$easinturl = "https://" + "$internalhostname" + "/Microsoft-Server-ActiveSync"
$easexturl = "https://" + "$externalhostname" + "/Microsoft-Server-ActiveSync"
$oabinturl = "https://" + "$internalhostname" + "/OAB"
$oabexturl = "https://" + "$externalhostname" + "/OAB"
$mapiinturl = "https://" + "$internalhostname" + "/mapi"
$mapiexturl = "https://" + "$externalhostname" + "/mapi"
$aduri = "https://" + "$autodiscoverhostname" + "/Autodiscover/Autodiscover.xml"
Get-OwaVirtualDirectory -Server $servername | Set-OwaVirtualDirectory -internalurl $owainturl -externalurl $owaexturl
Get-EcpVirtualDirectory -server $servername | Set-EcpVirtualDirectory -internalurl $ecpinturl -externalurl $ecpexturl
Get-WebServicesVirtualDirectory -server $servername | Set-WebServicesVirtualDirectory -internalurl $ewsinturl -externalurl $ewsexturl
Get-ActiveSyncVirtualDirectory -Server $servername | Set-ActiveSyncVirtualDirectory -internalurl $easinturl -externalurl $easexturl
Get-OabVirtualDirectory -Server $servername | Set-OabVirtualDirectory -internalurl $oabinturl -externalurl $oabexturl
Get-MapiVirtualDirectory -Server $servername | Set-MapiVirtualDirectory -externalurl $mapiexturl -internalurl $mapiinturl
Get-OutlookAnywhere -Server $servername | Set-OutlookAnywhere -externalhostname $externalhostname -internalhostname $internalhostname -ExternalClientsRequireSsl:$true -InternalClientsRequireSsl:$true -ExternalClientAuthenticationMethod 'Negotiate'
Get-ClientAccessService $servername | Set-ClientAccessService -AutoDiscoverServiceInternalUri $aduri
Important: After installing Exchange 2019, the server will respond to autodiscover requests from clients. To prevent clients from receiving certificate warnings or incorrect URLs, the new Exchange 2019 server should be configured with the same URLs and the same certificate as Exchange 2013 immediately after installation.
The certificate of the Exchange 2013 server can continue to be used, it is not absolutely necessary to buy a new certificate or to issue one through the internal PKI. It makes no difference whether a new certificate is purchased or the existing one continues to be used. It is important that the DNS names used are present on the certificate, in my case outlook.frankysweblab.de and autodiscover.frankysweblab.de. The topic of certificates for Exchange Server is described in detail in the whitepaper described.
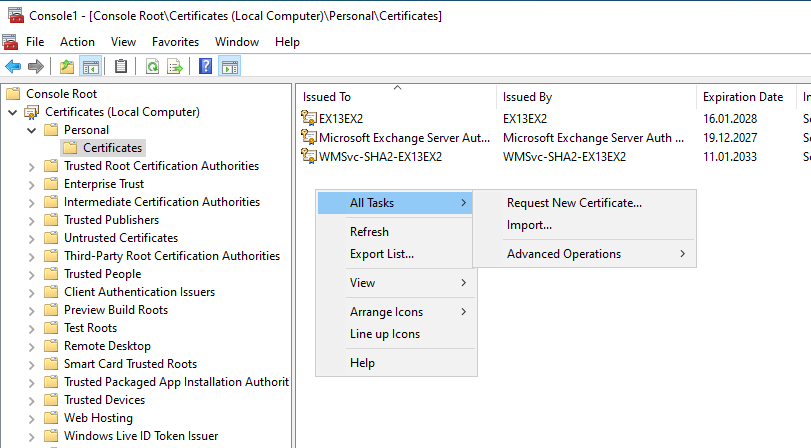
In my case, I export the existing certificate via MMC from the Exchange 2013 server and import it back to the Exchange 201 server:
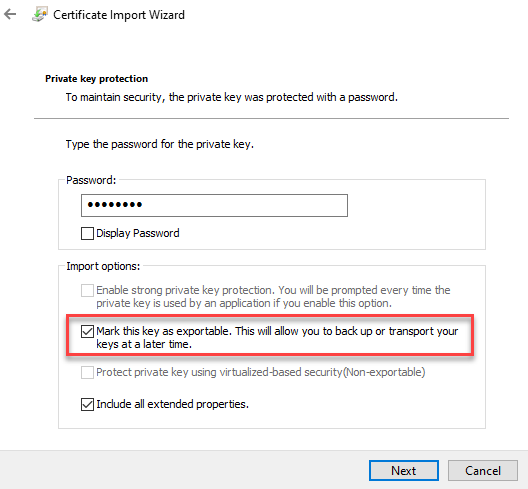
It is important that the option "Mark this key as exportable" is checked during import:
After importing the certificate, the certificate must still be activated for the Exchange services:
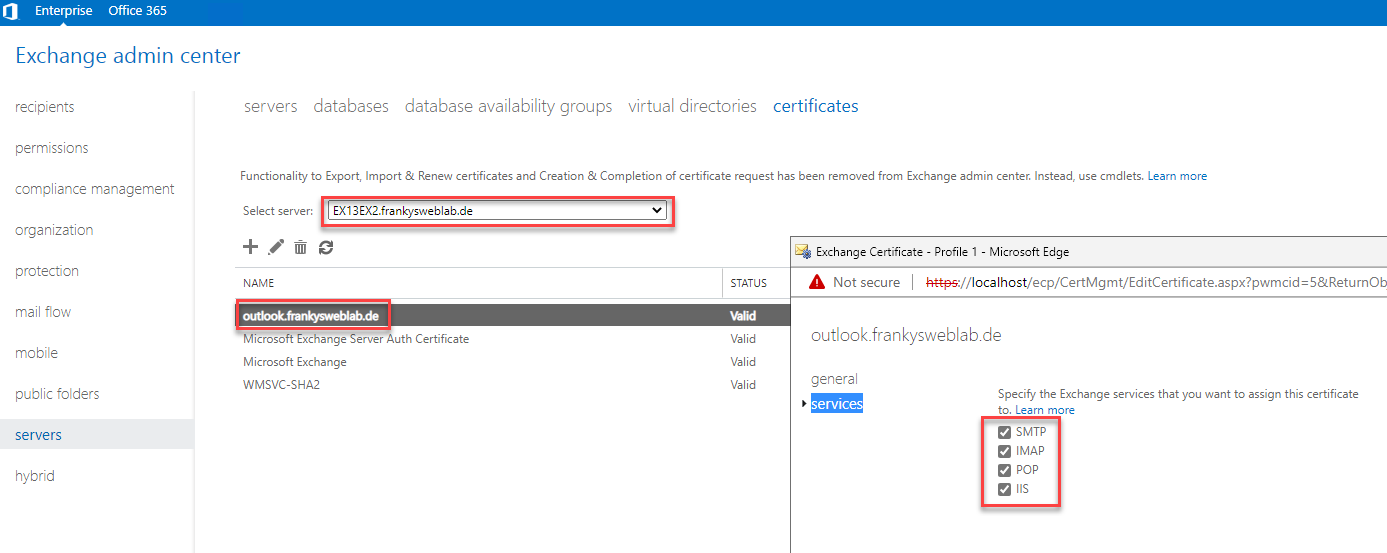
Important: All settings in the Exchange Admin Center are made on the Exchange 2019 server. The Exchange 2013 Admin Center is no longer needed.
The certificate and URLs are now configured, but the authentication settings for the Exchange protocols are still missing. Here you can follow the settings of the Exchange 2013 server and configure the Exchange 2019 server accordingly. Here is an example for Outlook Anywhere:
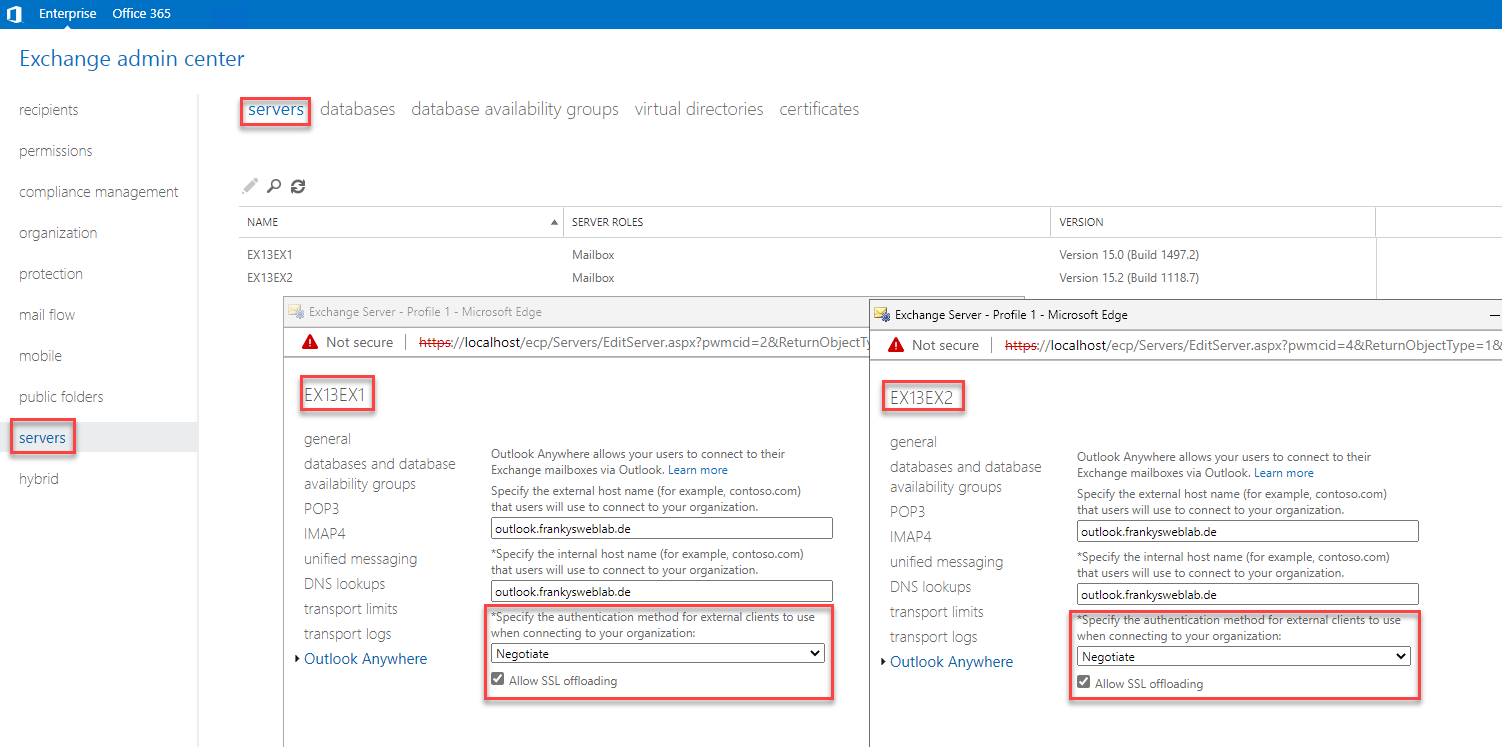
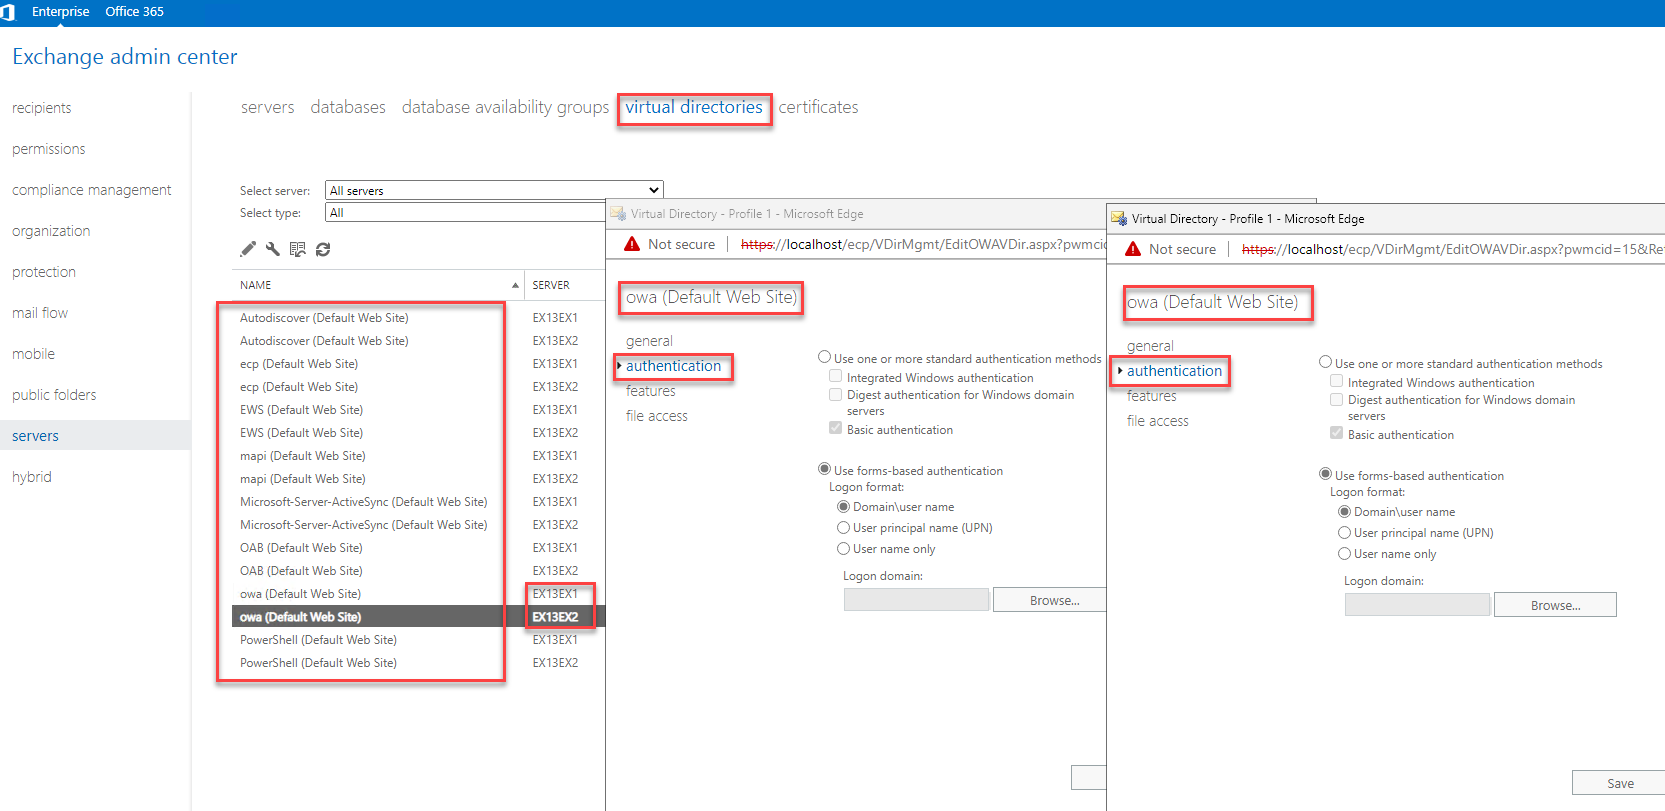
The same applies to the other Exchange protocols, such as EWS, MAPIoverHTTP or OWA. Here too, you can use the Exchange 2013 server as a guide for each protocol and adapt the directory of the Exchange 2019 server:
To complete the preparations, the new Exchange 2019 server must now be added as the source server for the send connector:
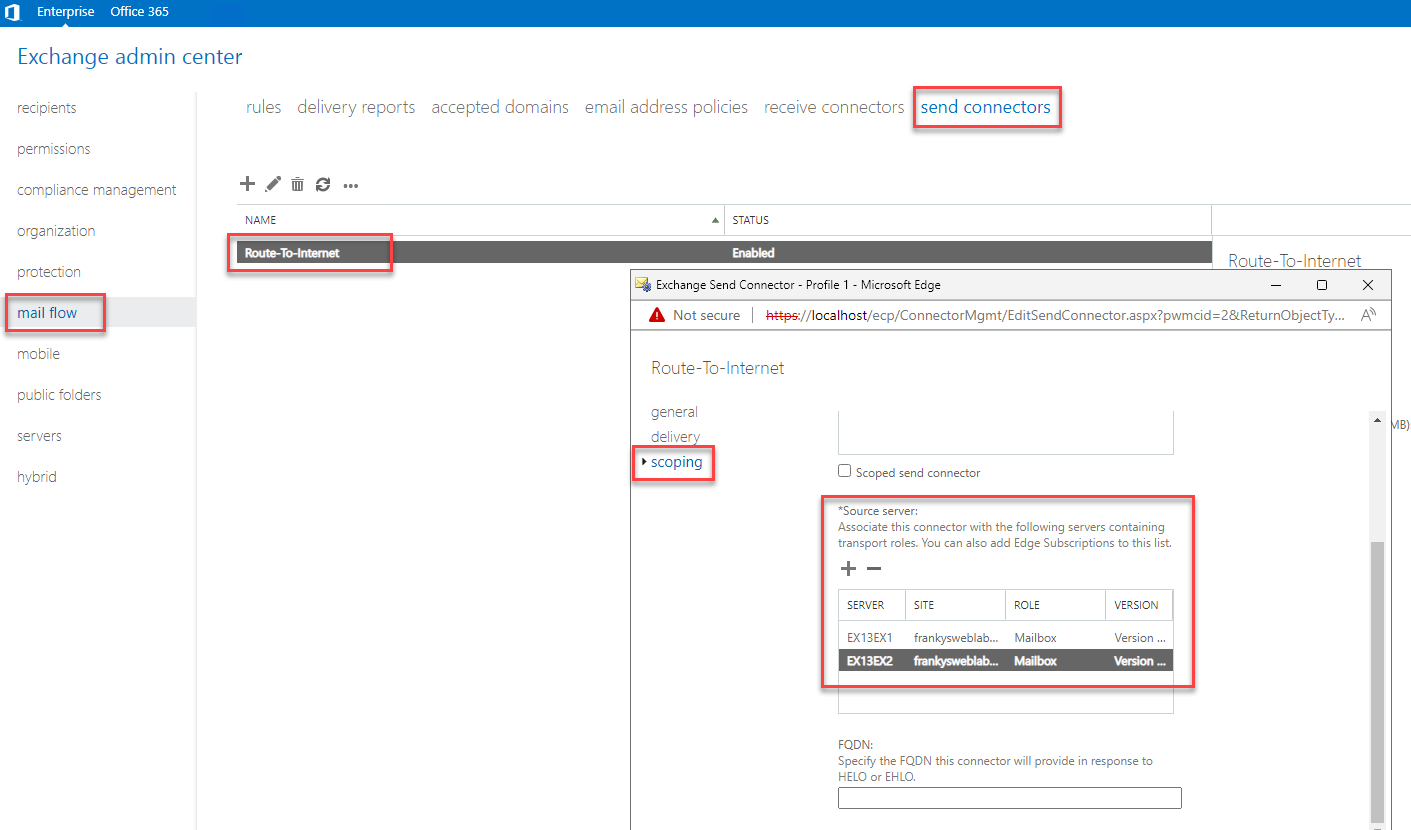
The preparations are now complete. The Exchange 2019 server can now send mails to the Internet and will also respond to autodiscover requests from clients within the Active Directory.
The actual migration of the data is then carried out in the second part.

Frage in die Runde.
Ich habe derzeit einen 2. Exchange-Server 2019 auf Basis von Server 2025 mit CU 15 installiert und betreibe ihn als CAS Proxy.
Jetzt müssen die Postfächer per PowerShell verschoben werden.
Können diese im Onlinebetrieb verschoben werden, oder müssen die betreffenden User offline sein?
Vielen Dank im Voraus.
Der Beitrag ist zwar schon alt, aber immer noch Gold wert. Trotzdem eine Anmerkung. Hier heisst es:
Wichtig: Nach der Installation von Exchange 2019 wird der Server auf Autodiscover Anfragen der Clients reagieren. Damit Clients keine Zertifikatswarnungen oder falsche URLs übermittelt bekommen, sollte der neue Exchange 2019 Server direkt nach der Installation mit den gleichen URLs und dem gleichen Zertifikat wie Exchange 2013 konfiguriert werden.
Das stimmt doch so nicht ganz, in einer produktiven Umgebung, wo EX2013 und EX2019 parallel laufen. Wenn ich dir URLs sofort auf die URLs des alten Servers ändere, können sich User nicht mehr per Outlook verbinden, deren Postfächer bereits auf den neuen EX umgezogen wurden, weil diese Clients ja dann auf den alten Server gehen, dort liegt aber das Postfach nicht mehr.
Selbst getestet :-)
Vielen lieben Dank für die tolle Anleitung und auch an die zahlreiche Kommentatoren, die ebenfalls noch Licht ins Dunkel gebracht haben.
Beachte: zum obigen Punkt „Wichtig: Alle Einstellungen im Exchange Admin Center werden auf den Exchange 2019 Server durchgeführt. Das Exchange 2013 Admin Center braucht man nicht mehr.“
In einem Hybridscenario, in dem ein Exchange2013 und Exchange2019 Server zusammen betreiben werden,
muss, so lange sich das Administrator Postfach noch auf dem Exchange2013 befindet, beim Zugriff auf das ECP des Exchange2019 zwingend folgender Querystring an die aufgerufene URL angehangen werden: https:///ecp/?ExchClientVer=15.2
sonst kommt es zu ungewöhnlichen Fehlermeldungen im Browser beim Versuch die Exchange2019 Datenbanken zu verwalten (Timeouts, „versuchen Sie es später nchmal“ oder HTTP 500 Fehler im rechten Frame)
Habe sehr lange nach der Ursache dieser merkwürdigen Fehler gesucht (Verdacht lag erst auf falsch konfigurierten Zertifikaten etc) und bin schlussendlich in den Troubleshooting FAQ von Microsoft fündig geworden.
Quelle: https://learn.microsoft.com/de-de/exchange/troubleshoot/administration/can't-manage-ex19-database-eac
Hintergrund: So lange sich das Administrator Postfach noch auf dem Exchange2013 befindet, werden die ECP Verbindungen alle mit der alten Exchange2013 Clientversion 15.0 aufgebaut.
Das führ beim Versuch Exchnage2019 Ressourcen zu verwalten zu fehlern.
Umgekehrt ist jedoch ein Zugriff auf Exchange2013 Ressourcen mit der ClientVersieon 15.2 jederzeit möglich, da abwärtskompatibel.
Sobald das Postfach des Nutzers „Administrator“ auf den Exchange2019 verschoben wurde, wird die imBrowser verwendete ClientVersion automatisch auf 15.2 umgestellt.
Aktuelles Setup Exchange2013 CU23 + Exchange2019 CU13 mit alles SU’s bis 06/2023
Evtl ist es ja hilfreich für jemanden, der ebenfalls auf diese Problematik stößt.
Im obigen Kommentar hat der Linkassistent zugeschlagen und in der Beispiel URL des ECP Aufrufs den Hostnamen entfernt.
Beispiel soll natürlich lauten: https://ex2019/ecp/?ExchClientVer=15.2
Hast du dazu inzwischen eine Lösung gefunden? Habe den gleichen Fehler…
Bei Benutzern mit mehreren Postfächern vom Exchange kommt beim Start von Outlook ein Zertifikatsfehler, da der interne Name verwendet wird (ich vermute beim autodiscover). Wie könnte mann das lösen, ohne bei jedem Bennutzer die zusätzlichen Postfächer erst zu entfernen und wieder einzubinden?
Hast du dazu inzwischen eine Lösung gefunden? Habe den gleichen Fehler…
Kann ich die Migration von Exchange 2013 auf 2019 im laufenden Betrieb machen, ohne das die Leute etwas merken? Mein Ziel wäre, dass ich gemütlich eine Woche lang die Postfächer von 2013 auf 2019 händisch verschiebe. Da wäre die Voraussetzung, dass alle Leute welche ihr Postfach noch am 2013er haben, Mails senden und empfangen können. Natürlich sollen parallel die Personen, von denen das Postfach bereits auf den 2019er migriert wurde, ebenso Mails senden und empfangen können. Ist so ein Parallelbetrieb mit dieser Anleitung möglich?
„Wichtig: Alle Einstellungen im Exchange Admin Center werden auf den Exchange 2019 Server durchgeführt. Das Exchange 2013 Admin Center braucht man nicht mehr.“
Ist das so, sobald man den ersten 2019er installiert hat ? Darf man dann das 2013 nicht mehr benutzen ?
Danke und Grüße,
MG
Guten Morgen,
danke für die tolle Anleitung, kann man das auch für Exchange 2016 auf 2019 nehmen?
Ja, alternativ eben die hier: https://www.frankysweb.de/migration-exchange-2016-zu-exchange-2019/
danke
Perfekt, danke schön.
Bald steht genau das für mich an…
Bin gespannt