

Support for Exchange Server 2013 ends on 11.04.2023, after this date there will be no more security updates for Exchange 2013. It is therefore high time to consider the migration from Exchange 2013 to Exchange 2019. The migration should not present any major hurdles and corresponds almost 1-to-1 to the Migration from Exchange 2013 to Exchange 2016. However, migrating from Exchange 2013 to Exchange 2016 makes little sense, as Exchange 2016 is already in extended support. So here is a short how-to on migrating from Exchange 2013 to Exchange 2019.
Foreword
This guide describes the migration from Exchange 2013 to Exchange 2019 and is intended to provide an overview of the necessary steps and is therefore deliberately kept simple. Certificates and the namespace are to be transferred. As Exchange 2013 and Exchange 2019 are very similar, the migration is quite simple and will probably not cause any major problems in most cases.
One thing first: This is not a generally valid migration guide that can be applied to every Exchange 2013 organization. The migration should therefore be tried out in a test environment to get a feel for it.
Surroundings
The test environment consists of 3 Windows servers. A domain controller, an Exchange 2013 server and an Exchange 2019 server:
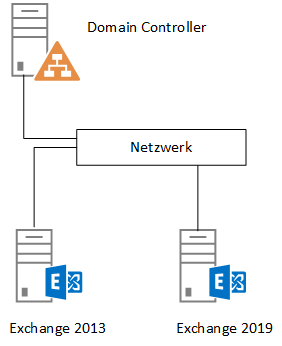
Exchange 2013 and Exchange 2019 are already installed.
To avoid problems during the migration, the Exchange organization should have the latest updates installed. This means that the latest CU23 and the currently available security updates for the operating system and Exchange should be installed. The download for the Exchange 2013 CU 23 can be found here:
The Exchange 2019 installation in an existing Exchange 2013 organization is no different from the installation in a fresh environment. Only the question about the organization name is omitted. I will therefore save myself the trouble of describing the installation of Exchange 2016, as I have already done that here:
Exchange 2013 is configured to the following URLs:
- Server name: EX2013EX1.frankysweblab.de
- Outlook: outlook.frankysweblab.de
- OWA, EWS, ActiveSync, OAB: outlook.frankysweblab.de
- Outlook Anywhere: outlook.frankysweblab.de
- Autodiscover: autodiscover.frankysweblab.de
Exchange 2016 should use the following URLs:
- Server name: EX2013EX2.frankysweblab.de
- Outlook: outlook.frankysweblab.de
- OWA, EWS, ActiveSync OAB: outlook.frankysweblab.de
- Outlook Anywhere: outlook.frankysweblab.de
- MAPIoverHTTP: outlook.frankysweblab.de
- Autodiscover: autodiscover.frankysweblab.de
The new Exchange 2019 should therefore use the same URLs as Exchange 2013, so users do not need to get used to them.
MAPIoverHTTP is already activated in the test environment. If this is not yet the case in the Exchange 2013 organization to be migrated, MAPIoverHTTP should be activated before the migration. I have described how to activate MAPIoverHTTP here:
Preparation for the migration
As already mentioned, Exchange 2019 is already installed in the test environment, but not yet configured. The URLs are therefore configured first, the easiest way to do this is using the Exchange Management Shell:
$servername = "EX2013EX2"
$internalhostname = "outlook.frankysweblab.de"
$externalhostname = "outlook.frankysweblab.de"
$autodiscoverhostname = "autodiscover.frankysweblab.de"
$owainturl = "https://" + "$internalhostname" + "/owa"
$owaexturl = "https://" + "$externalhostname" + "/owa"
$ecpinturl = "https://" + "$internalhostname" + "/ecp"
$ecpexturl = "https://" + "$externalhostname" + "/ecp"
$ewsinturl = "https://" + "$internalhostname" + "/EWS/Exchange.asmx"
$ewsexturl = "https://" + "$externalhostname" + "/EWS/Exchange.asmx"
$easinturl = "https://" + "$internalhostname" + "/Microsoft-Server-ActiveSync"
$easexturl = "https://" + "$externalhostname" + "/Microsoft-Server-ActiveSync"
$oabinturl = "https://" + "$internalhostname" + "/OAB"
$oabexturl = "https://" + "$externalhostname" + "/OAB"
$mapiinturl = "https://" + "$internalhostname" + "/mapi"
$mapiexturl = "https://" + "$externalhostname" + "/mapi"
$aduri = "https://" + "$autodiscoverhostname" + "/Autodiscover/Autodiscover.xml"
Get-OwaVirtualDirectory -Server $servername | Set-OwaVirtualDirectory -internalurl $owainturl -externalurl $owaexturl
Get-EcpVirtualDirectory -server $servername | Set-EcpVirtualDirectory -internalurl $ecpinturl -externalurl $ecpexturl
Get-WebServicesVirtualDirectory -server $servername | Set-WebServicesVirtualDirectory -internalurl $ewsinturl -externalurl $ewsexturl
Get-ActiveSyncVirtualDirectory -Server $servername | Set-ActiveSyncVirtualDirectory -internalurl $easinturl -externalurl $easexturl
Get-OabVirtualDirectory -Server $servername | Set-OabVirtualDirectory -internalurl $oabinturl -externalurl $oabexturl
Get-MapiVirtualDirectory -Server $servername | Set-MapiVirtualDirectory -externalurl $mapiexturl -internalurl $mapiinturl
Get-OutlookAnywhere -Server $servername | Set-OutlookAnywhere -externalhostname $externalhostname -internalhostname $internalhostname -ExternalClientsRequireSsl:$true -InternalClientsRequireSsl:$true -ExternalClientAuthenticationMethod 'Negotiate'
Get-ClientAccessService $servername | Set-ClientAccessService -AutoDiscoverServiceInternalUri $aduri
Important: After installing Exchange 2019, the server will respond to autodiscover requests from clients. To prevent clients from receiving certificate warnings or incorrect URLs, the new Exchange 2019 server should be configured with the same URLs and the same certificate as Exchange 2013 immediately after installation.
The certificate of the Exchange 2013 server can continue to be used, it is not absolutely necessary to buy a new certificate or to issue one through the internal PKI. It makes no difference whether a new certificate is purchased or the existing one continues to be used. It is important that the DNS names used are present on the certificate, in my case outlook.frankysweblab.de and autodiscover.frankysweblab.de. The topic of certificates for Exchange Server is described in detail in the whitepaper described.
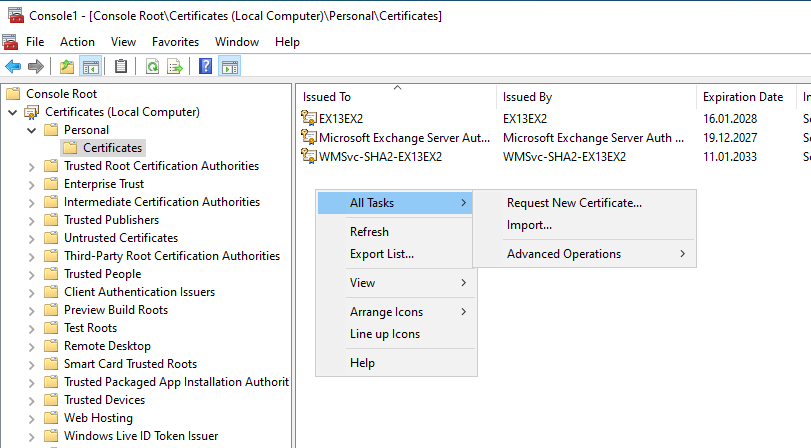
In my case, I export the existing certificate via MMC from the Exchange 2013 server and import it back to the Exchange 201 server:
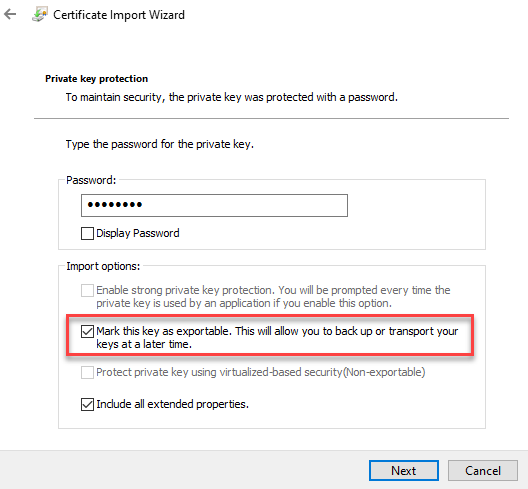
It is important that the option "Mark this key as exportable" is checked during import:
After importing the certificate, the certificate must still be activated for the Exchange services:
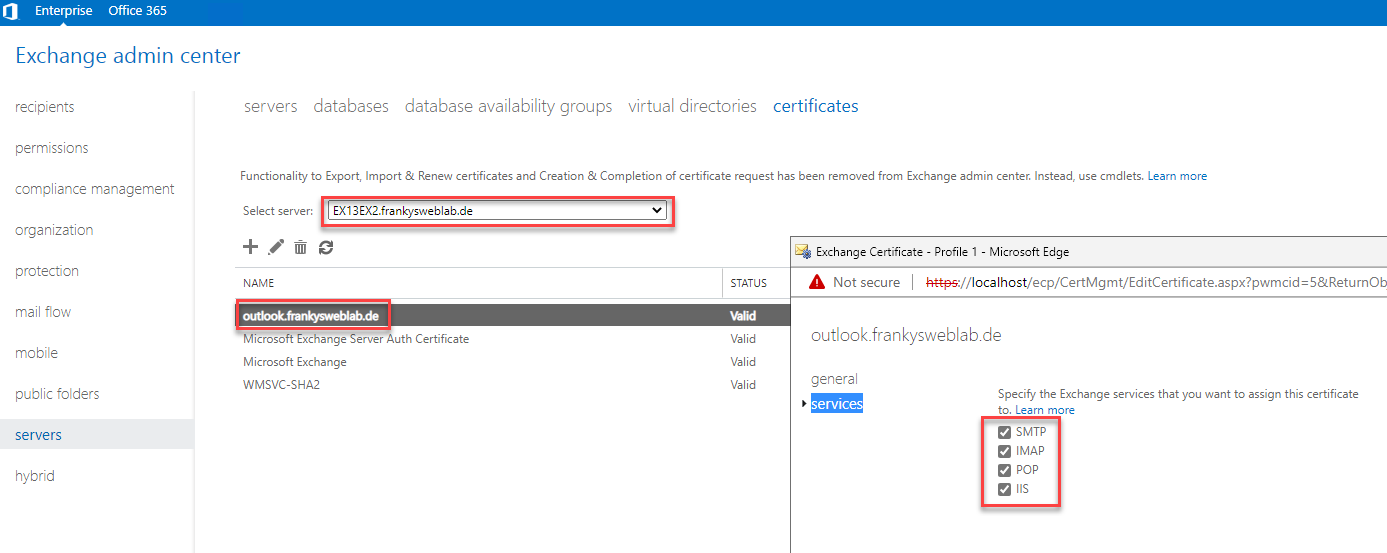
Important: All settings in the Exchange Admin Center are made on the Exchange 2019 server. The Exchange 2013 Admin Center is no longer needed.
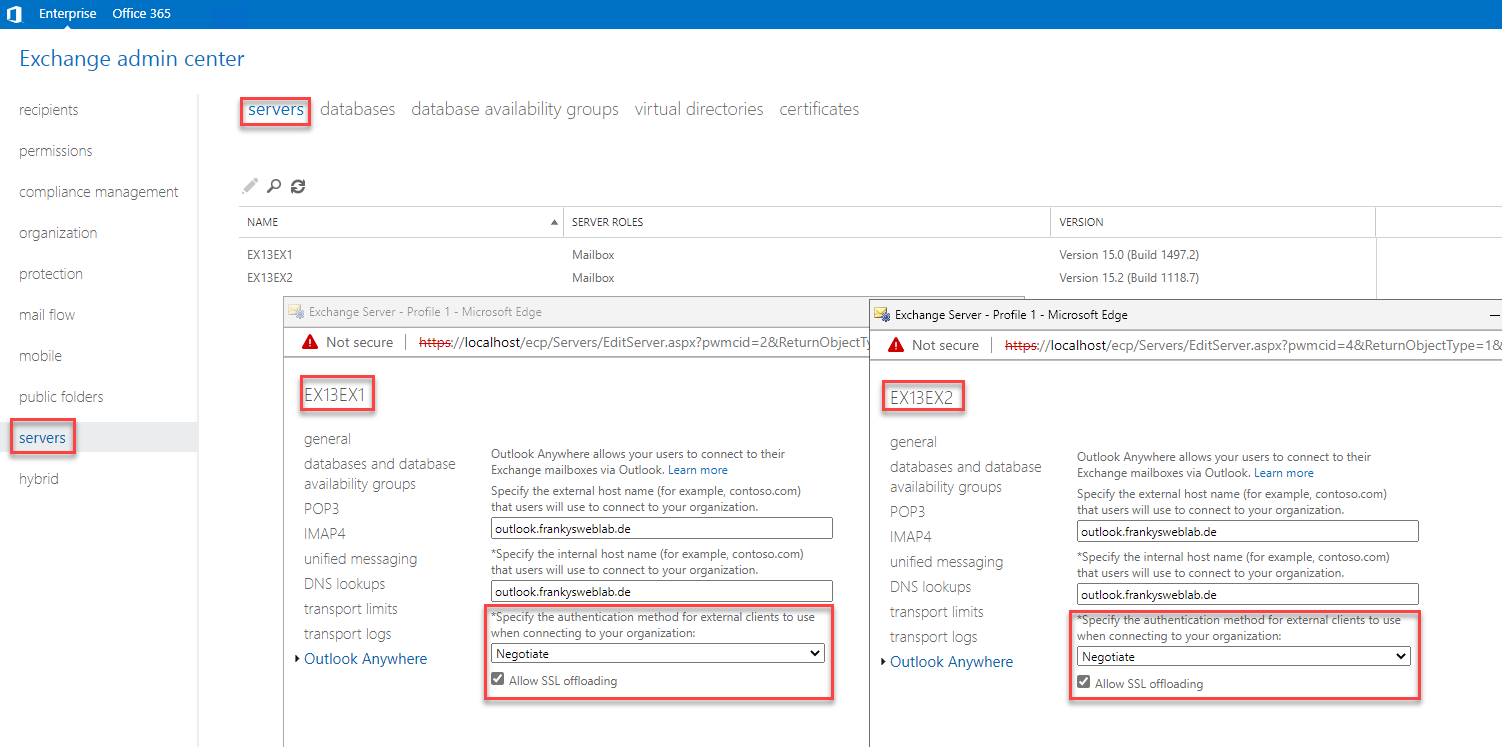
The certificate and URLs are now configured, but the authentication settings for the Exchange protocols are still missing. Here you can follow the settings of the Exchange 2013 server and configure the Exchange 2019 server accordingly. Here is an example for Outlook Anywhere:
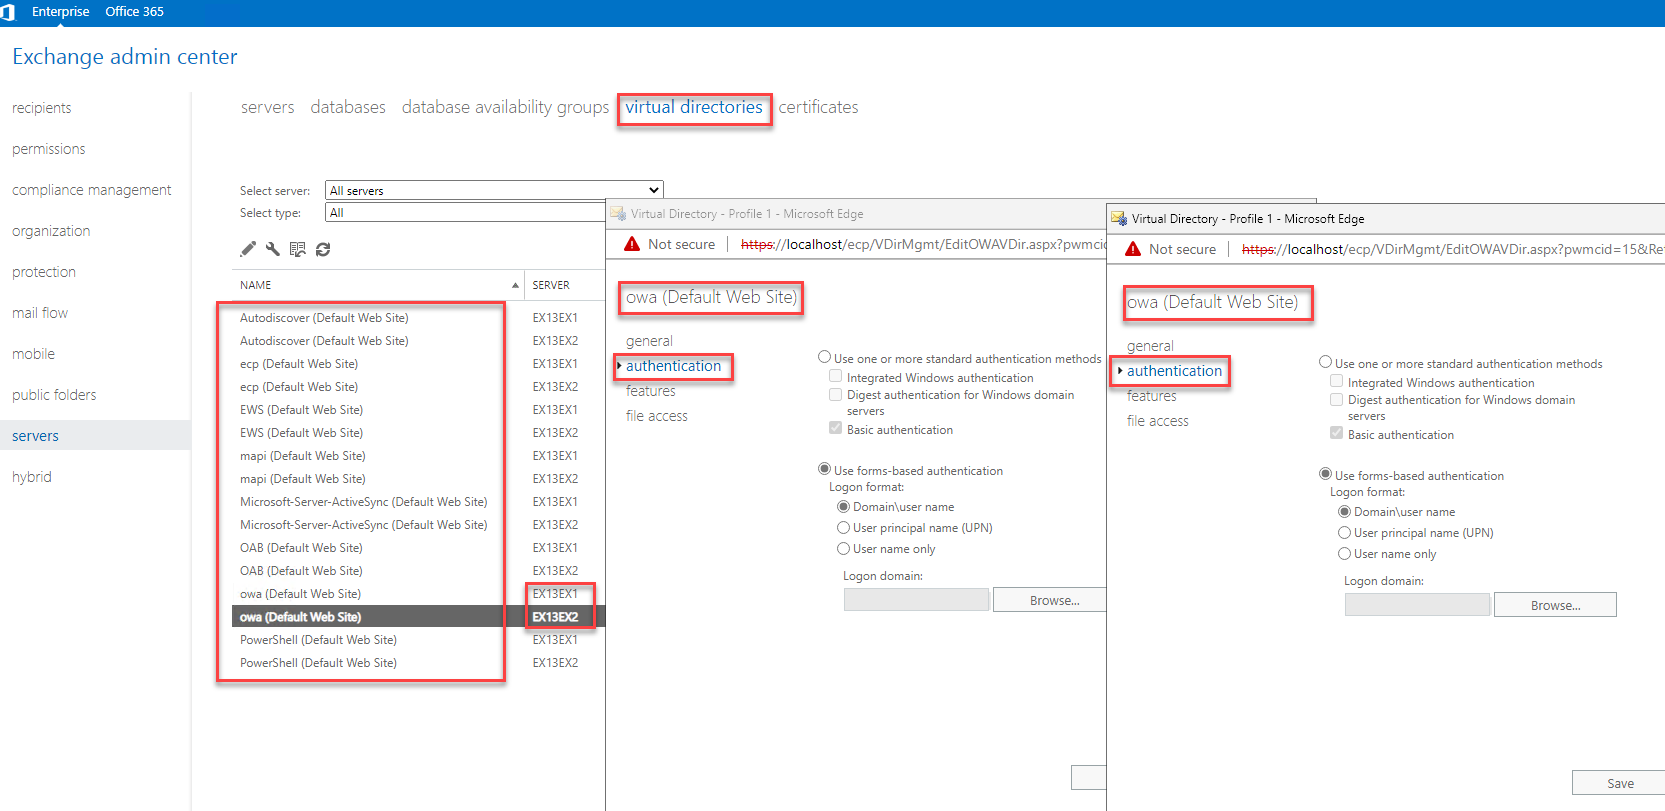
The same applies to the other Exchange protocols, such as EWS, MAPIoverHTTP or OWA. Here too, you can use the Exchange 2013 server as a guide for each protocol and adapt the directory of the Exchange 2019 server:
To complete the preparations, the new Exchange 2019 server must now be added as the source server for the send connector:
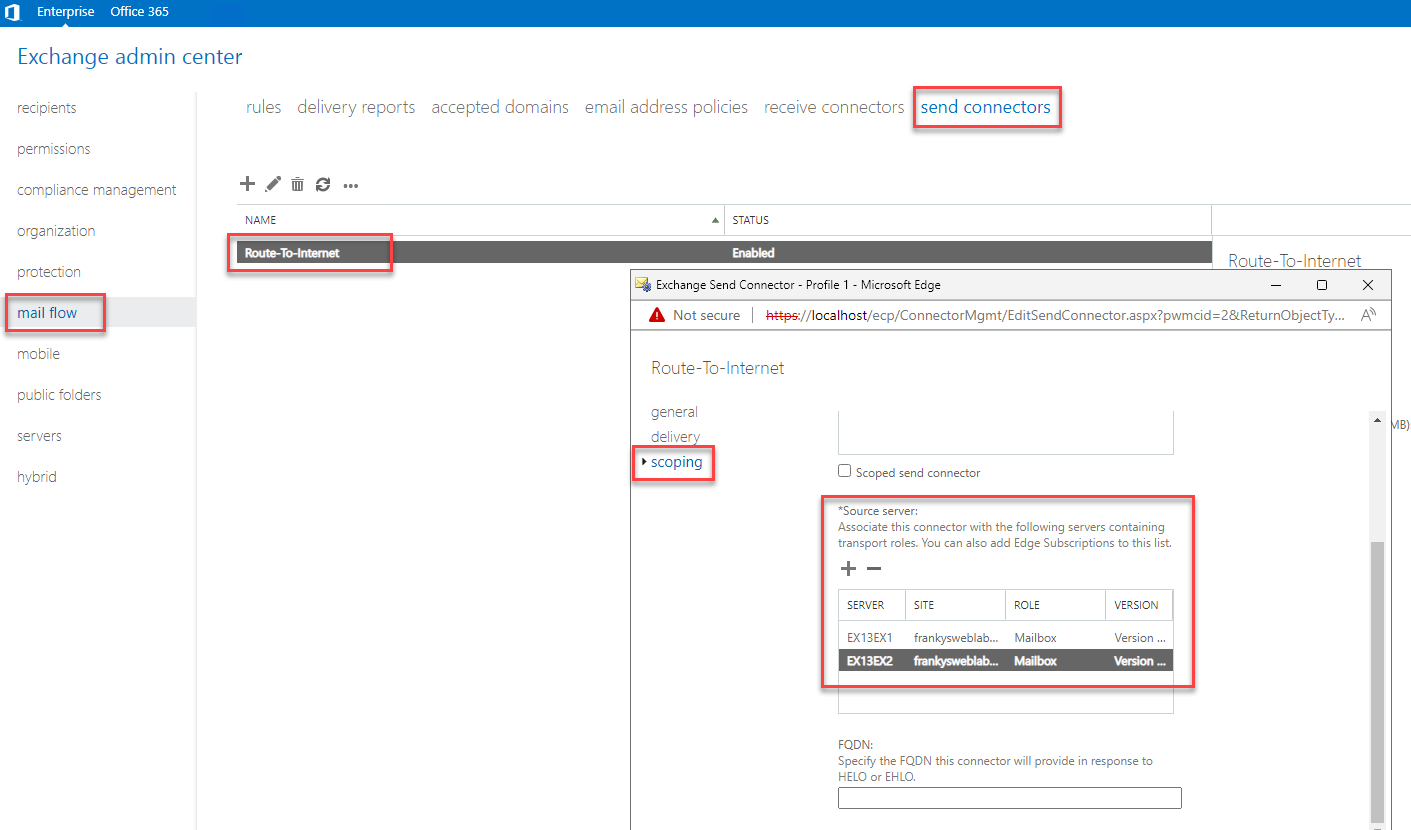
The preparations are now complete. The Exchange 2019 server can now send mails to the Internet and will also respond to autodiscover requests from clients within the Active Directory.
The actual migration of the data is then carried out in the second part.