Most of them will Let's Encrypt as a free and open certification authority. Let's Encrypt uses the ACME (Automatic Certificate Management Environment) protocol to issue valid certificates for all possible services and systems with minimal administrative effort.
Let's Encrypt is particularly suitable for all systems and services that are publicly accessible, as the issuing process for the certificates is very simple here. However, Let's Encrypt is less suitable for internal systems that are not directly accessible on the Internet. Although Let's Encrypt and the ACME protocol also offer solutions for this, these are usually difficult or impossible to use for purely internal systems.
For purely internal systems, however, an ACME-compatible certification body such as the Step CA can be used. This means that certificates can also be used easily and automatically for internal systems.
This article presents a Step CA is configured as a sub CA (intermediate certification authority) for a Windows root CA (root certification authority). This means that the ACME protocol can also be used internally and certificates can be automated for Windows and Linux services.
Installation Step CA
The installation of Step CA on an Ubuntu server is done quickly. To make things a little easier later on, I have created the folder /tmp/step, which I will also use later for file exchange. Here are the steps for installing the Step CLI and Step CA:
mkdir /tmp/step
cd /tmp/step
wget https://dl.smallstep.com/cli/docs-ca-install/latest/step-cli_amd64.deb
sudo dpkg -i step-cli_amd64.deb
wget https://dl.smallstep.com/certificates/docs-ca-install/latest/step-ca_amd64.deb
sudo dpkg -i step-ca_amd64.deb
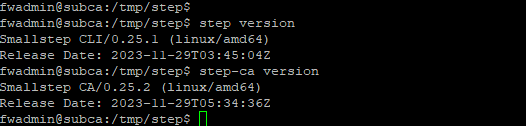
If the installation was successful, the following two commands should output the version:
step version
step-ca version
Initial configuration Step CA
After installing the Step CA, the initial configuration can be carried out. A wizard helps with the setup and only a few questions need to be answered. The configuration can be started with the following command:
step ca init
You can see my configuration in the screenshot. The DNS name is important here, I have chosen the DNS name acme.frankysweblab.de for this example. However, I would recommend a name like stepca.frankysweblab.de or subca.frankysweblab.de, because the Step-CA can offer several protocols (not only ACME). I only chose acme.frankysweblab.de because it is easier to differentiate.
Incidentally, you don't have to remember the password here. Here is a screenshot of the configuration:
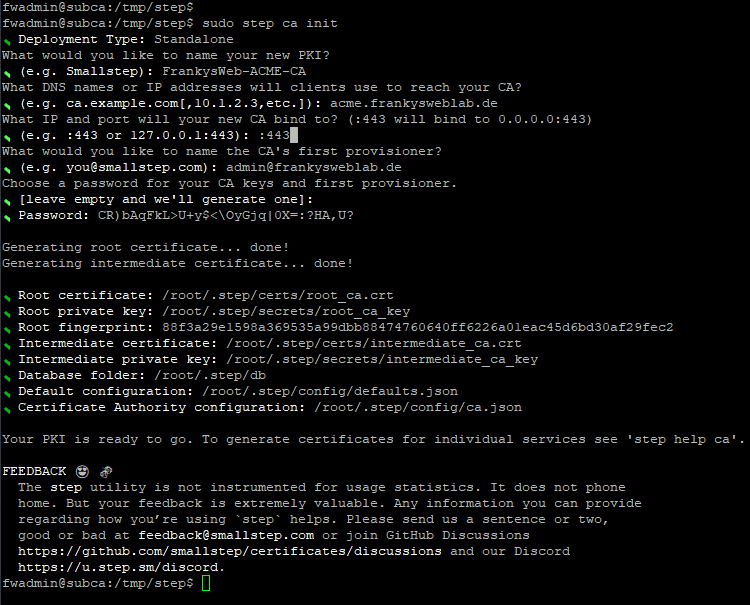
The Step CA is now a separate Root CA, this will be changed in the next part.
Configure Step CA as Sub CA of your own Root CA
In order for Active Directory clients to accept the new CA and its certificates as valid, the Step CA can be configured as a Sub CA of the Root CA. The Step CA is therefore no longer a Root CA, but a Sub CA. The Step CA must therefore be signed by the Root CA, which requires a CSR (Certificate Signing Request) and a little configuration:
sudo su
rm ~/.step/secrets/root_ca_key
rm ~/.step/certs/root_ca.crt
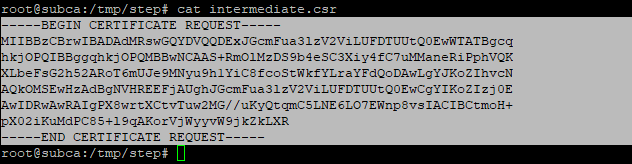
step certificate create "FrankysWeb-ACME-CA" intermediate.csr intermediate_ca_key --csr

You should now remember the password for the private key, as it will be needed later. The intermediate.csr file now contains the CSR, which must be signed by the root CA:
The intermediate.csr file must now be copied to the root CA. It is best to create a folder on the root CA, as a few files need to be exchanged below.
The Root CA certificate can now be exported to the Root CA:
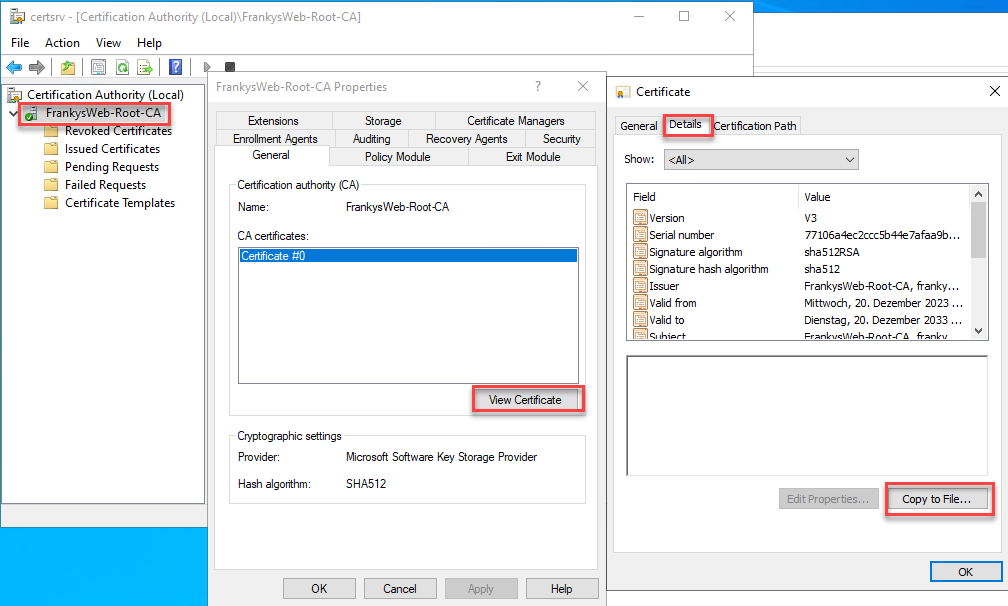
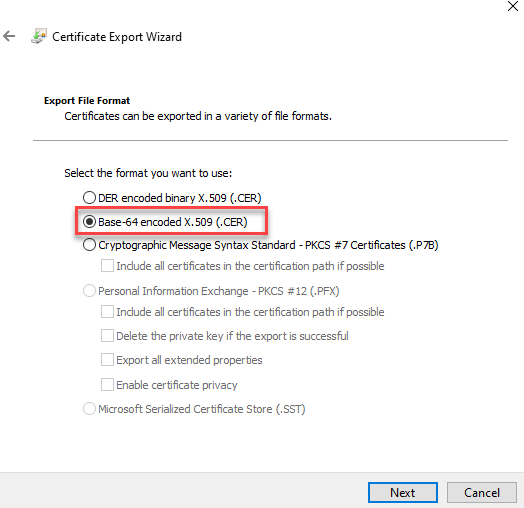
The certificate must be exported in BASE64 format. The name root.crt can be specified directly:
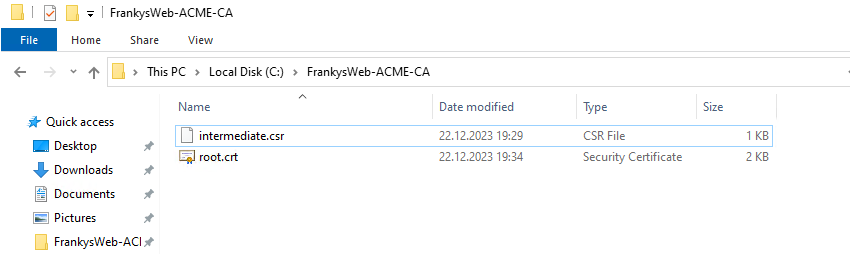
There should now be two files in the folder, the exported root certificate and the CSR of the Step CA:
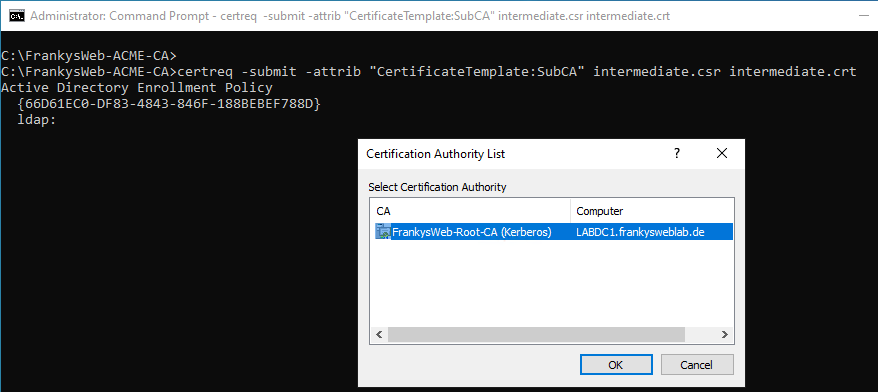
The CSR of the Step CA (intermediate.csr) must now be signed by the Root CA. The following command can be used for this:
certreq -submit -attrib "CertificateTemplate:SubCA" intermediate.csr intermediate.crt
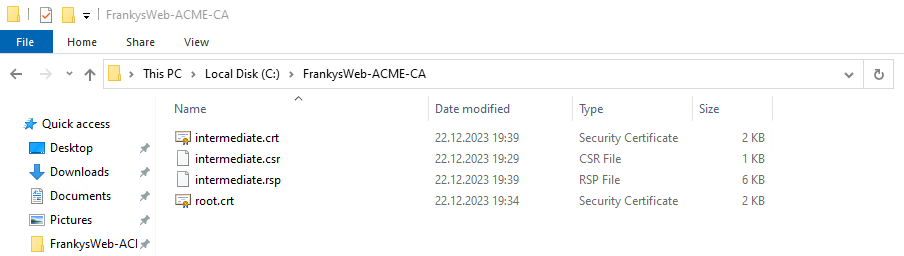
There should now be 4 files in the folder:
The 4 files must now be copied to the Step CA in the /tmp/step folder. As soon as the files have been copied to the ACME CA, the files can be copied to the correct locations. The following commands can be used for this:
mv root.crt ~/.step/certs/root_ca.crt
mv intermediate.crt ~/.step/certs/intermediate_ca.crt
mv intermediate_ca_key ~/.step/secrets/intermediate_ca_key
Note: The intermediate_ca_key file was previously created with the "step certificate create" command and is already located in the /tmp/step directory.

The CA can now be started once as a test with the command "step-ca". The previously defined password must be entered at the start. If it was successful up to this point, the output should look like this:
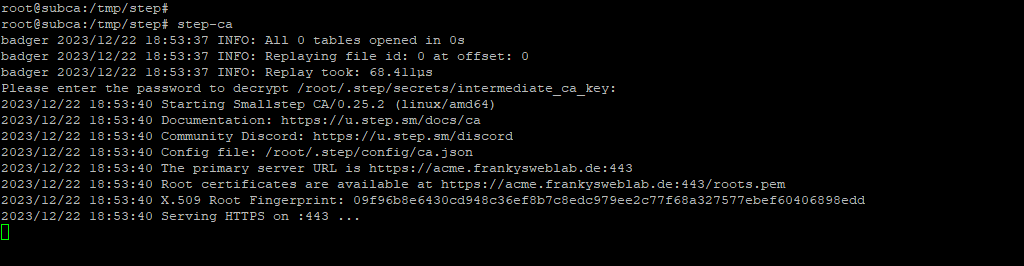
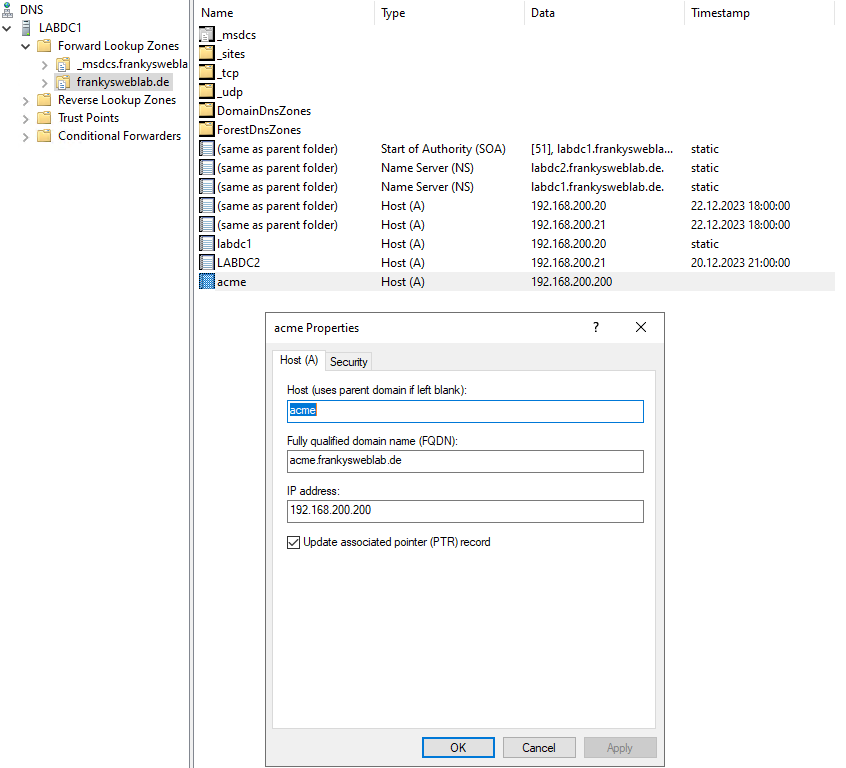
The corresponding DNS entry can now be created on the DNS server. I have entered the name acme.frankysweblab.de in the "step ca init" command, so I have created a HOST-A entry with the IP of the ACME CA:
The CA can now be accessed in the browser via https. Although the CA only returns a "404 page not found", there should be no certificate error here:
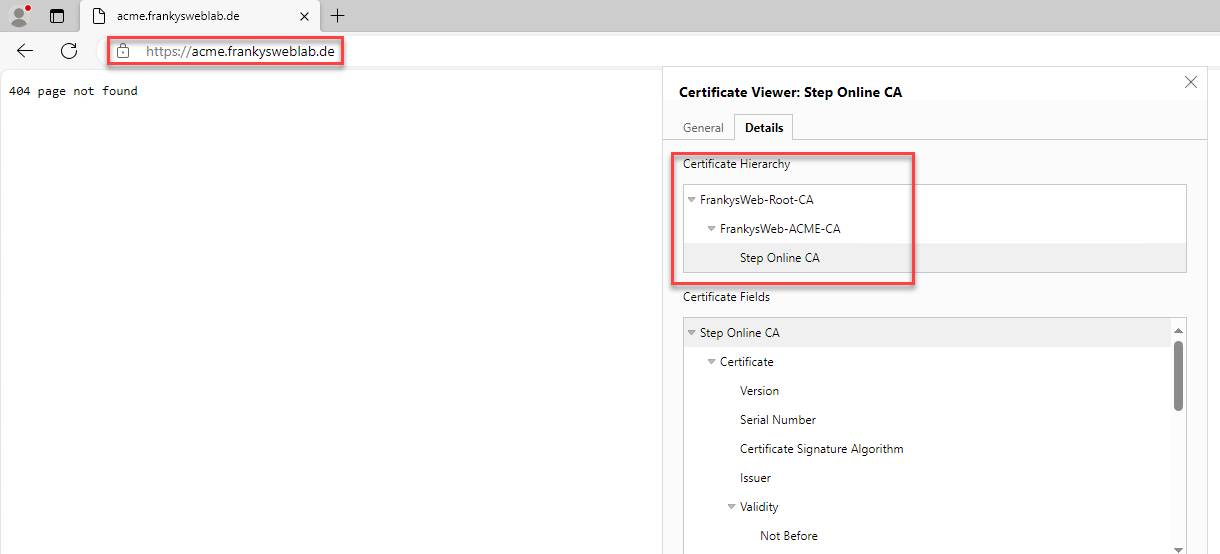
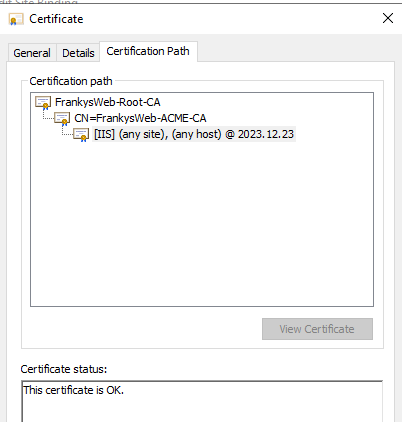
As you can see, the browser does not complain about the certificate because the CA FrankysWeb-ACME-CA was signed via its own root CA FrankysWeb-Root-CA.
Configure Step CA as Deamon
The CA can be configured as a deamon so that the Step CA is also started after the operating system is started. To do this, the password for the private key must first be saved in a file:
echo 'Secret123!' > /root/.step/.ca-pw
The Deamon can now be created:
cat > /etc/systemd/system/step-ca-server.service <<EOF
[Unit]
Description=step-ca-server
After=network-online.target
Wants=network-online.target
[Service]
TimeoutStartSec=0
ExecStart=/usr/bin/step-ca --password-file=/root/.step/.ca-pw /root/.step/config/ca.json
ExecReload=kill -s sighup $(ps aux | grep 'step-ca' | grep json | tr -s ' ' | cut -f 2 -d ' ')
ExecStop=kill -9 $(ps aux | grep 'step-ca' | grep json | tr -s ' ' | cut -f 2 -d ' ')
Restart=always
RestartSec=30
[Install]
WantedBy=multi-user.target
EOF
# Reload systemd
systemctl daemon-reload
# Start Step CA
systemctl enable --now step-ca-server
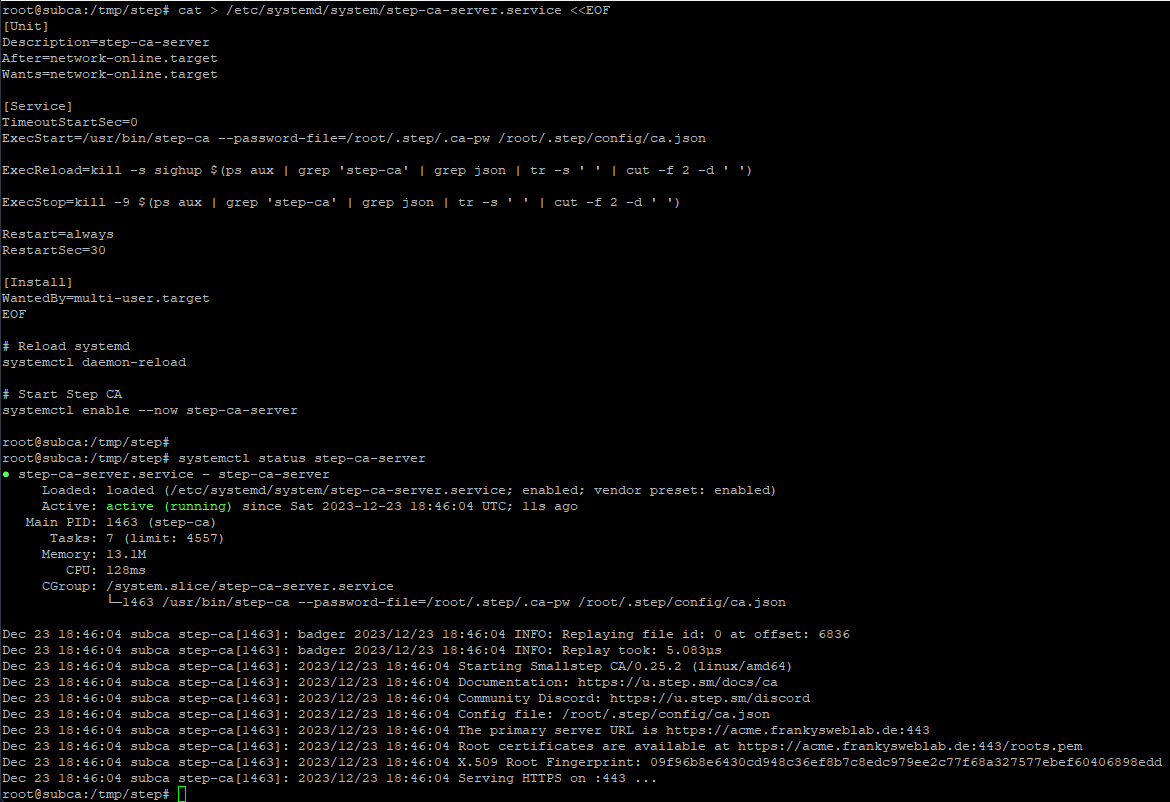
The following command can be used to check whether the Step CA has been started:
systemctl status step-ca-server
This is what it looks like when everything has worked out here:
Activate ACME protocol
step ca provisioner add acme --type=ACME --x509-max-dur=4320h --x509-default-dur=744h --force-cn

The Deamon must now be restarted:
systemctl restart step-ca-server
systemctl status step-ca-server

You should now be able to open the following URL in a browser:
https:///acme/acme/directory
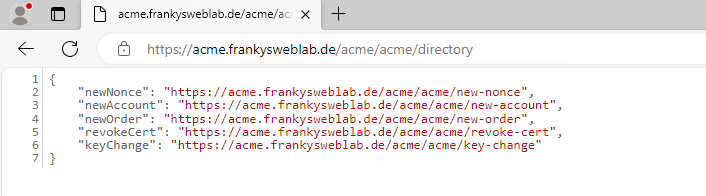
Again, there must be no certificate warning.
Request certificate on Windows computers via Win-ACME
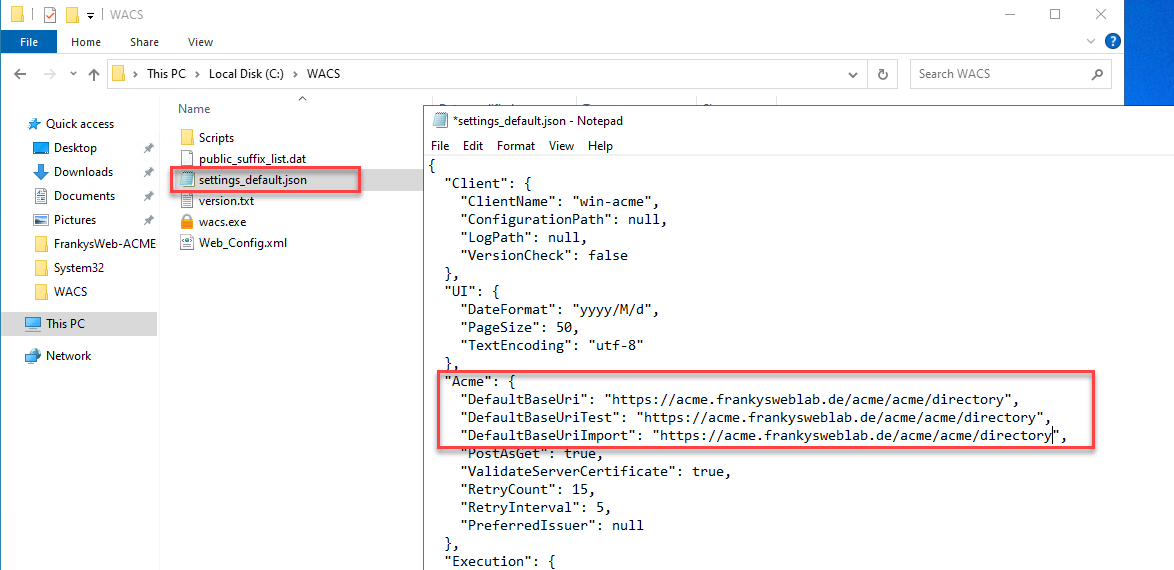
The Windows ACME client (win-acme or WACS) is available for Windows systems. Win-ACME also takes over the configuration of various services such as Exchange, IIS, Apache or RDS and takes care of the automatic renewal of certificates. WIN-ACME can be downloaded here:
After unpacking, the settings_default.json file can be found in the win-acme directory. In this file, the values for "DefaultBaseUri", "DefaultBaseUriTest" and "DefaultBaseUriImport" must be adapted with the URL of the CA. The corresponding URL of the Step CA is entered here:
https:///acme/acme/directory
win-acme can then be started. The following screenshot shows win-acme on an IIS web server. The fourth line shows that the connection has been successfully established. Win-acme now requests a certificate from the Step CA and also configures the IIS web server directly. The renewal of the certificate now also runs automatically:
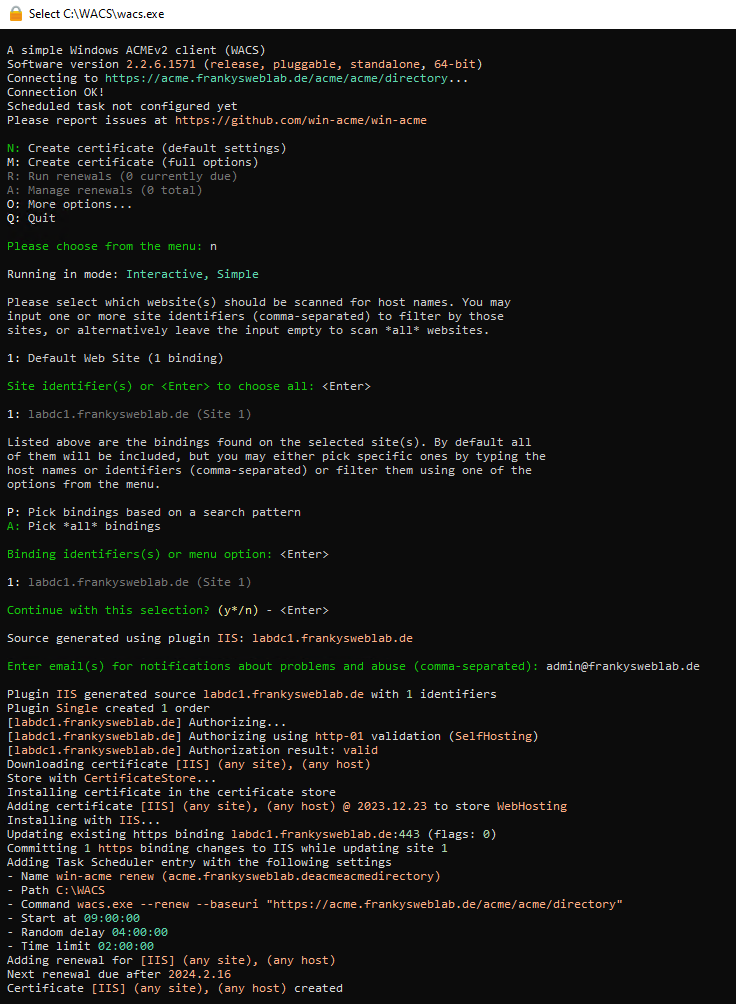
The certificate is issued for the corresponding DNS name of the server. In this case, win-acme has used the http-01 challenge. However, it is also possible to use dns-01 or tls-alpn-01:
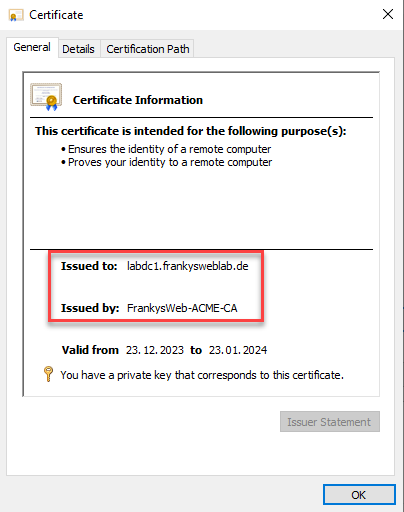
Here is a screenshot of the certificate chain:
Request certificate on Ubuntu computers via Certbot
On Ubuntu or other Linux systems, certbot is a popular ACME client. Certbot can be installed with the following two commands, which also install the ca-certificates package so that the root certificate can be installed on the Ubuntu server:
apt install python3-pip ca-certificates
pip install certbot
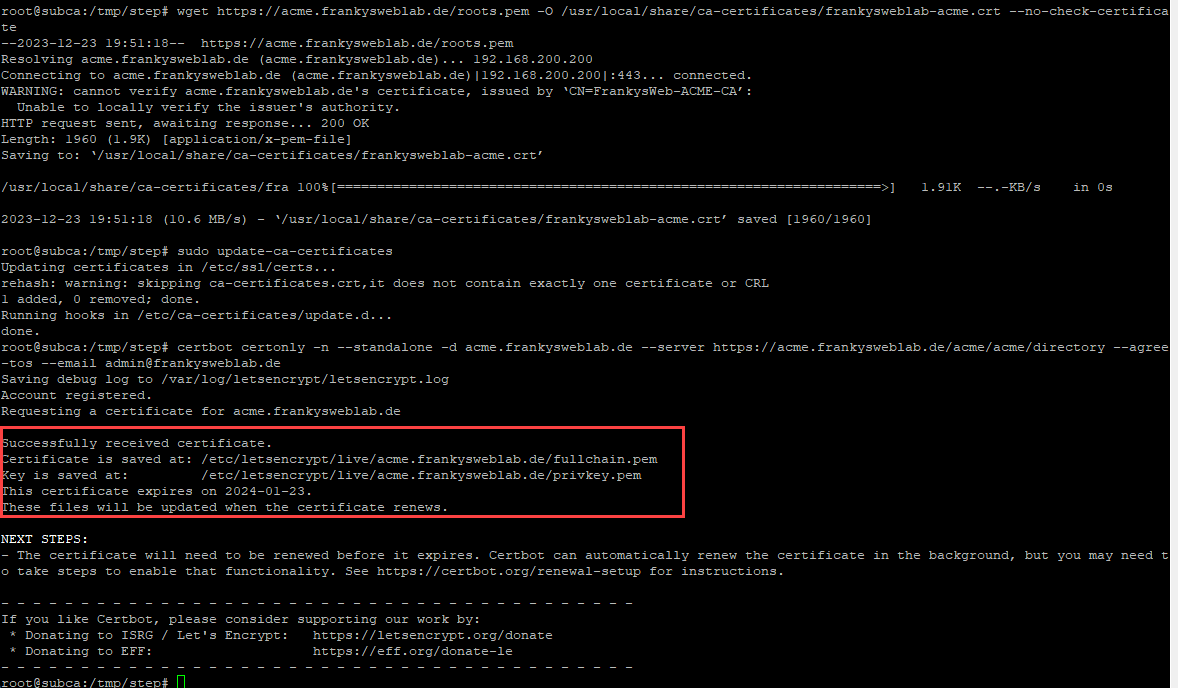
After installing Certbot, the root certificate must first be installed. This can be done with the following two commands:
wget https://acme.frankysweblab.de/roots.pem -O /usr/local/share/ca-certificates/frankysweblab-acme.crt --no-check-certificate
sudo update-ca-certificates
The commands must be used accordingly with your own URLs or file names. A certificate can then be requested via Certbot:
certbot certonly -n --standalone -d acme.frankysweblab.de --server https://acme.frankysweblab.de/acme/acme/directory --agree-tos --email admin@frankysweblab.de
Automatic renewal works via cronjob. The following line can be added with the command "crontab -e":
*/15 * * * * * root certbot -q renew
From now on, the system will check every 15 minutes whether a certificate needs to be renewed.
Conclusion
The ACME protocol is also suitable for internal systems and services and simplifies the handling of certificates enormously. In the best case scenario, you hardly have to worry about certificates, as ACME clients such as win-acme and certbot do almost all the work for you. Many appliances also support Let's Encrypt and thus the ACME protocol; for example, a Kemp load balancer can also use an internal ACME CA:
Unfortunately, Kemp only allows one configuration, so Kemp can either use the public Let's Encrypt or its own ACME CA. Nevertheless, the Step CA and the ACME protocol are perfectly suited to provide all its internal services with valid certificates with minimal effort. The public services can use Let's Encrypt, the internal services can use their own ACME CA. This means that all certificates, whether internal or public, can be obtained free of charge.

Hallo und vielen Dank für die gute Anleitung!
für mich stellt sich die Frage, wenn das Roo-CA von Microsoft PKI abläuft, muss man die Prozedur nochmal durchführen.
Wie Kann man das automatisieren?
Hallo,
für gewöhnlich hat das Root Zertifikat eine recht lange Laufzeit (10-20 Jahre) und auch die Laufzeit der Sub-CA liegt normal bei 3-10 Jahre. Den Austausch zu Automatisieren wäre sehr aufwendig und macht daher aus meiner Sicht keinen sind.
hey franky,
vielen dank für die anleitung, das klappt super soweit – nur eine Sache wundert mich doch total und funktioniert auch bei uns dadurch unsauber: Die Certificate sind nur 30 Tage gültig -> Cerbot kommt dadurch aber ins Stocken, da er -30 Days Valid erneuert und bezeichnet sie andauernd als noch nicht due for renew selbst wenn er ein Tag vor Schluss ist.
In deine Konsolen Outputs glaube ich auch zu erkennen, dass sie ähnlich lange valid sind.
Hast du ne Idee woher das kommt (normalerweise sind ja letsencrypt certs 90 tage gültig)
VG
und start zu fragen, sollte man mal selber suchen…
im config folder von step (zu finden mit step path) findet sich die ca.json dort gibt es den Wert für „defaultTLSCertDuration“:
den einfach wie gewünscht angepasst – oder sieht da wer ein problem?
Sehr interessantes Thema. Vielen Dank für den ausführlichen Einblick!