Update 12.01.17: This article is outdated, here is an updated version: Exchange 2016: Free certificates from Let's Encrypt
The new CA "Let's Encrypt" has been in the public beta phase for a few days now. The aim of Let's Encrypt is to make it easy to issue SSL certificates. The certificates are also free of charge.
The CA is already supported by most browsers, as the Let's Encrypt CA has been signed by Identrust (Cross Signing).
Even though it is currently a beta phase, the certificates can already be used for Exchange test environments, but it is currently still somewhat cumbersome in connection with Exchange Server. There is a Windows Clientbut it didn't really want to run on my test system. It will probably take a little more time for the programs to mature.
Since the Windows clients are not yet ready, I used an Ubuntu Server VM with the LAMP stack installed for this test. The LAMP stack is not actually necessary, but I didn't have anything else to hand :-)
I am using my domain frankysweb.com for my test. I would like to have a certificate issued for my Exchange server that contains the following DNS names:
- outlook.frankysweb.com
- autodiscover.frankysweb.com
In other words, a classic SAN certificate with two DNS names.
Let's Encrypt works a little differently than a normal CA. Most CAs have a web portal where a certificate request (CSR) must be submitted. At Let's Encrypt, this is done by a client. We therefore need the client first. The client is downloaded from the GIT repository with the following command:
git clone https://github.com/letsencrypt/letsencrypt
As soon as the download is complete, you can switch to the "letsencrypt" directory. The client is located in this directory.
First, the client can be called with the -help parameter; any missing dependencies are then installed:
At this point, we now have the Let's Encrypt client and all dependencies. However, there are a few special features in this case:
The PC or server requesting the certificate must be accessible from the Internet under the requested domain name via port 80. In this way, Let's Encrypt ensures that you are also in possession of the domain for which the certificate is requested (Domain Validation). Other CAs usually send an e-mail with a link to an e-mail address such as postmaster@domain.de. With Let's Encrypt, this function is performed by the client.
Since an Apache server is already listening on port 80 on my test server, Apache must first be terminated so that port 80 is free for the Let's Encrypt client.
sudo service apache2 stop
To make the test server accessible under the domain names autodiscover,frankysweb.com and outlook.frankysweb.com, I created the two subdomains with my hoster and had them point to my WAN IP:
I then forwarded port 80 on the firewall to my test server via DNAT.
Note: Port 80 is only required for the request, after which the port can be closed again.
The Let's Encrypt client is now accessible and the certificate can be requested:
/letsencrypt-auto certonly --standalone -d outlook.frankysweb.com -d autodiscover.frankysweb.com
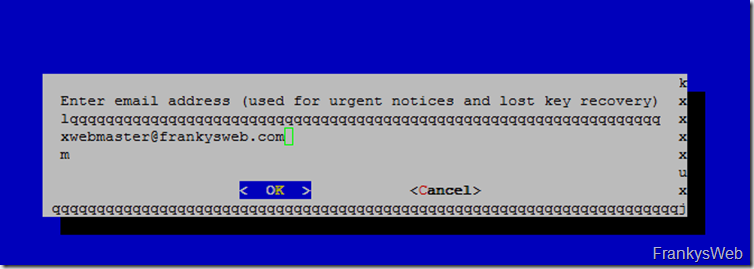
Only one e-mail address needs to be entered for notifications:
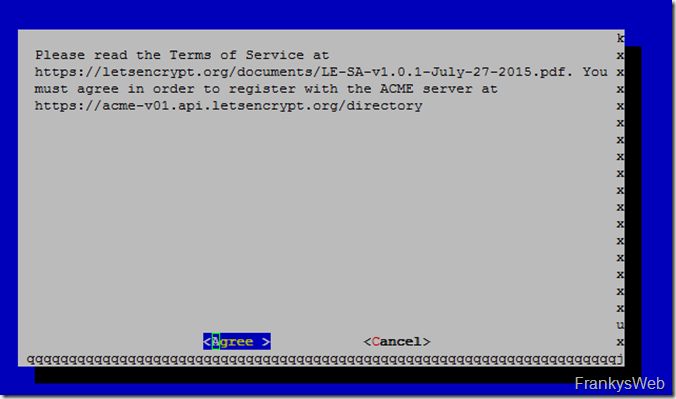
and then agree to the Terms of Service:
After the certificate has been issued, it is saved in the /etc/letsencrypt/live/ folder:
Normally only the root user has access to the /live directory, so log in as root user with the following command:
su -
You can now switch to the corresponding directory. Among other things, the private key (privkey.pem) and the certificate (cert.pem) can now be found there:
However, Windows cannot do much with certificates in PEM format. So the certificate and the private key are converted into PKCS format:
openssl pkcs12 -export -in cert.pem -inkey privkey.pem -out frankyweb.p12
The certificate can now best be copied to the home directory, then it can be easily accessed via WinSCP or similar, without having to adjust the permissions for /etc/letsencrypt/live.
cp frankyweb.p12 /home/frank/frankysweb.p12
The .p12 file can now be transferred to the Exchange Server. The easiest way to do this is probably via WinSCP:
The certificate can now be imported. To do this, an MMC with the "Certificates" snap-in (local computer) can be loaded:
The .P12 file can now be imported here:
A glance at the certificate confirms that it is valid. Certificates with a validity period of 3 months are currently issued:
Both DNS names are included:
IdenTrust (DST Root CA X3) has signed the Let's Encrypt Authority X1, so this certificate is valid on most browsers and devices:
Now assign the Exchange services to the new certificate:
Done:
The certificate is only valid for 3 months. Renewal also works via the Let's Encrypt client. Let's see if longer terms are possible after the beta phase. There will certainly be a lot more to come.
It is not yet intended for productive use, but for your own tests and games, why not?
And above all: Simply request free SAN certificates via Windows Client and have the IIS configured at the same time? That would be too good to be true, wouldn't it? But that's exactly how Let's Encrypt intends it to be. It remains exciting.
Update 12.01.17: This article is outdated, here is an updated version: Exchange 2016: Free certificates from Let's Encrypt


Hallo zusammen! Toller Artikel.
Wie ist der aktuelle Stand bezüglich eines Windows Clients?
LG Michael
Thank a lot Franky!
You are a Boss!
It’s work like a charm ;)
Anleitung funktioniert allerdings hate ich folgendes Problem.
Da mein Exchange lief hate er immer auf das aktuelle Zertifikat ( via 443) zugegriffen und da er die internen Domänen logischerweise nicht überprüfen konnte gabe es immer ein Problem.
Da gibt es allerdings einen FIX :
–standalone-supported-challenges http-01 to use port 80
–standalone-supported-challenges tls-sni-01 to use port 443
Über Port 80 gehts dann obwohl schon ein Zert via 443 dranhängt.
Der Rest war wie beschrieben.
Vielen Dank!
Uil
Hallo,
muss jeder der Domainnames per HTTP-80 erreichbar sein, die ins SAN soo? Wenn ja sind die Let’s Encrypt-IPs bekannt wo, von denen die Anfragen überprüft werden (Habe auf der LE-Seite nichts gefunden)?
Ich denke hier an einen Kunden mit mehreren Standorten, verbunden mit VPN-Tunneln für den viele DNS-Records und Firewallregeln notwendig wären, damit StandortA.FirmaA.tld auf einem zentralen System ankommt, dass die Zertifikatsanfragen stellt und dann auf die Exchange-Server verteilt.
Grüße
Steve
Geht auf jeden fall mit letsencrypt winsimple soeben getestet mit Sophos Webadmin. Erstellt unter Win10 mit Miniwebserver und NAT auf Port 80
Das Zertifikat hast du dann manuell im Webadmin auf der UTM hinterlegt? Kennst du einen Weg die Zertifikate automatisch zur UTM zu bringen?
Coole Anleitung. Vielen Dank.
Soweit ich gehört habe, soll es wohl bei den 3 Monaten Zertifikatgültigkeit bleiben. Hier sollen die Zyklen verkürzt werden um dadurch die Zertifikatsicherheit zu erhöhen.
Eine Zertifikatsverlängerung kann man sicher unter LAMP scripten und dann per Freigabe auf Windows ablegen. Und dort vielleicht per Powershell und Task aktivieren, zumindest bis ein vernüftiger Windows Client existiert.
Was mir noch fehlt ist eine Unterstützung durch die Sophos UTM WAF. Denn mein Exchange ist auch hier veröffenticht und da bringen die Exchange Let’s Encrypt Zertifikate nach außen nur einen ersten Schritt.
Viele Grüße
Nathan
Hi Nathan,
vielen Dank für die Info. Ich denke sobald es einen stabilen Windows Client gibt lässt sich das auch wunderbar per Script direkt auf dem Exchange Server erledigen. Könnte mir vorstellen ein kleines Powershell Script, welches täglich durch den Taskplaner aufgerufen wird, das Ablaufdatum des Zertifikats prüft und ggf. per Let’s Encrypt Client erneuert, dann kurz das Zertifikat an die Exchange Services bindet und fertig. Denke das ist gerade für kleine Umgebungen eine schöne Lösung. Ich werde das mal etwas im Auge behalten.
Der Let’s Encrypt Client ist in manchen Situationen natürlich Fluch und Segen zugleich, gerade bei Geräten wie Firewalls oder ähnlichem lässt sich kein Client nachinstallieren der sich dann um Zertifikate kümmert und alle 3 Monate zig Zertifikate manuell tauschen will man auch nicht. Andererseits macht es der Client natürlich einfach an Zertifikate zu kommen und auf Servern auszurollen.
Ich hab ebenfalls privat die Sophos UTM WAF im Einsatz, von daher werde ich mal schauen, wie ich da was automatisieren kann.
Schönes Wochenende,
Frank