

Here is the second part of the migration from Exchange 2010 to Exchange 2016. The first part can be found here:
Migration from Exchange 2010 to Exchange 2016 Part 1
In this article, the public folders and mailboxes are migrated. The migration of the public folders can only take place with downtime, so read first, then plan :-)
Update: Order of screenshots corrected
Preparation Migration Public folders
As already mentioned in Part 1, it is not yet possible to access the Exchange 2010 public folders from an Exchange 2016 mailbox. If you do not use public folders under Exchange 2010, you can skip this part and continue reading from "Exchange 2016 as a proxy for Exchange 2010".
There are public folders set up on the Exchange 2010 server that need to be migrated, here is an example:
The Exchange 2010 user Frank can access the public folders under Exchange 2010:

However, the user Hans with an Exchange 2016 mailbox does not:

A proxy mailbox is required so that Exchange 2016 users can access the public folders. The proxy mailbox for public folders should ideally be stored in a separate database. The ProxyMailbox is basically a normal mailbox and can be created via shell or GUI. Here is the quick way via the shell (the last command must be executed via shell):
Create a new database for the ProxyMailbox:
New-MailboxDatabase -Server FWEX2010 -Name PFProxyDatabase -IsExcludedFromProvisioning $true

Create ProxyMailbox in the new database:
New-Mailbox -Name PFProxyMailbox1 -Database PFProxyDatabase -UserPrincipalName PFProxyMailbox1@frankysweb.local

Hide ProxyMailbox from the address book:
Set-Mailbox -Identity PFProxyMailbox1 -HiddenFromAddressListsEnabled $true
Once the database and proxy mailbox have been created, access can be activated. To do this, the following command must be executed on the Exchange 2016 Server be executed:
Set-OrganizationConfig -PublicFoldersEnabled Remote -RemotePublicFolderMailboxes PFProxyMailbox1
Wait briefly, then the Exchange 2010 public folders will also appear for Exchange 2016 users:

Exchange 2016 as a proxy for Exchange 2010
Now the DNS entries are being changed to Exchange 2016, as already mentioned in the first part, it affects all clients from here on. Currently, the DNS entries still refer to Exchange 2010 (172.16.100.101):
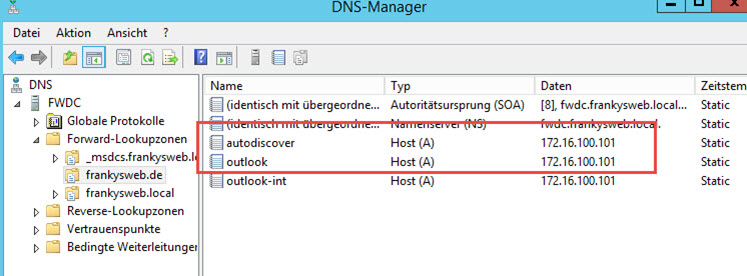
The CAS array with the name outlook-int remains in place because Exchange 2016 serves as a proxy for mailboxes running on Exchange 2010. The connection is therefore established via outlook.frankysweb.de from Exchange 2016 and then forwarded to outlook-int.frankysweb.de if the mailbox is still on the Exchange 2010 server.
The DNS entries are changed as follows:
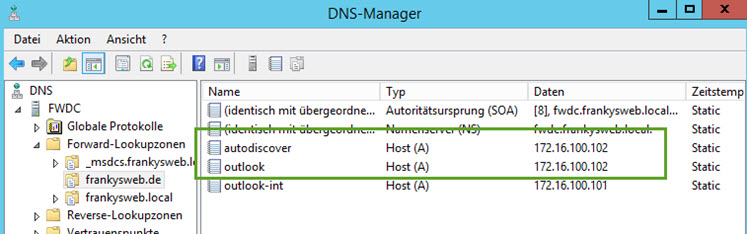
outlook.frankysweb.de and autodiscover.frankysweb.de now point to the Exchange 2016 IP. The changes to the HOSTS file on the test clients can be undone.
Anyone using Outlook Anywhere and/or ActiveSync must now adjust their firewall. Depending on how Exchange 2010 was accessible on the Internet (NAT, ReverseProxy), you must now switch to Exchange 2016. If you only use NAT, i.e. Exchange 2010 was directly accessible via port forward on the Internet, you only need to change the destination IP to the Exchange 2016 IP. The procedure naturally depends on the product/route used.
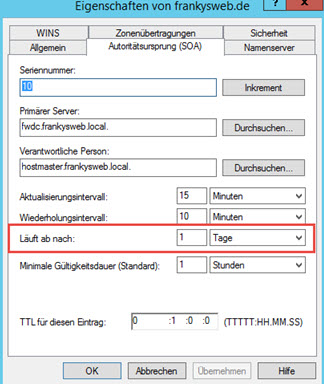
From here, we should allow a little time to pass until all clients have noticed the DNS change. Putting your feet up for a day can't hurt either:
After some time has passed, the Outlook connection of Exchange 2016 users (test users from part 1) should look like this:

User Hans uses MAPIoverHTTP with Exchange 2016, whereas user Frank uses MAPI with Exchange 2010:

When user Frank calls up OWA, he receives the new login screen:

And is referred to Exchange 2010 OWA after logging in:

Migration of mailboxes
Now it's time to move the mailboxes. Migrating the mailboxes is the easiest part. As with the test mailbox, a new migration batch is created:

All mailboxes to be migrated to Exchange 2016 are now selected, with the exception of the proxy mailbox for public folders, which remains on the Exchange 2010 server:

In the next dialog, simply select the Exchange 2016 database again

Finally, the migration batch can be started:

Depending on the number of users and the time window, everyone must decide for themselves how many users should be processed within a batch.
The status of the migration batch can be viewed via the "Show details" item:

When all mailboxes in the migration batch have been moved, it looks like this:

As soon as the mailbox has been moved to Exchange 2016, the users receive the message that Outlook must be restarted

After the restart, Outlook is connected to Exchange 2016.

This means that all mailboxes can now be moved bit by bit and users are only asked to restart Outlook once. I think this is also manageable during the day. If you prefer to move users at night, you can select the option "Complete batch manually", then the mailboxes can be migrated during the day, and at night you can quickly run a small script and finalize the mailboxes.
Migration of public folder
Once all mailboxes have been moved, you can start migrating the public folders. If you do not use public folders, you can skip this part and wait patiently for part 3.
For the migration of public folders, the "Public Folder Migration Scripts" are required, the scripts can be downloaded here:
Microsoft Exchange 2013 Public Folders Migration Scripts
Now not via "Microsoft Exchange 2013 Public Folder Migration Scripts", the scripts are also valid for Exchange 2016.

The 4 files are stored on the Exchange 2010 server, here in the example in C:\PFMigration

Now the following 3 commands are executed on the Exchange 2010 server to save the existing structure, number of elements and authorizations:
Get-PublicFolder -Recurse | Export-CliXML C:\PFMigration\Legacy_PFStructure.xml
Get-PublicFolderStatistics | Export-CliXML C:\PFMigration\Legacy_PFStatistics.xml
Get-PublicFolder -Recurse | Get-PublicFolderClientPermission | Select-Object Identity,User -ExpandProperty AccessRights | Export-CliXML C:\PFMigration\Legacy_PFPerms.xml

The 3 commands create these 3 files:

NoteA backshlash "\" in the name of the public folder is not supported, folders with backshlash in the name must be renamed before migration. The following command can be used to find corresponding folders:
Get-PublicFolderStatistics -ResultSize Unlimited | Where {$_.Name -like "*\*"} | Format-List Name, Identity
It is also important that there have been no other attempts to migrate the public folders, in my test environment I am sure at this point and skip the steps for testing. If you are not quite sure, you should follow the appropriate procedure read here.
I would also like to point this out at this point: These instructions only show the procedure, but are not generally valid. If you only have a few public folders, you can continue, if you have many public folders and / or a lot of data volume, you should plan the new public folder structure.
At this point I assume that there are only a few public folders and that the amount of data is manageable (max. 20 GB, which in most cases leads to a PFMailbox)
The CSV files required for the migration are now created with the help of the scripts:
.\Export-PublicFolderStatistics.ps1 FolderToSizeMap.csv fwex2010.frankysweb.local

The next step is to create the mapping from the public folder to the public folder mailbox:
.\PublicFolderToMailboxMapGenerator.ps1 21474836480 .\FolderToSizeMap.csv FolderToMailBoxMap.csv

Note: 21474836480 corresponds to 20 GB in bytes and at this point means that a public folder mailbox should have a maximum size of 20 GB.
Since I only want to use one mailbox for public folders, I now create the corresponding mailbox on the Exchange 2016 server:
New-Mailbox -PublicFolder Mailbox1 -HoldForMigration:$true

The migration batch for the public folders can now be created and started:
New-MigrationBatch -Name PFMigration -SourcePublicFolderDatabase (Get-PublicFolderDatabase -Server FWEX2010) -CSVData (Get-Content \\fwex2010\C$\PFMigration\FolderToMailBoxMap.csv -Encoding Byte) -NotificationEmails administrator@frankysweb.de
Start-MigrationBatch PFMigration

The status of the migration can be checked via the shell or via EAC:
Get-MigrationBatch


Now you have to wait until the migration batch is finished and has the status "Synchronized":

A maintenance window is required for the next steps, because access to the public folders, will not be possible. Outlook will display a corresponding message:

Set-OrganizationConfig -PublicFoldersLockedForMigration:$true

Note: To speed up the process at this point, it is necessary to restart the IIS on the Exchange 2010 server (iisreset). This will of course interrupt Outlook connections. After the restart, you can continue with the following commands. Alternatively, "wait" also helps:
Set-OrganizationConfig -PublicFoldersEnabled Remote
Complete-MigrationBatch PFMigration

Now wait until the migration batch is complete:


As soon as the migration batch is complete, you can test whether everything worked. The test can be carried out with a test user, in this case the user Frank:
set-mailbox frank -DefaultPublicFolderMailbox Mailbox1

User Frank can now test access to the public folders:

If everything looks good so far, the public folders can be shared with all users again by executing the following command on the Exchange 2016 server:
Get-Mailbox -PublicFolder | Set-Mailbox -PublicFolder -IsExcludedFromServingHierarchy $false
This command is then executed on the Exchange 2010 server:
Set-OrganizationConfig -PublicFolderMigrationComplete:$true
And last but not least, this command on the Exchange 2016 server:
Set-OrganizationConfig -PublicFoldersEnabled Local
Admittedly, the migration of public folders is complicated and requires downtime, but once you've done it a few times... Planning is important here, how big should the mailboxes for public folders be, how many mailboxes do I want to create, how much growth will there be, etc.? The downtime should also be well planned and a correspondingly long maintenance window should be communicated.
From here on, mailboxes and public folders are on Exchange 2016. Now it is time (if necessary) to switch the MX records and devices such as printers, scanners, other servers that send mails to Exchange 2016.
In the next and final part, we will clean up and uninstall Exchange 2010.