I have somewhat neglected the topic of Active Directory here recently, so here is an easy introduction to the topic.
Foreword
This article is about the installation of a new Active Directory on a greenfield site. In this test environment, there is currently only one server that is to be upgraded to a domain controller and thus provides a new overall structure. Windows Server 2016 is installed on the server and, of course, all updates available at the time.
Preparation
The preparations are quickly completed. The server must be configured with an appropriate host name and have a permanently assigned IP address. In my case, I choose the host name FWDC1
I assign the IP address 172.16.100.11
Gateway and at least one DNS server should also be specified. In principle, these were all the necessary preparations.
Install Active Directory role
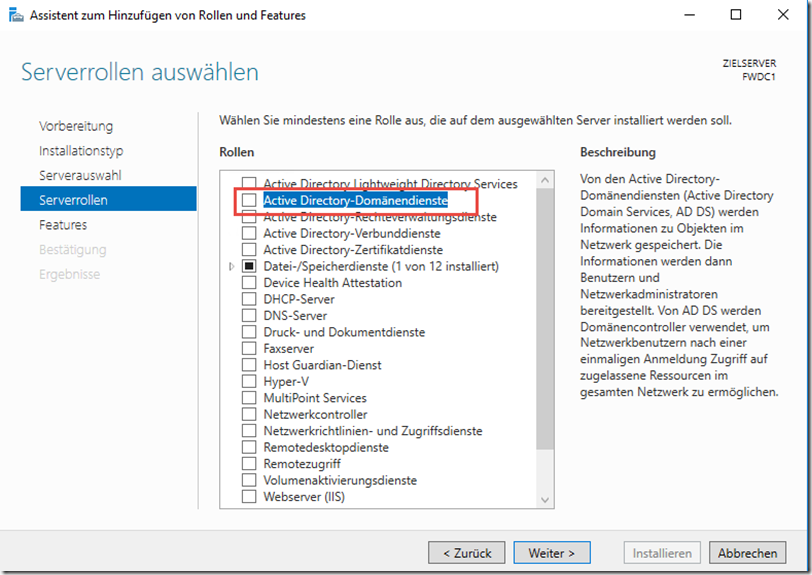
In order to install a new Active Directory, the "Active Directory Domain Services" role must first be installed:
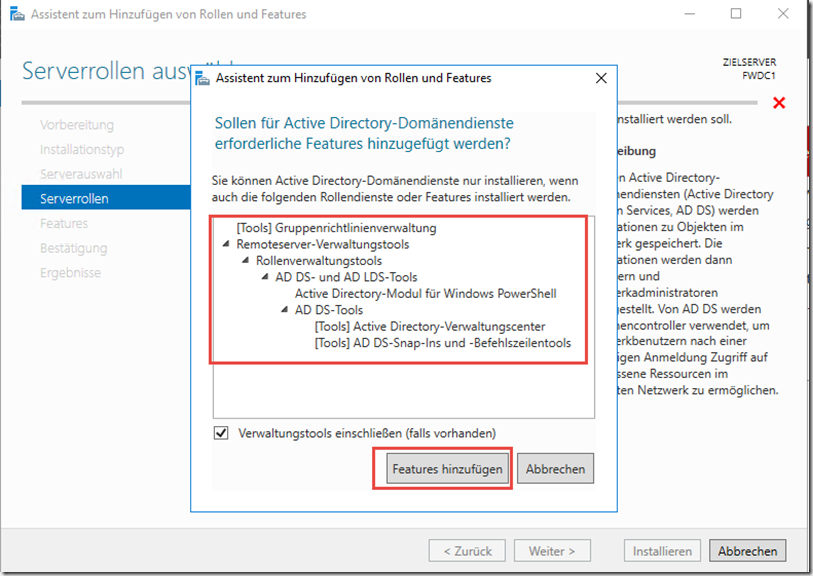
The required features for the role are also installed:
The remaining queries can all be confirmed with "Next"
Finally, a summary is displayed
Once the binary data has been installed, the server can be upgraded to a domain controller and the Active Directory can be installed:
Upgrade domain controller
If the previous wizard window has already been closed, the wizard for upgrading to Domain Controller is also available in the Server Manager:
If you are on a greenfield site, you can freely assign the name for the Active Directory. In the meantime, names such as company.local are no longer used in new environments. A name like ad.firma.de would be better here. Nevertheless, names such as firma.local or firma.intern can still be used. However, the root domain name must not be one part. "Company" or "Internal" is therefore not possible.
I choose ad.frankysweb.com as the name:
The following dialog takes some time if no DNS delegation can be created; this is completely normal for the first domain controller and public DNS servers. In this case, this server is now trying to create a DNS delegation for ad.frankysweb.com in the frankysweb.com zone. Since frankysweb.com is hosted by a name server on the Internet and cannot be updated by this server, the creation of the delegation runs into a timeout.
Normally, delegation from the public DNS to the internal DNS is not required and you would hardly want to make the future DC accessible via port 53 (DNS) on the Internet.
The overall structure and domain function level can be set to "Server 2016" for a new environment. In this case, all Active Directory features will be available, but no server can be upgraded to a DC that does not use at least Server 2016 as its operating system.
Keep the password for the recovery mode in a SAFE place.
The following dialog also displays a corresponding message that no delegation could be created:
The NetBIOS name "AD" is quite nice, short, crisp and memorable. The first part of the root domain name becomes the NetBIOS name of the domain by default. In my case, this is "AD". However, the NetBIOS name can also be customized here:
Well, AD may mean something to every admin, but not to the users, the company name as NetBIOS name would also be conceivable.
The NetBIOS name is later used for the user names, for example "AD\frank". "frankysweb" can also be entered here as the NetBIOS name. The user name would then be "frankysweb\frank" or "frank@ad.frankysweb.com".
The storage paths can normally be left as they are:
Finally, a summary before the upgrade
Nice addition: The wizard also directly displays the PowerShell command for upgrading. This is very practical for new domain controllers.
Due to the DNS delegation, the prerequisite check also takes some time, the two warnings are normal.
After clicking on "Install", the server is upgraded to a domain controller and restarts.
After the restart, a few small adjustments are still necessary.
Reworking
The new domain controller is already functional, but there are still a few small finishing touches that are often forgotten.
Here again the example for the user name (as described above):
After the domain controller has been installed, a reverse lookup zone must be created:
The options can be adopted as far as possible, it is a primary zone:
The zone should be replicated to all DCs in this domain:
As type IPv4:
Only the subnet must be specified here:
Only secure dynamic updates are permitted, i.e. only domain computers are allowed to update their own DNS records.
After the reverse lookup zone has been created, the "Update corresponding pointer entry" checkbox is activated on the Host-A entry of the domain controller:
Checking the box then creates a PTR for the DC in the reverse lookup zone:
After the reverse lookup zone has been created, the subnet for the Active Directory location must be created, which is often forgotten:
The corresponding subnet or subnets for which domain controllers are responsible at this location are also specified here. In my case, this is only 172.16.100.0/24
We therefore have an Active Directory site with a domain controller for the subnet 172.16.100.0/24
By the way, it is a good idea to protect all organizational units from accidental deletion, this is done with a small Powershell command and can do no harm:
Get-ADOrganizationalUnit -filter * -Properties ProtectedFromAccidentalDeletion | where {$_.ProtectedFromAccidentalDeletion -eq $false} | Set-ADOrganizationalUnit -ProtectedFromAccidentalDeletion $true
One important thing at the end: the time!
The time in the Active Directory is still extremely important. A domain controller should therefore be synchronized with a time server. In this environment, there is only one domain controller so far, so the question of which DC needs to be synchronized with an external time source does not arise here. If there is more than one DC in the domain: The DC with the FSMO role "PDC" is synchronized with a time source:
To set an NTP server on the PDC, the following two commands are sufficient:
w32tm /config /manualpeerlist:ptbtime1.ptb.de /syncfromflags:manual /reliable:yes /update
net stop w32time && net start w32time
The rework has been completed so far and the Active Directory is basically usable. However, as the Active Directory is a, if not the, core component in most companies, it is advisable to install at least two domain controllers.
The installation of a second domain controller follows in the next article.


Moin,
@David Li Bergolis
kannst du dazu evtl. deine best practices als tutorial durchreichen, das wäre klasse.
Hi, sorry für die späte Antwort.
Hier mal eine Anleitung von dieser Seite:
https://www.ip-insider.de/active-directory-und-domaenencontroller-sichern-und-wiederherstellen-a-683858
Verschieben der Active-Directory-Datenbank
Der Speicherort der Active-Directory-Datenbank kann angepasst werden. Die notwendigen Angaben werden in der Befehlszeile vorgenommen:
1. Dazu muss zunächst der Server im Verzeichnisdienstwiederherstellungs-Modus neu gestartet werden.
2. In der Befehlszeile wird „Ntdsutil“ gestartet und danach „activate instance ntds“.
3. Um die Datenbank zu verschieben, wird der Befehl „move db to “ verwendet.
Hierbei sollte der Pfad keinerlei Leerzeichen oder Umlaute enthalten.
4. Danach wird die Datenbank verschoben.
5. Nach dem Verschieben der Datenbank müssen noch die Transaktionsprotokolle verschoben werden.
Dazu wird der Befehl „move logs to “ verwendet.
Hierbei sollte der Pfad keinerlei Leerzeichen oder Umlaute enthalten.
6. Mit dem Befehl „integrity“, wird noch die Konsistenz der Active-Directory-Datenbank geprüft.
Das Verschieben von SYSVOL wird von Microsoft nicht empfohlen, aber WENN schon,
dann wird dringend empfohlen, den DC herunterzustufen und erneut hochzustufen,
währenddessen logischerweise die vorgegeben Pfade für Datenbank, Logs und SYSVOL anpassen.
Das MANUELLE Verschieben von SYSVOL habe ich persönlich noch NIE erfolgreich hinbekommen.
Aber im Grunde sollte schon bei der EINRICHTUNG des DC auf eine Trennung der Laufwerke geachtet werden.
Ich habe föllig unerfahren damit angefangen und dennoch von Anfang an alles sauber getrennt, hat sich gelohnt.
Wenn es dir allerdings nur um den Cache geht, gibt es eine andere Methode (sei Dir bitte unbedingt sicher, dass die Stromversorgung stabil ist!!!):
Im NT4 Resource Kit gab es DSKCACHE.EXE (hab die Datei noch, sie funktioniert sogar auf Windows Server 2019 fehlerfrei),
das kann über ein Bootskript bei jedem Start den Cache auf allen Laufwerken aktivieren.
Kann dir die Datei gerne zusenden samt einem kleinen Dreizeiler als Batch, der bei Booten ausgeführt wird.
Alternativ ginge es über die Registry, aber erfahrungsgemäß ist diese Methode nicht von Dauer.
Spätestens beim nächsten größeren Update kann das wieder zurückgesetzt werden.
Hier mal die Infoseite dazu:
https://znil.net/index.php/Windows_Domain_Controller_Schreibcache_dauerhaft_aktivieren
Es wäre gut, zu erwähnen,
dass die Ordner für die NTDS Datenbank sowie SYSVOL ganz ganz dringend
auf ein separates Laufwerk verlegt werden (keine Partition auf dem Bootlaufwerk, wirklich ein EIGENER Datenträger),
da Windows grundsätzlich und nicht einstellbar
den Schreibcache auf dem kompletten Datenträger deaktiviert, auf dem sich die Datenbank befindet.
Das macht sich an der gesamten Performance des Systems bemerkbar, und das nicht zu knapp.
Selbst wenn eine SSD benutzt wird, ist die Bedienung danach eine Qual.
Idealerweise benutzt man dafür aber auch einen Hardware-RAID Controller mit eigenem Cache und Backupbatterie.
Ganz gute Beschreibung, aber weil wohl für Frank normal muss man suchen wie man nun in das Menü reinkommt. Auch mit dem neuen Subnet aufsetzen bin ich hängen geblieben. Ich kann ja nicht das vom Beispiel nehmen, und wenn ich die IP von mir nehme, kommt immer eine Fehlermeldung. Also lasse ich das halt aus.
Hallo Frank, erstmal ein Danke für diese tolle Erklärung. Wenn man das nicht täglich macht ist es eine kleine Hilfe.
Aber beim heraufstufen bekomme ich bei der Überprüfung den Fehler, das ich meine TCP/IP-Netzwerkkonfiguration abschließen soll. Ich habe alle Einstellungen genauso vorgenommen wie in diesem Beitrag beschrieben. Sogar die IPs. Erst wenn ich den DNS von unserem Testnetz eingebe und das Netzwerkkabel anstecke ist die Überprüfung OK. Also funktioniert es nur wenn ich einen vorhanden DNS eintrage? Aber „auf der grünen Wiese“ habe ich normalerweise keinen DNS oder Router. Ich möchte ein komplett neues Netz aufbauen.
Vllt. hier noch erwähnenswert, dass bei Installationen von virtuellen DCs beachtet werden muss, dass die Zeitsynchronisation des Hypervisors ausgeschaltet werden sollte – da dieser die Zeitkonfiguration wieder überschreibt.
Kurze Verständnisfrage, wieso ist die interne Domain ad.frankysweb.de besser als frankysweb.local? Gibt es da bestimmte Vorteile?
Gruss Dave
Hi,
gute und berechtigte Frage. Zu diesem Thema wird es einen Artikel geben. Vielen Dank!
Gruß, Frank
Hi,
ich habe dazu gerade einen Artikel geschrieben:
https://www.frankysweb.de/active-directory-name-fr-ein-neues-active-directory/
Gruß, Frank