The setup of the small Exchange 2016 organization for small businesses and test environments is now quite advanced. The fourth part of this article series is about the Sophos UTM. The network configuration is as follows:
The Fritzbox establishes the Internet connection, the WAN port of the UTM (VM) is connected to a LAN port of the Fritzbox. A switch to which the servers are connected is in turn connected to the LAN port of the UTM. At network and VM level, this can be solved wonderfully via VLANs, or by using a corresponding number of network cards.
I have installed the UTM as a VM, 2 CPUs, 4 GB RAM and an HDD with 60 GB are completely sufficient here.
Installation
As I mentioned, I have already installed the Sophos UTM, for the sake of completeness, here are a few screenshots of the installation and configuration that has already been done:
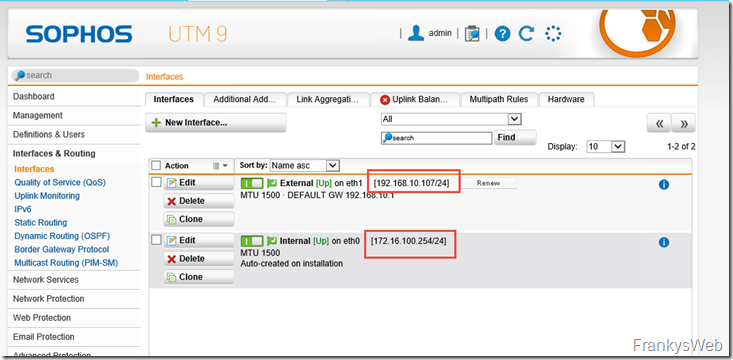
Internal network: 172.16.100.254/24
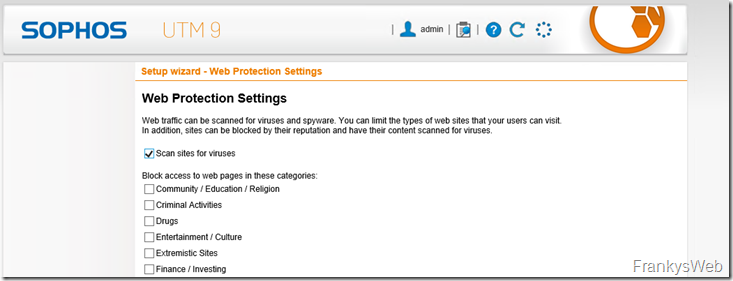
Interestingly, the Setup Wizard no longer found the second network card for the external network. The interface was still displayed during the installation. I therefore simply skipped this step and made up for the configuration. Here are the corresponding settings of the Setup Wizard from my test environment:
As mentioned above, the setup wizard did not find the second network card, but eth1 was displayed correctly after logging in, so I configured it as an external interface:
Now both network cards are configured accordingly. eth1 is connected to the Fritzbox, eth0 in the same network as the DC and Exchange Server:
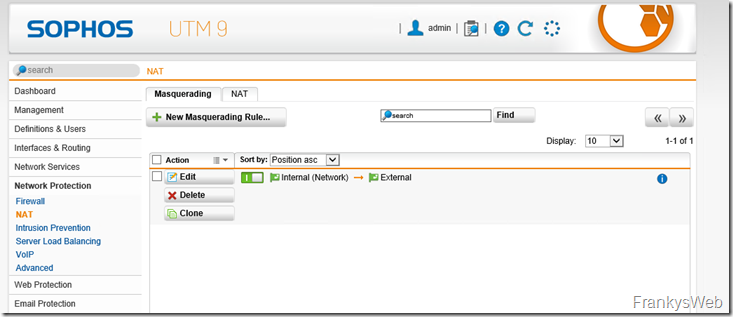
Since I had set up the Internet connection manually, I also have to create a masquerading rule:
The next step is to send e-mails.
E-mail dispatch
The Exchange Send Connector has already been described in Part 3 created. Using the send connector, Exchange forwards mails to external recipients to the UTM. The UTM should now transfer the mails to the Strato mail server, so Strato is also used as a smart host, as otherwise problems with AntiSpam gateways occur in connection with a dynamic IP.
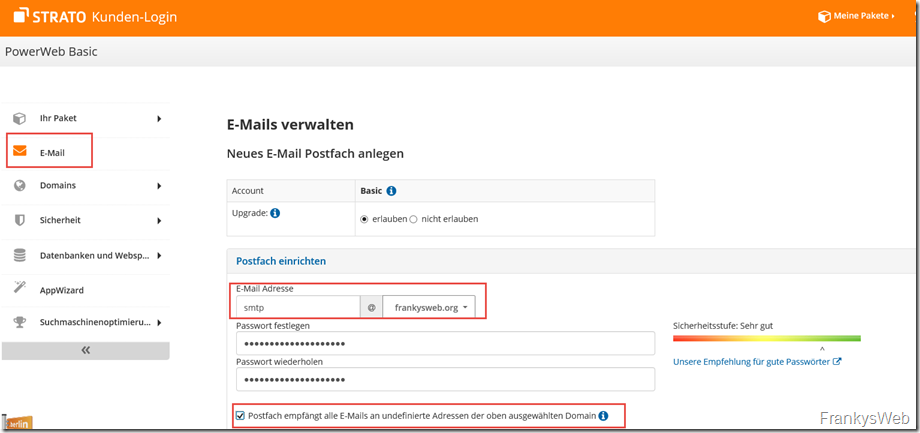
In order to use Strato as a smarthost, a mailbox is required, the Catch-All mailbox is suitable here. The Catch-All mailbox must still be created at Strato, this is done via the Strato Customer Center:
Important: Check the box "Mailbox receives all e-mails to undefined addresses...". Remember password and e-mail address.
That's all, let's continue with the UTM.
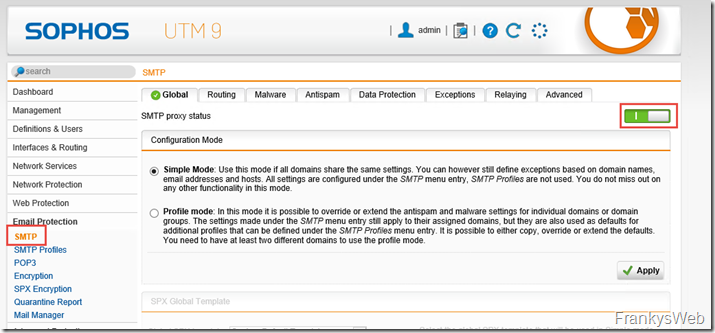
To enable sending, the e-mail protection of the UTM must be activated:
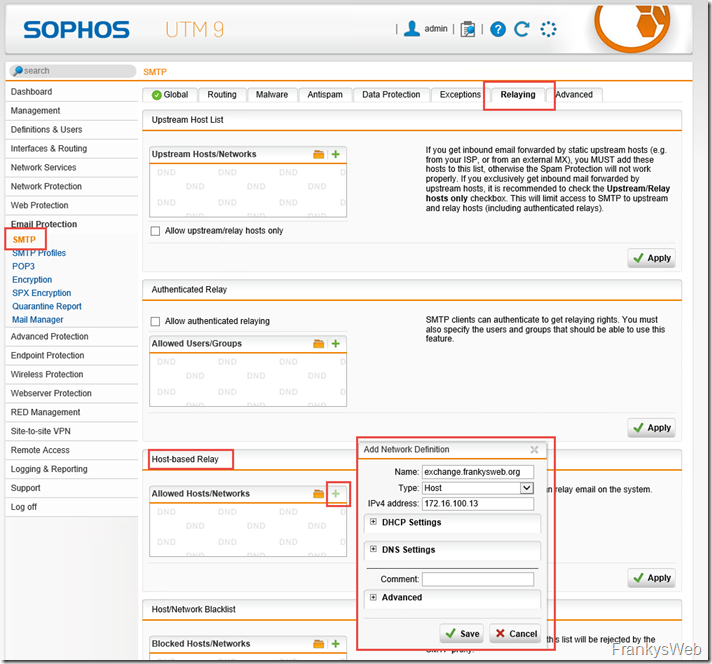
Under the Relaying tab, the Exchange Server is now entered in the "Host-based Relay" category:
It should now look like this:
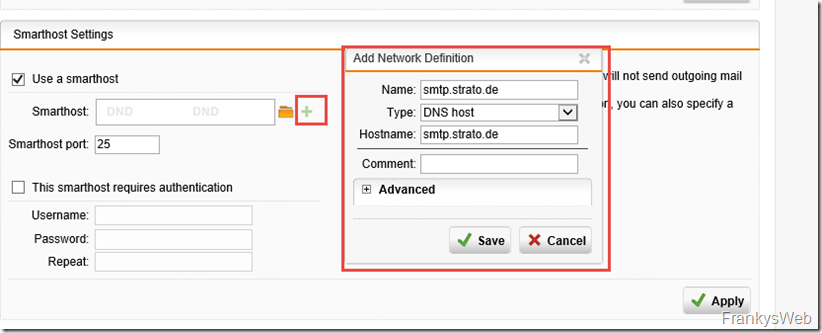
Exchange can now relay emails via Sophos UTM, the only thing missing is the configuration of Strato as a smarthost. Under the "Advanced" tab, you will find the "Smarthost Settings" item at the bottom:
The SMTP server from Strato is now entered here:
Since Strato requires login information, the e-mail address and password of the catch-all mailbox are also entered:
Sending mails is finished, now you can continue with receiving mails.
E-mail reception
The subject of reception is a little more complicated, at least if you do it the way I do. Hence a short explanation.
The UTM comes with a fairly sophisticated SPAM filter, which is great for small environments and test environments. For sending, we already use the feature called e-mail protection. For receiving, we can also use the spam filter with a trick. Due to the dynamic IP, we have no other option than to retrieve the mails from the catch-all mailbox via POP3 from Strato. Of course, retrieving the mails via POP3 "bypasses" the SMTP spam filter, as a different protocol is used here, namely POP3 instead of SMTP.
Although the UTM also offers a POP3 proxy, I don't think the POP3 proxy is particularly well implemented. For example, 2 separate quarantines are created, one for SMTP, one for POP3. A quarantine mail notification cannot be activated either. So there are 2 possibilities: Either install POP3 Connector on the Exchange Server and forward mails directly to the Exchange Server via SMTP, or install POP3 Connector somewhere (can be a small VM, or even the Exchange Server itself) and forward the mails back to the UTM. The UTM forwards after its SPAM checks (now the protocol is SMTP), back to the Exchange. The second variant was "from behind through the chest into the eye", but now the SPAM filter of the UTM can also be used.
Configuration of the "from behind through the chest into the eye" variant
A user is required for the Active Directory so that the UTM can verify the valid recipients, a standard user account is sufficient, only the password should better not expire:
In this case it is the account "SophosUTM", we now need the Distinguished Name, the fastest way to get the DN is via PowerShell:
Get-ADUser SophosUTM | fl name,DistinguishedName
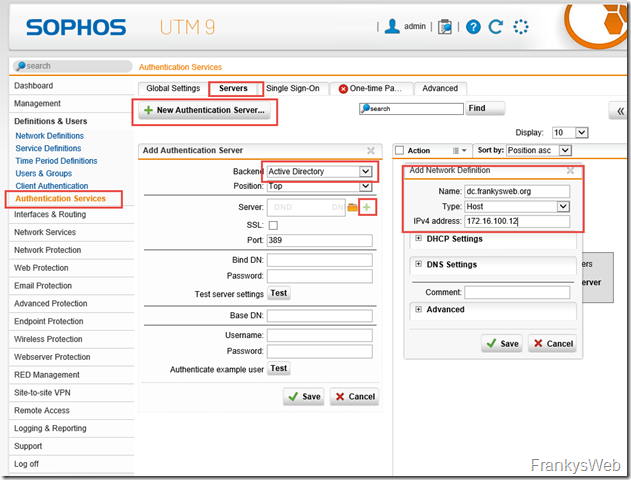
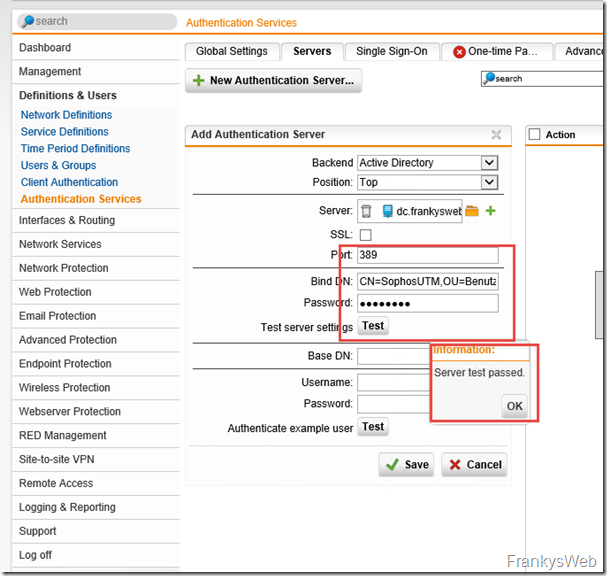
A new authentication server of the type "Active Directory" is now created on the Sophos UTM under "Definitions & Users":
The domain controller is specified as the server and the "Bind DN" is the distinguished name of the user created earlier with the corresponding user password. The test should now be successful.
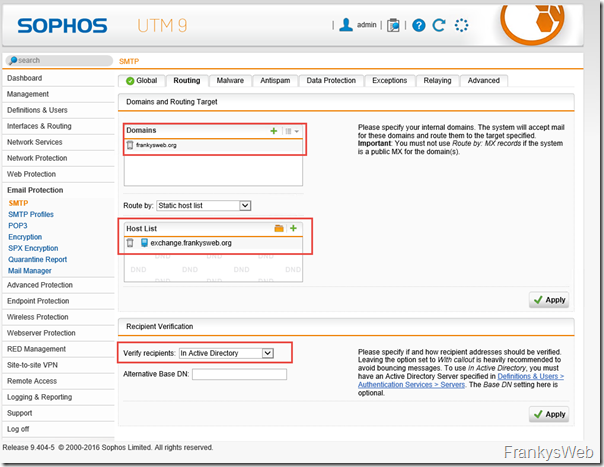
Now the domain can be specified in E-Mail Protection and the routing to the Exchange server. Recipient validation takes place via the Active Directory:
Continue with the POP Connector
Setup POP Connector
A POP3 connector is now required. I have had good experiences in the past with POPcon from Servolutions made. POPcon costs 79 EUR, but there are also free POP Connectors such as POP Collector.
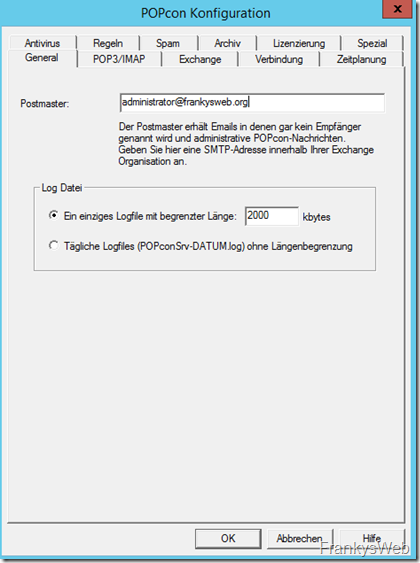
First of all, the example with POPCon from Servolutions. The installation is self-explanatory. After installation, click on "Configure server" and enter a postmaster address on the first tab:
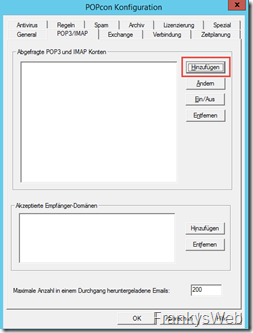
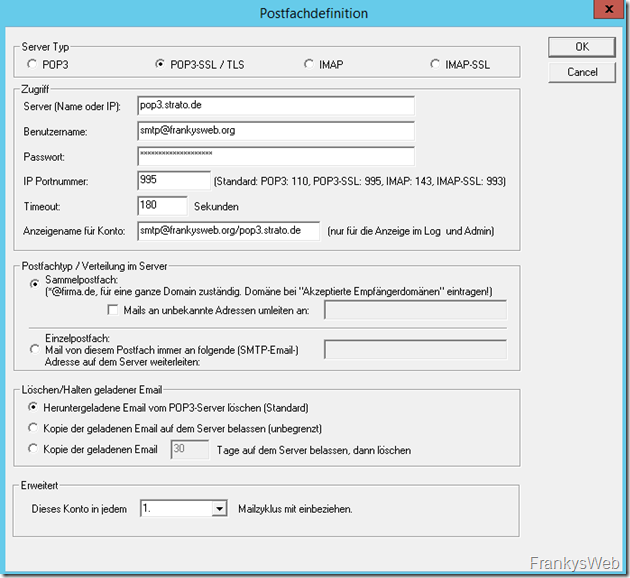
The catch-all account can be configured on the "POP3/IMAP" tab:
The type should be POP3-SSL / TSL. The Strato POP3 server is called pop3.strato.de. The user name and password correspond to the catch-all mailbox created above.
On the "Exchange" tab, do not enter the Exchange server, but the IP or the host name of the UTM, so that the SPAM filter part of the UTM can be used:
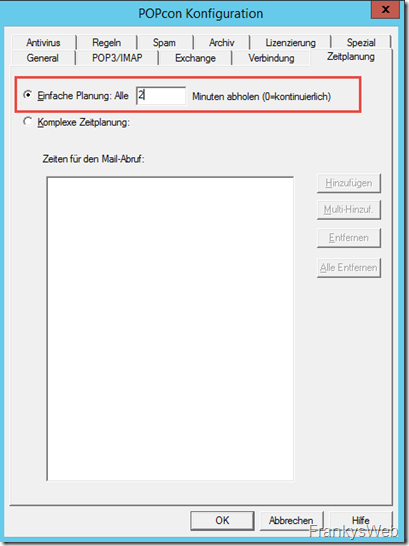
If you don't want to use the "from the back through the chest into the eye" method, you can of course also simply enter the IP or host name of the Exchange server here. Finally, enter an appropriate value for the retrieval on the "Scheduling" tab:
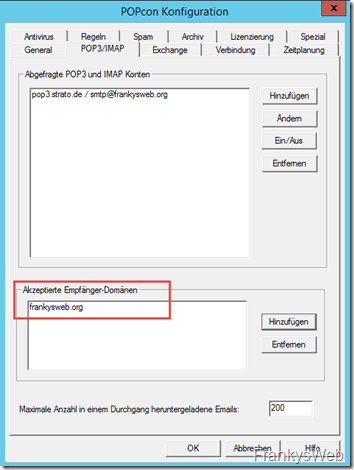
After the POP3 account has been created, the e-mail domain must be entered:
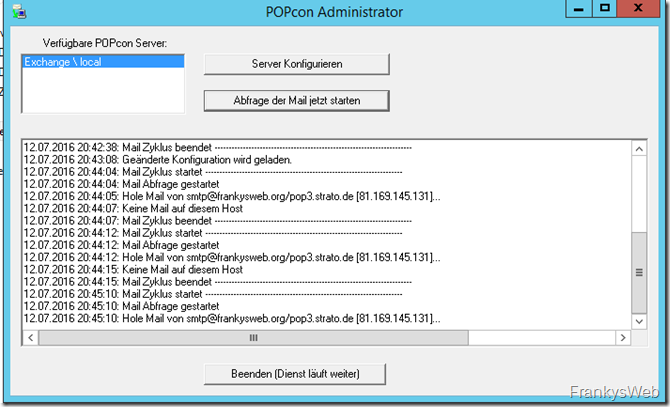
The download of the mails, if available, should now work:
Summary
Sending and receiving mails already works and the connection to Outlook from the internal network also works. However, some work is still required for Outlook Anywhere, Active Sync and OWA to work.









Hallo Frank,
wenn ich mir deine Beträge lese, echt Klasse geschrieben.
Leider bin ich bezüglich der Leitung ein wenig irritiert.
Frage1: Hast du mehr als 1 DSL-Ltg bei dir laufen oder wie kannst du franksweb.de und franksweb.org parallel laufen lassen?
Frage2: Netzwerkkonfiguration. Hier verstehe ich leider nicht wirklich wie du geschaltet /konfiguriert hast. „An dem LAN Port der UTM hängt wiederum ein Switch an dem die Server angeschlossen sind.“ Soweit ich mich erinnere ist Sophos UTM, DC & Exchange VM als VM installiert, auf dem gleichen Host. Mit „interner VSwitch“ verbunden?
Viele Grüße
Markus
Hallo Markus,
zu 1) Ich habe nur eine DSL Leitung, die beiden Domains (unterschiedliche Exchange Organisationen (Prod/Test) werden an der UTM WAF entsprechend der Hostnames zu den jeweiligen Umgebungen geleitet.
zu 2) Richtig, UTM und alle weiteres Systeme sind VMs. Der Hypervisor ist ein ESX Server, die Trennung der Netze erfolgt durch VLANs bzw. auch durch vSwitches. An der UTM kommen sind für Exchange beispielsweise 3 Netze konfiguriert: WAN, LAN, VMs. LAN und WAN sind VLAN Interfaces. VMs ist eine NIC mit Verbindung zu einem vSwitch welcher keinen Uplink hat. Die VMs sind also nicht direkt erreichbar sondern nur via Routing oder WAF der UTM.
Das Netzwerkdesign / VLAN Design ist da aber flexibel und lässt sich ja entsprechend anpassen.
Gruß,
Frank
Hallo Frank,
danke für deine schnelle Antwort.
zu 1) Das finde ich sehr interessant und würde da gerne mehr wissen. Ich würde es gerne auch so Aufbau , damit vorher Testen kann bevor es in die „Produktion“ geht. So könne man viele Problem vorher ausmerzen ;) :)
zu 2) Okay, mit einem ESX-Server kann ich leider nicht dienen. Ich habe es da eher mit mehr physische Server umzusetzen , sprich mehr Hardware Server & Firewall in der Praxis, WM nicht ausgeschlossen :)
Viele Grüße
Markus
Hallo Frank,
ich lese mit Begeisterung deinen Blog, da ich in der Situation bin, für einen kleinen Handwerksbetrieb (Brandmeldeanlagen, Sicherheitstechnik usw.) mit 25 Angestellten genau eine solche Umgebung aufsetzen zu müssen. Leider ist das Thema Digitalisierung in der Vergangenheit etwas stiefmütterlich behandelt worden.
Aber wir jetzt die Chance, alles richtig zu machen, denn wir müssen alles „from scratch“ aufsetzen.
Meine Config ist ähnlich nur statt der Fritzbox haben wir einen Bintec Elmeg be IP plus angeschafft. Ein gebrauchter HP ML350 2 CPUs mit 128GB Ram, XEN Hypervisor ist die Maschine auf der wir die Umgebung hosten. Als Storage können wir ein großes bereits vorhandenes Synology NAS anbinden. Strato ist der Domain Hoster.
Aufgrund mangelnder Kenntnisse habe ich mich in den letzten Wochen eingelesen und ein bisschen rumprobiert.
Beim Exchange bin ich an den Zertifikaten gescheitert, das lets-encrypt skript tat nicht und irgendwie hab ich’s geschafft die Installation so zu zerschießen, dass ich nun alles neu aufsetzten werde (sind noch keine User drauf).
Natürlich hab ich vergessen vor den entsprechenden Schritten Snapshots zu machen.
Ein paar Verständisfragen habe ich:
Die Bintec bringt an und für sich schon eine Firewall mit. Sollte man Sophos für zusätzlichen Schutz einziehen oder kann man darauf verzichten? Br
Wenn ich die MX Einträge gesetzt habe, kann man dann weiterhin das WebMail Frontend von Strato benutzen?
Gruß Holger
Hat sich erledigt, habe deinen anderen Beitrag dazu gefunden ;)
Gruß
Eric
Hallo Frank,
kann man nicht bei Strato einen MX-Eintrag setzen und die Mails direkt zustellen?
Dann kann man auch auf der Sophos problemlos die E-Mail Protection für eingehende Mails nutzen.
Gruß
Eric
Um an den Smarthost verschlüsselt zu versenden kann man bei Strato den Port 587 verwenden und bei der UTM eingeben.
„Bitte beachten Sie: Bei der Verwendung als Smarthost (Relay), bspw. über Exchange 2003, verwenden Sie bitte die Standardauthentifizierung per TLS (STARTTLS) über den Port 587 (alternativ Port 25). Zur Authentifizierung verwenden Sie bitte wie gewohnt Ihre E-Mailadresse sowie das dazu gehörige E-Mailpasswort.“ (https://www.strato.de/faq/article/118)
Gruß Klaus
Hallo Frank,
danke für den Tipp. Hat super funktioniert :)
Gruß
Steffen
Hallo Frank,
ich hatte zuvor meinen Exchange ohne der UTM im Betrieb. Dank deiner guten Beschreibung läuft aktuell fast alles problemlos :) Einzig der Versand an extern gehostete Email-Empfänger der gleichen Domain funktioniert nun nicht mehr, da der Sende/Empfangsconnector über die UTM läuft. Unter Nachrichtenfluss –> Aktzeptierte Domänen –> habe ich bereits den Domänentyp auf Internes Relay umgestellt damit Nachrichten welche kein Exchangepostfach haben nach extern verschickt werden. Jedoch schickt die UTM, wie in deiner Anleitung beschrieben, die Email wieder zurück zum Exchange-Server – Endlosschleife bis die max. Anzahl der Hops erreicht ist dann schläft die Zustellung natürlich fehl.
Gibt es hier noch eine Möglichkeit etwas auf UTM anzupassen?
Gruß
Steffen
Hi Steffen,
du könntest folgendes testen: Erstelle einen neuen Sendeconnector mit der deiner Zieldomain und lass die Mails direkt an den Zielmailserver zustellen (ohne über die UTM zu senden). Das dürfte das Problem umgehen.
Gruß, Frank
Hallo Frank
Es lag an der Netzwerkkarte, diese hatte Probleme. Einmal raus geworfen neu gestartet und neu hinzugefügt und alles läuft bestens
Danke
Marc
Hallo Frank,
Ich habe, mit Ausnahme von Strato, die identische Umgebung.
Ich habe mich an deine tolle Anleitung gehalten, jedoch macht mir die UTM einen Strich durch die Rechnung. Popcon meldet immer: Keine Verbindung zum POP3/IMAP Host .pop3.xxxx.com auf Port 995 möglich.
Auf der Firewall gibt es die Regel „Internal Network“ > „alle Materialdienste“ > „any“, diese beinhaltet pop3ssl mit Port 995. Zusätzlich habe ich es mit der Super Firewallregel any >any> any test weise versucht. Keine Änderung.
Hänge ich den Exchange & PopconServer Server vor die Firewall, geht es, somit kann ich hier Virenscanner, Windows Firewall etc ausschließen
Hi Marc,
ist auf deiner UTM der POP Proxy aktiviert?
Gruß, Frank
Wenn doch alles so einfach wäre.
Ich habe die Daten für das relay eingetragen. wenn ich aus Outlook nun eine testmail absende, dann erhalte ich die Info, das die UTM die mail ablehnt. Kein relay möglich.
Gibt es noch etwas zu beachten?
Info: Ich habe die Zertifikate noch nicht eingespielt und auch den Empfang noch nicht eingerichtet. Da aber die UTM ablehnt, gehe ich davon aus, dass es hier schon nicht richtig ist.
Habe ich einen Denkfehler?
Danke und Grüße
Hi Martin,
du kannst dem Exchange Server an der UTM Mail Protection entsprechende Relay Rechte (Host Based Relay) geben.
Gruß, Frank
Frank,
habe ich nach Deiner Anleitung gemacht.
Ich habe den Fehler nun nach einem Tag gefunden. Recht simpel :-/
In der UTM habe ich den Host für das relay zuerst klein geschrieben. Mein Exchange hat aber
Großbuchstaben. Daher hat er es nicht angenommen.
Nach der Namensänderung gab es keine Fehlermeldung bzgl. Relay.
Also wieder ein Schritt weiter. Die Mail kann zwar noch nicht zugestellt werden, aber das ist dann der nächste Schritt.
1000 Dank für Deine mühen.
Grüße
Hallo Frank,
ich habe ein Verständnisproblem zum „Catch all“ Postfach.
Meine Frage: Ist dieses Postfach bzw. dessen Funktion überhaupt notwendig?
Mein Provider bietet dies nicht an. Catch all soll doch alle nicht zustellbaren Mails sammeln du einer definierten Person zustellen. Du beschreibst den Zweck dieses Postfaches aber für die Mail Weiterleitung an die UTM und dann an Strato. Hab ich da einen Denkfehler?
Danke und Grüße
Hi Martin,
nein, ein Catch All Postfach ist nicht zwingend notwendig. Du kannst auch einzelne Postfächer bei deinem Provider anlegen und sie per POP3 abholen. Ein Postfach (für das Senden der Mails) muss allerdings Relay Rechte haben.
Gruß, Frank
Hallo Jürgen,
hast du das Problem lösen können?
Ich habe den gleichen Fehler.
Gruß Björn
hi frank,
habe nun Rdns abgeschaltet und bekomme auch diesbezüglich keinen Fehler mehr .
wenn nun die mail vom Popcon an die utm geleitet wird kommt.
550 adress not present in directory .
der user existiert und kann senden. der Sophos user in der utm hat den verbindungsfest erfolgreich abgeschlossen.
was kann ich noch checken?
gruss
juergen
hi frank,
danke für diese Anleitung. habe es nur folgende frage:
wenn ich die mails vom Popcorn an die utm leite, sagt das log des Popcorn :
550 : no RDNS entry for 192.168.10.11 (SRV-EX)
was kann ich tun ?
Jürgen
Bei der aktuellen UTM Home Edition sind bei mir alle relevanten Funktionen ausgegraut und nicht verfügbar. Die freie Version der Sophos Firewall XG ist so gewöhnungsbedürftig im WebUI, das ich diese erstmal aussen vor lasse.
hast du hier die kostenlose „UTM Home Edition“ benutzt? Hat diese den vollen Funktionsumfang wie die kostenpflichtigen Appliances?
Hi,
ich nutze in dieser Testumgebung nur die Demo. Meine private Umgebung läuft mit der Home Edition. Der Funktionsumfang ist der gleiche wie die Full Guard Option, es gibt lediglich ein paar Einschränkungen, soweit ich mich richtig erinnere: max. 50 interne IPs und diverse Anpassungen am Layout lassen sich nicht ändern. Die Features sind aber alle Verfügbar.
Gruß, Frank